Defining a Dynamic Barcode
This topic explains how to define a dynamic barcode using a graphic content object.
To add a barcode content object in uPlan:
-
Create a graphic content object.

-
Double-click the graphic content object in the ADOR Objects pane to edit the expression.
The Expression tab of the graphic content object is displayed.
-
Write a barcode expression using the XMPBarcode function. This function takes two parameters: the barcode name and the string to be encoded.
An optional third parameter may be added to provide further customization to the barcode options.
Example: a QLingo expression of a Code 128 barcode encoding the Index data field:
XMPBarcode("Code128", |->[Index])

To add a barcode content object in uCreate Print:
-
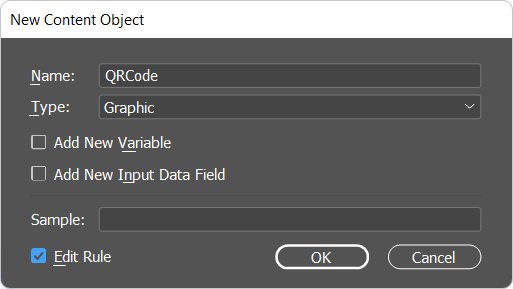
Right click anywhere in the Dynamic Content panel and select New Content Object.
The New Content Object dialog is displayed.
-
Enter a name for the content object, select Graphic from the Type list, and then select the Edit rule checkbox to open the rule editor.
-
From the functions list, select the XMPBarcode function.

-
Between the function parentheses, enter the data you wish to encode in the barcode.
The following example demonstrates a condition according to which if the recipient whose CustomerType content object’s value is "Private", will be redirected to the uDirect webpage, whereas a recipient whose CustomerType is "Business" will land in the PersonalEffect page. For more information on the data you can encode, see Defining a Dynamic Barcode.

if(|->[CustomerType] = "Private")
{
XMPBarcode("QRCode","http://www.xmpie.com/uDirect")
}
else
{
XMPBarcode("QRCode","http://www.xmpie.com/PersonalEffect")
}
-
If you wish to customize the barcode, click the Edit Qlingo button and edit the rule. For example, if you wish to add color to the barcode, the rule will be as follows:
if(|->[CustomerType] = "Private")
{
XMPBarCode("QRCode", "http://www.xmpie.com/uDirect", "color=rgb(248,16,85);")
}
else
{
XMPBarCode("QRCode", "http:www.xmpie.com/PersonalEffect", "color=rgb(248,16,85);")
}
-
Click OK to close the Qlingo window.
-
Click OK to accept your settings.
The new barcode content object is added to the list of content objects.
-
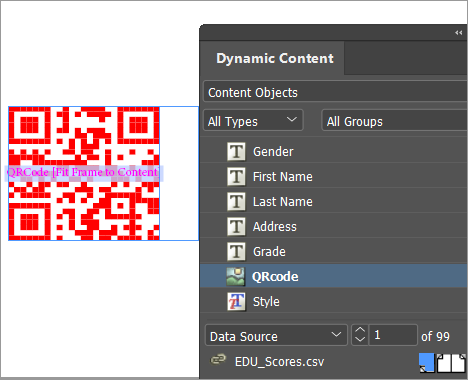
In the document, create a graphic frame that will display the barcode.
-
Tag the graphic frame with the graphic content object.
The recipient-specific barcode is displayed in the graphic frame.
-
Scroll through the data source records using the record selection box (located at the bottom of the Dynamic Content panel) to see how the tagged object changes in the document for each recipient.
The barcode image is best viewed in your document when setting the display performance to High Quality Display.