Tagging Design Objects with Content Objects
Create dynamic objects by tagging a design object with a content object. For example, creating a static graphic frame and tagging it with a graphic content object results in a dynamic graphic frame.
To create a dynamic object in your design, select a design object and double-click a content object in the content objects list. This will associate this content object with the selected design object.
You can highlight in the document all dynamic design objects by selecting Highlight All Content Placeholders from the Dynamic Content menu.
You can also highlight selected content objects, to help you identify where one or more content objects are located in the design. Simply right-click the specific content object(s) in the Dynamic Content panel, and select Highlight Placeholders from the menu.
Double-clicking the highlighted area in the document shows the corresponding content object in the Dynamic Content panel.
Tag a design object with a text content object
-
In InDesign, click the Type Tool icon and then use the mouse to draw a rectangular area in the document, or place the text insertion point in an existing text frame.
-
In the Dynamic Content panel, double-click the desired text content object.
The object is inserted into the document. You can now proceed to format the text using standard InDesign methods.
The content object will use the same font as the existing text in the frame. If you wish to change the font, you can select the content object and use the InDesign Character Formatting Controls. For more information, see Adobe fonts.
Tag a design object with a graphic content object
The graphic content object is a pointer to a graphic file that is used in your dynamic document. The recipient-specific values of a graphic content object are asset names.
To insert a graphic content object:
-
In your document, select or create a graphic box.
-
In the Dynamic Content panel, double-click the desired graphic content object.
The object is inserted into your document.
You can also make a text selection in InDesign, and insert the graphic content object as an inline image.
You can now proceed to modify the graphic using standard InDesign methods. For details on how to modify the object’s properties, see Dynamic Graphic Properties.
To remove a graphic content object:
-
Right-click the tagged graphic frame, and from the context menu choose Dynamic Content > Remove Content Object from Graphic.
You can apply this option to multiple dynamic graphic frames.
Tag a design object with an automatic web content object
If you wish to see the XMPieRecipientKey web content object, do the following:
-
From the Dynamic Content menu, select Preferences.
-
Select the Show Built-in Objects checkbox.
-
Click OK.
To tag a design object with an automatic web content object:
-
Place the insertion point in the required location in the document.
-
In the Dynamic Content panel, double-click the desired automatic web content object.
The object is inserted into your document.
You can now proceed to format the text using standard InDesign methods.
Add a link content object to your design
The link content object is used to apply a URL to text or to an object.
The link will be active only if the document is produced in the interactive PDF format. The interactive PDF format is available only when working in connectivity mode.
To insert a link content object:
-
Click InDesign's type tool or selection tool, and then highlight any text or object in the document.
-
In the Dynamic Content panel, double-click the desired link content object.
Note that when assigning a link to a text box or to an image box, a dashed line surrounds it. There is no visual indication of the link. You can see it via the Hyperlinks panel.
Use visibility content objects
When you assign a visibility object to a layer or spread in your design application, you can control whether the layer or spread will be visible or hidden. For example, if you have a personal message that is appropriate only for male recipients, you can create a visibility content object called ‘ismale’. You can then select the layer that includes the message and assign the ismale content object to this layer or spread.
Visibility content objects also support layer names. This allows one visibility content object to control the visibility of all layers, whose names match its values. For example, if the value of the visibility content object for a given recipient is “Family”, then the layer named “Family” will be shown.
When creating a visibility content object, you should take into consideration that:
-
Visibility content object values are case sensitive, meaning a value must match the case of the layer’s name, to which it refers. If no value matches any layer's name, all layers will be turned off.
-
White spaces in layer names are also supported. For example, the visibility content object value "--Family--" matches the layer "--Family--" (where the character "-" indicates a white space).
-
Do not name the design layers with any of the following: "0", "1", "true" or "false". These values are reserved to the visibility content objects interpreter.
-
Layers that are tagged as non-printable layers in Adobe InDesign are not visible when printing the design regardless of the visibility content object status (visible or not visible).
To assign a visibility content object to the active layer or spread:
-
In your document, select the object that is part of the desired layer or spread for which you want to control visibility.
-
Click a visibility content object and then click the visibility icon (either
 layer
or
layer
or  spread).
The Dynamic Visibility dialog opens. You are prompted to assign the visibility content object to the selected layer or spread.
-
Click Assign.
You can see how the visibility feature affects objects in the document by cycling through data source or proof set data.
You can also use InDesign's Layers/Pages panel to assign visibility content objects, or to toggle the visibility of layers/spreads that have visible content objects assigned to them. You can access these panels from the Window menu.
From these panels, you can set visibility not only to single but also to multiple layers/spreads at once using the right-click menu.
Adobe fonts
Adobe Fonts (formerly called Typekit) is a library of over 30,000 fonts that is available to Adobe Creative Cloud subscribers via the Adobe Creative Cloud desktop application.
Since uCreate Print is a plugin to InDesign, you can leverage the Adobe Font library when creating your VDP templates.
To access the Adobe font collection in Adobe InDesign:
-
Ensure that the Adobe Creative Cloud Desktop application is installed, running and that you are logged in to Adobe using the same username and password that you use for all your Adobe applications, including InDesign.
-
In the Adobe Creative Cloud Desktop application, select File > Preferences > Services. Ensure that the Adobe Fonts setting is enabled.
-
In Adobe InDesign, select Edit > Preferences > File Handling > Fonts. The Auto-add Adobe Fonts setting should be enabled.
The full range of fonts will appear in your InDesign font list when you select Find More:
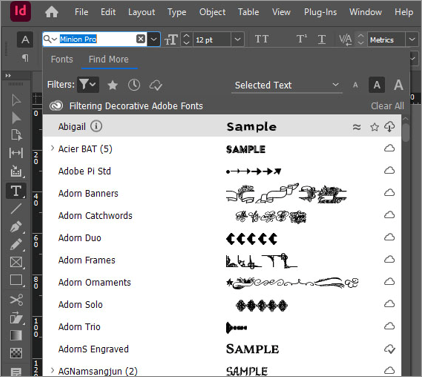
The cloud icons on the right show the status of the font:
-
The Cloud icon by itself shows a font that is available to download from the cloud.
-
Selecting a font that is available will change the icon to a Cloud with a down arrow allowing you to download the font to your computer.
-
The Cloud icon with a tick shows that you have downloaded this file already.
-
Selecting a font which is downloaded, the icon will change to a Cloud with a cross allowing you to remove / delete the font from your computer.
How XMPie works with Adobe fonts
uCreate Print creates VDP output using InDesign on the desktop. Once you have downloaded a font from the Adobe Fonts library and use it in your document design, you can create VDP Output in the usual way.
When you save your document to the XMPie server, there is an option for Fonts to "Upload New Only" which will upload any fonts used in the document that are not already available in the campaign where you are saving the document.
When you export a Campaign Package (CPKG), any fonts used in the document will be zipped and included in the package. Later when the package is uploaded to the uProduce server, the fonts will be unzipped and available in the campaign.
When you export a Document Package (DPKG), fonts are NOT included in the package. If you upload the package to a uProduce campaign, you will need to check the fonts that are in the campaign already, and upload any new fonts used in the document that are not already in the campaign.