Referencing a uImage Template File
If you choose to reference a standalone uImage template, the uImage Settings dialog displays the following options:
-
Define the uImage content object settings as described in the following table:
Option
Description
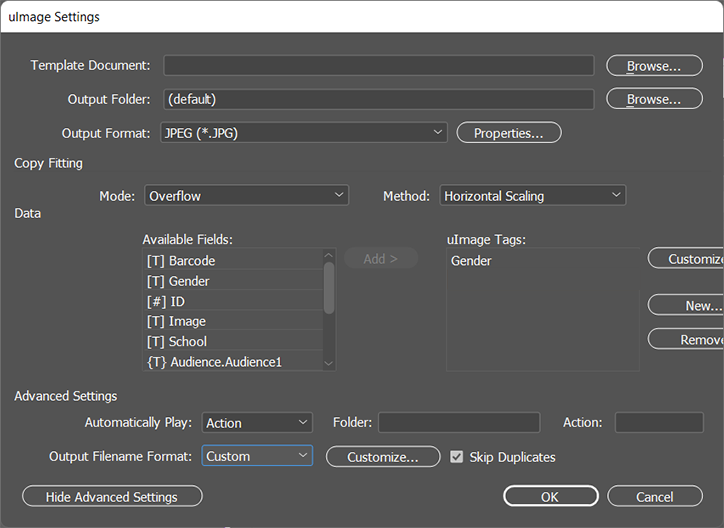
Template Document
The uImage template (a Photoshop or Illustrator file, depending on the function chosen in the rule editor) that you wish to use, to create images with embedded personalization.
Choose one of the following:
-
Click Browse to locate the full path to the uImage template.
-
Enter a relative path, to be appended to the default uImage templates folder (see Setting uImage Defaults).
Output Folder
The folder in which the personalized images are stored.
Choose one of the following:
-
Click Browse to locate the full path to the uImage Output folder.
-
Enter a relative path, to be appended to the default uImage Output folder (see Setting uImage Defaults).
Output Format
Select the format of the uImage output files (JPG, EPS etc.) from the drop-down list. To define the format settings, click Properties.
A format-specific Properties dialog is displayed, allowing you to define the desired settings.
For details, see Output Format Properties for Templates.
Copy Fitting
For uImage templates that embed recipient-specific text, specify how to handle cases of text overflow (exceeding the boundaries of the text frame) or underflow (leaving extraneous blank spaces).
Overflow and underflow occur because different dynamic text values have different lengths. For example, the name “Jo” is much shorter than “Christopher”. In some templates, the name “Jo” will fit into the text frame, while the name “Christopher” will overflow.
Choose a copyfitting mode and then choose a copyfitting method.
Copy Fitting Mode
Select one of the following copyfitting modes from the list:
-
Off: disables the copyfitting feature. Select this mode if you do not want the dynamic text to be manipulated in any way. Note that copyfitting is required to make sure variances in recipient data fit properly into the text frame.
-
Overflow: automatically handles text overflow, by reducing it to the maximum size allowed by the uImage template. If the text is shorter than the maximum size allowed, it remains unchanged.
-
Overflow and Underflow: automatically stretches or condenses the text, so that it is exactly the maximum size allowed.
-
Manual: uses the copyfitting settings defined in the uImage template.
-
Underflow: automatically handles text underflow, by enlarging it up to the maximum size allowed. This mode is rarely used, since it does not handle overflowing text: if text is longer than the maximum size allowed, it remains unchanged.
Copy Fitting Method
Once a copyfitting Mode is selected, choose one of the following methods:
-
Horizontal Scaling: handles text overflow and/or underflow (depending on the copyfitting mode), by either condensing or expanding the text horizontally. The font is distorted (appears narrower or wider than it should), but its height remains unchanged. Keeping the same height ensures the text does not overflow above or below its frame. For example, in the figure below, handling the underflow with horizontal scaling stretches the text without overflowing into the image above it
-
Font Size: handles text overflow or underflow by scaling the font proportionally (both horizontally and vertically). The font is not distorted; however, its height varies for different text lengths. When using one of the underflow copyfitting modes, height variations might cause the text to overflow above or below its frame. For example, in the following figure, handing the underflow by increasing the font size caused the text to overflow into the image above it.
The minimum and maximum font sizes allowed are defined by the uImage template.
The following are copyfitting methods - Underflow Handled with Font Size versus Horizontal Scaling:

Data
Define the rules for calculating the values of the uImage tags in this uImage template. For each uImage tag defined in the uImage template, a matching uImage tag rule must be defined here.
Available Fields
The fields of the linked data source, which may be used to define uImage tag rules.
If a tag is based on a data source field, you can easily define its rule by selecting the relevant field and clicking Add.
This tag is added to the uImage tags list with the same name as the field's name, and its default rule is to take the field's value as-is from the data source.
To edit the name or the rule of a tag that is based on an available field, select this tag in the uImage tags list and double-click, or click Customize.
uImage Tags
The rules for calculating the recipient-specific values of the uImage tags in the uImage template.
Make sure you define a rule for each tag in the uImage template. The name of the tag's rule in the uImage Settings dialog must match the name of the tag in the uImage template (note that tag names are NOT case-sensitive):
-
For text tags, use the tag's name in the uImage template, without the angle brackets that define the tag in Photoshop and Illustrator.
-
For image tags, use the name of the tag's Smart Object layer in Photoshop.
If a uImage tag is not listed here, or if it has different names in the uImage template and in the uImage Settings dialog, this tag will not be personalized during production (the image will show the tag's placeholder).
You can define and edit uImage tag rules using one of the following methods:
-
Add a tag based on a data source field: select a field in the Available Fields list and double click, or click Add…
By default, this tag's name is the same as the field's name, and its rule is to take the field's value as-is from the data source. To edit this tag, select it and double click, or click Customize.
-
Change a tag's rule: select the tag in the uImage tags list and click Customize. The Customize uImage tag dialog is displayed, allowing you to rename the tag and edit its rule using a rule editor (see Defining uImage Tag Rules).
-
Define a tag starting with an empty rule: click New.
The New uImage tag dialog is displayed, allowing you to define the tag's name and its rule using a rule editor (see Defining uImage Tag Rules).
-
Delete a tag that is NOT used in the uImage template: select the tag and click Remove. The tag is deleted from the uImage tags list.
Advanced Settings
Define advanced uImage production parameters. The available options depend on the application used to create this template: Photoshop or illustrator.
Note: Hide Advanced Settings changes to Show Advanced Settings when clicked.
Automatically Play (Photoshop Only)
Choose whether to automatically play an action or JavaScript during production. An action or JavaScript code may be used to integrate dynamic content into the personalized image. If an action or JavaScript code was created by the uImage template designer, they must be defined here for the personalized images to appear correctly.
Choose one of the following options:
-
None: the uImage template will be produced without running any JavaScript or Action. This is the default setting.
-
Action: select the Photoshop action to be played back during production by setting the following properties:
-
Folder: the name of the folder (Set) containing this action, as it appears in the Photoshop Actions panel.
-
Action: the name of this Action, as it appears in the Photoshop Actions panel.
-
-
JavaScript: select an external Photoshop JavaScript file to be run during production. Specify the file's location in the Path text frame, or click Browse to locate the file.
Output Filename Format
Defines the format of the uImage output filenames. A uImage output file is created for each recipient. Its name typically includes the name of the template followed by the recipient's values for all tags in the template. As a result, identical images that share the same values receive the same filename. This enables proper operation of the Skip Duplicates functionality.
-
Automatic: uImage automatically names each uImage output file, using the uImage template's name followed by the values of the tags on the uImage tags list. The default naming convention is:
<uImage Template
		 Name>_<uImage Tag 1 Value>_<uImage Tag 2 Value>..._<uImage
		 Tag n Value>.<Format Extension>
For example, when using the Balloon - HighRes.psd template, which includes the tag <First Name>, Ernest and Faith's automatic filenames are as follows:
-
Balloon - HighRes.psd_Ernest.jpg -
Balloon - HighRes.psd_Faith.jpg
-
-
Custom: Customize the format of the uImage output file names.
Click Customize to open the uImage Output Filename Format dialog, and define a rule for the file name. For example, you can set a specific uImage tag (such as the recipient's name) to appear in uppercase. For details, see Formatting uImage Output Filename.
-
Skip Duplicates: setting the Output Filename Format to Customize enables you to optimize production by reusing a single image for all recipients who share the same data.
To use this functionality, the Output Filename Format must reflect the values used in all uImage tags. That is, if two recipients' data create the same personalized image, the Output Filename Format will create the same filename for both recipients. This enables uImage to detect which personalized images are duplicates and optimize production by skipping the.
Choose one of the following:
-
Check this box to skip output filenames that have already been processed (this is the default setting).
-
Leave this box unchecked to force uImage to generate images even though they already exist in the uImage Output Folder.
-
When using Dynamic Print, it is recommended to optimize production speed, by checking this box and setting the Output Filename Format to Automatic.
Note: Skip Duplicates optimizes production by reusing the whole personalized image for different recipients. There are additional optimizations, which reuse variable sections of the personalized image. When using the template workflow, these optimizations are supported for the EPS format (see Optimization).
-
-
Click OK to close the dialog.
The uImage template properties are displayed in the New Content Object dialog.
-
Click OK to close the dialog.
-
Select a graphic frame in your document.
-
In the Dynamic Content panel, double-click the uImage graphic content object.
The personalized image generated for the current recipient (using the Photoshop or Illustrator template) is displayed in the document.
-
Scroll through the data source records, to see how the uImage output file changes dynamically per-recipient.
Note: If the uImage output files have not been created in advance, but are created on-the-fly, browsing between the records may take some time.