Adding uImage Tags to Text Layers
To add dynamic text to your template, create a uImage Text tag: a placeholder for variable text, such as the recipient’s first name. The Text tag is created by entering the tag name enclosed by angle brackets into a Text layer. For example, to create a Text tag for the “First Name” variable, add the text “<First Name>” to a text layer. During production, uImage identifies this uImage tag and replaces it with recipient-specific text.
uImage tag defines how personalized information fits into the design, but does not determine how to calculate the tag’s recipient-specific value. These values are defined by the tag’s rule, set in uPlan and uCreate Print.
The text layer containing the uImage tag may be one of the following:
-
Point Text layer: This type of layer is created by selecting the Type tool and then clicking once in your template. Point Text layers allow Copy Fitting to work properly.
For information on creating Point Text layers, see Adding a uImage Text tag to a Point Text Layer.
We strongly advise you not to create a Paragraph Text layer (by dragging the Type tool to define the paragraph boundaries), since it does not support Copy Fitting.
-
Smart Object layer: This type of layer allows you to apply Photoshop Smart Filters to dynamic text.
For information on creating Smart Object layers, see Adding a uImage Text tag to a Smart Object Text Layer.
Adding a uImage Text Tag to a Point Text Layer
-
In the Tools panel, select the Type tool.
-
Create a Point Text layer by clicking once in your design and entering the text. Adding text automatically creates a new text layer.
In the Layers panel, right-click the text layer. Ensure the layer is named using regular alpha numeric characters, and is NOT surrounded by the angle brackets.
Note: The same text layer may include both static and dynamic text (one or more tags). For example, you can create a layer containing the string “Welcome <First Name><Last Name>”, in which “Welcome” will remain static and “First Name” and “Last Name” will be personalized.
-
Style the text and the layer.
-
Add the uImage tag to the layer, by typing the tag name surrounded by angle brackets.
For example, if the tag name is “First Name”, add angle brackets as follows: <First Name>
The text layer may have any name. However, the tag name defined inside the layer (without the brackets) must match the tag name defined in the uImage content object expression (set in uPlan or uCreate Print).
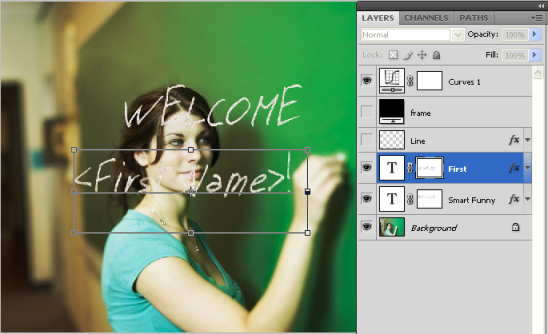
For example, a layer named “First” may contain the tag “<First Name>”, which matches a tag named “First Name” in the uImage content object expression.
-
Save your changes.
During production, uImage recognizes the tag name inside the text layer, and replaces the tag with recipient-specific text.
The following figure shows an example uImage tag, First Name, that has been added to a Point Text layer named First. The uImage tag is surrounded by angle brackets.

Adding a uImage Text Tag to a Smart Object Text Layer
uImage for Photoshop allows you to place text to be personalized in a Smart Object layer instead of a regular Point text layer. Smart Object layers allow you to apply Photoshop Smart Filters to dynamic text. For many designers, this is a more convenient work7flow than recording an action that applies Photoshop filters to regular text layers.
To place dynamic text within a Smart Object layer, first add the uImage tag to a Point Text layer, and then convert this layer to a Smart Object layer.
To convert a Photoshop Point Text layer to a Smart Object layer:
-
Add the uImage tag to a Point Text layer. See Adding a uImage Text tag to a Point Text Layer.
-
In the Layers panel, right-click the Text layer.
-
Select Convert to Smart Object from the context menu.
The Point Text layer is converted to a Smart Object layer.
Note: If the smart object layer is named using the angle brackets, for example <layer> then it is considered a dynamic image layer. If the layer contains text objects that are tagged with the angle brackets, the layer itself should be named with normal alpha numeric characters and not use the angle brackets.
