Working with Data Sources
Data sources represent the different databases and schema that are required for use in your current plan. You can work with one or more data sources in your plan. You can automatically import the first and second data sources when you use the wizard to create a new plan. You can then add any additional data sources by importing them from within uPlan.
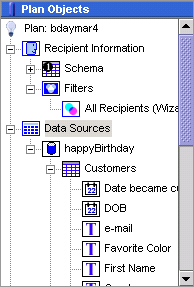
When you are working with the data sources, various options are available by right clicking a data source, a table or a field.
When you right-click the data source root node, the following menu options are displayed:
|
Option |
Description |
|---|---|
|
New Data Source |
Create a new untitled data source, either by importing it using the Wizard or by manually creating it. |
|
Paste |
Paste a previously cut or copied data source. |
|
Order Data Sources |
Sort the data sources by name. |
When you right-click a specific data source, the following menu options are displayed:
|
Option |
Description |
|---|---|
|
New Table |
Add a new table to the currently selected data source. |
|
Insert |
Insert the currently selected data source into the active Expression window. |
|
Rename |
Rename the currently selected data source. |
|
Database Link |
Associate the currently selected schema with a specific database, to enable validation and creation of a proof set. If you created this data source in uPlan
and did not import it using the Wizard, you will need to link
it to a database. Any data source you import using the Wizard
is automatically linked to its |
|
Cut, Copy, Delete, Duplicate |
Cut, copy, delete, or duplicate the currently selected data source. |
|
Paste |
Paste a previously cut or copied table (for example, user view). |
|
Order Tables |
Sort the tables in the currently selected data source, by name. |
When you right-click a specific table, the following menu options are displayed:
|
Option |
Description |
|---|---|
|
New Field |
Add a new field to the currently selected table. |
|
Insert |
Insert the currently selected table into the active Expression window. |
|
Create Table ADOR |
Create a Table ADOR from the currently selected table. |
|
Rename |
Rename the currently selected table. |
|
Cut, Copy, Delete, Duplicate |
Cut, copy, delete or duplicate the currently selected table. |
|
Paste |
Paste the previously cut or copied field. |
|
Order Fields |
Sort the fields in the currently selected table by name or type. |
When you right-click a field in a data source table, the following menu options are displayed:
|
Option |
Description |
|---|---|
|
Insert |
Insert the currently selected field into the active Expression window. |
|
Rename |
Rename the currently selected field. |
|
Type |
Define the type of field: Bool, Date, Number, or String. |
|
Primary |
Set the currently selected field as the Primary field in the schema table to which the field belongs. |
|
Cut, Copy, Delete, Duplicate |
Cut, copy, delete, or duplicate the currently selected field. |
Add New Data Sources
You can add data sources to your plan at any time.
To add a data source:
-
Right-click the data sources icon in the plan objects view.
-
Select New data Source and choose either Untitled to manually create a new data source, or Import using Wizard to open the wizard and add in an existing data source.
If you create the new data source manually within uPlan and do not import it using the wizard, you should link the currently selected data source to a specific database. To do so, right-click the data source and select Database Link. This link associates the data source with an actual database so that you can generate proof sets and validate your plan. Any data source you import using the wizard is automatically linked to its database file.
Generate a Consolidated Data Source
When your plan has been created using multiple data sources or tables, uPlan allows you to generate a simplified data source single table file: uPlan extracts the data required to calculate ADOR values from all associated tables and/or data sources, and consolidates them into a single table.
Generating a data source is useful in the following cases:
-
When the work process is distributed between different sites.
In this case, your privacy and security policy may forbid transferring any information except for the data fields required to calculate ADOR values.
-
When you need to simplify the campaign data source structure, so that it can be used by tools designed to work with a single-table data source (for example, uCreate Print).
The data source is generated using all data sources that are linked to your plan. If you have data sources that are not linked to your plan, you will be prompted to link them. You can choose a filter and a range that determine the recipients for which data is extracted to the generated data source.
Note: Table ADORs cannot be included in the generated data source file. If your files contain Table ADORs, they are ignored and a warning is displayed.
To generate a data source:
-
From the Data menu, select the Generate Data Source option. The Data Source Generation dialog is displayed.
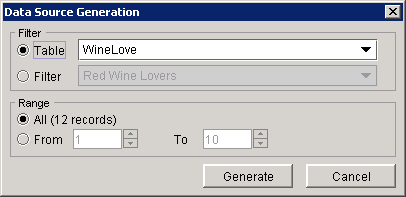
-
Make any necessary modifications to the dialog’s option.
-
Click Generate to create the data source. You will be prompted to assign a name to the data source *csv file.
Option
Description
Table
Choose a table from the drop-down list. Values for the ADORs associated with the recipients in this table will be used to generate the data source.
Filter
Choose a recipient filter from the drop-down list. Values for the ADORs associated with the recipients in this filter will be used to generate the data source.
Range
Under Range, select All to create a data source for all records. Or, enter a range in the From and To fields.
-
Enter a name for the data source file and click Save.
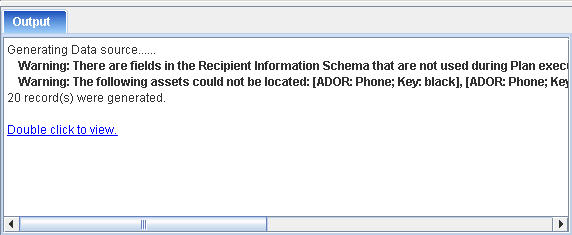
A progress bar displays the current status of your data source generation.
Your plan and queries will be validated during generation.
-
You can view the data source at the end of the process clicking the Double click to view link from the Output pane.
The data source opens with your default application for viewing *.csv files.
Watch a video
Learn how to add additional data sources to an existing Plan