Creating a Plan using the uPlan Wizard
The uPlan Wizard provides a quick and effortless way to create a plan using one or more existing data sources, when working in a Windows environment. The uPlan Wizard works with several types of database formats, including: MS Access, MS Excel, separated values text files, dBase, MS SQL Server, and Oracle.
The uPlan Wizard extracts the data schema from an existing database (or multiple databases), including inter-table relationships. Based on your selection, it then creates ADORs that represent the database fields. You can use the resulting plan ‘as is’, or edit and fine-tune it in uPlan. It is highly recommended that you initially create your campaign plan using the uPlan Wizard.
When you create a new plan, you are required to choose between the following Wizard options:
-
Single Table Plan Wizard: Creates a plan by importing database schema from a single table data source.
-
Single Data Source Plan Wizard: Creates a plan by importing database schema from a single data source, which may include more than one table.
-
Multiple Data Sources Plan Wizard: Creates a plan by importing database schema from a number of data sources.
Single Table Plan Wizard
To create a plan by importing a database schema from a single table in a data source:
-
Open the uPlan application.
-
From the menu bar, select File > New.
The New Plan dialog is displayed.
-
Choose the Single Table Plan Wizard and click OK.
The uPlan wizard opening screen is displayed.
-
Click Next to start using the uPlan wizard.
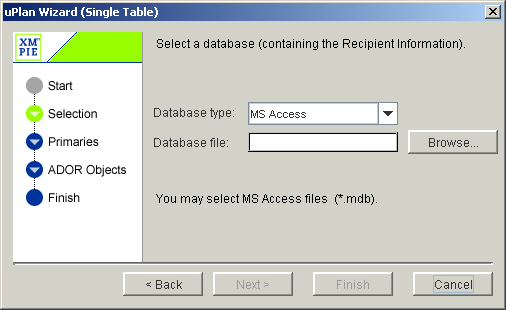
In the screen that is displayed, you are prompted to select the database type and database file.
-
Select the database type and then click the Browse button to browse for the file. Alternatively, enter the directory path to the location that includes the database file required by your campaign. In case of remote databases (MS SQL Server and Oracle Server), enter the connection parameters. For more details, see Working with Data Sources.
When selecting Counter as your data source, you are prompted to enter a range (From a number To a number), an interval (Step) and the name of the column (Field Name).
For example, entering the range: from ‘1’ to ‘9’ with step ‘2’, will result in the following sequence: 1, 3, 5, 7, 9.
-
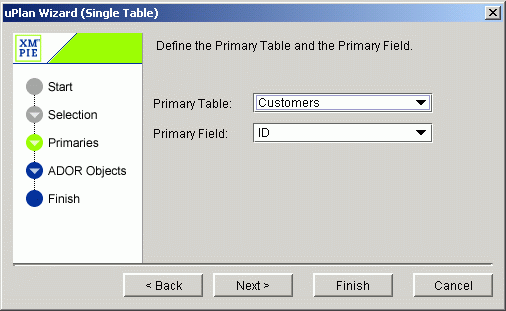
Click Next and then select the Primary Table and the Primary Field from the dropdown lists.
The Primary Table is the table that includes the information about the recipients who will receive the document instances. The Primary Field refers to the field that uniquely identifies each record in the table. For example, if you create a table that includes names, the Primary field could be a person’s social security number.
-
Click Next. You are prompted to select the ADORs that will be used in your plan.
Use the navigation buttons to choose the desired items. It is recommended that you include the entire table so that all its fields are defined as ADORs in the plan.
-
Click Next. The final screen displays a completion message.
-
Click Finish to create the plan and close the wizard.
Single Data Source Plan Wizard
To create a plan by importing database schema from a single data source:
-
Open the uPlan application.
-
From the menu bar, select File > New.
The New Plan dialog is displayed.
-
Choose the Single Data Source Plan Wizard and click OK.
The uPlan wizard’s opening screen is displayed.
-
Click Next to start using the uPlan Wizard. In the screen that is displayed, you are prompted to select the database type and a database file.
-
Select the database type and then click the Browse button to browse for the file. Alternatively, enter the directory path to the location that includes the database file required by your campaign. For more details, see Working with Data Sources.
-
Click Next.
-
Select the Primary Table and the Primary Field from the dropdown lists.
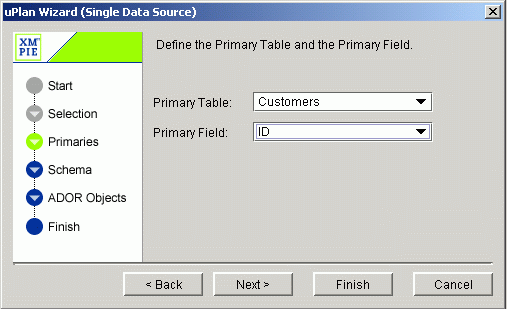
The Primary Table is the table that includes the information about the recipients who will receive the document instances. The Primary Field refers to the field that uniquely identifies each record in the table. For example, if you create a table that includes names, the Primary field could be a person’s social security number.
-
Click Next. You are prompted to select the additional tables that will make up the schema of your plan. It is recommended that you include all the tables so you can then select ADORs out of the fields of the selected tables.
Use the navigation buttons to choose the tables that constitute the schema you want to include in the plan.
You should add all tables that are relevant to your campaign at this time. Adding too many tables is not a problem, since you can easily delete them later in uPlan.
-
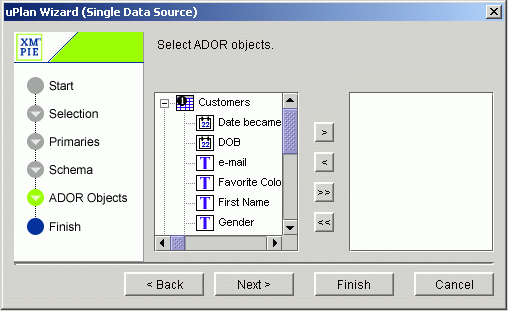
Click Next. You are now prompted to select the fields you wish to include from each table. ADORs will be created for the selected fields.
-
Use the arrow keys to choose the fields you wish to include in your plan file as ADORs. It is highly recommended that you select all fields that may be useful as ADORs, since it is easier to delete them later in uPlan than add in new ADORs. For details, see Working with ADORs.
-
Click Next. The final screen displays a completion message or any notifications regarding incompatibilities that may exist between the tables in the database.
-
Click Finish to create the plan and close the wizard.
Multiple Data Sources Plan Wizard
To create a plan by importing database schema from multiple data sources:
-
Open the uPlan application.
-
From the menu bar, select File > New.
-
Choose the Multiple Data Sources Plan Wizard and click OK.
The uPlan wizard’s opening screen is displayed.
-
Click Next to start using the uPlan wizard. In the screen that is displayed, you are prompted to select the database type and database file.
-
Select the database type and then click the Browse button to browse for the file. Alternatively, enter the directory path to the location that includes the database file required by your campaign. Select the database that includes your list of recipients. Later on, the wizard will prompt you for information on the other databases you may wish to add. For more details, see Working with Data Sources.
-
Click Next.
-
Select the Primary Table and the Primary Field from the dropdown lists.
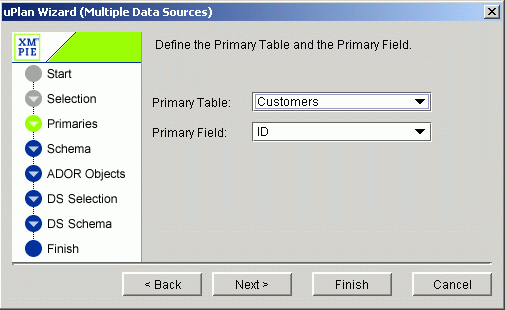
The Primary Table is the table that includes the information about the recipients who will receive the document instances. The Primary Field refers to the field that uniquely identifies each record in the table. For example, if you create a table that includes names, the Primary field could be a person’s social security number.
-
Click Next. You are prompted to select the tables that will make up the schema of your plan.
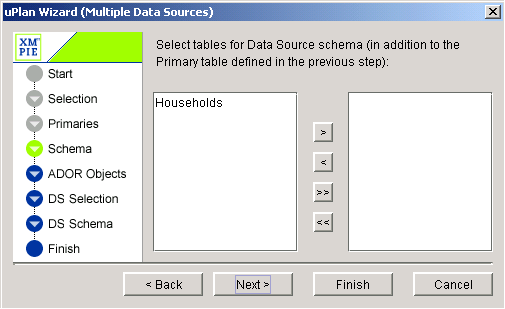
The table you defined as your Primary Table is automatically included in the schema. It is recommended that you include all the tables that are relevant to your campaign.
Use the navigation buttons to choose the tables that constitute the schema you want to include in the plan.
You should add all tables that are relevant to your campaign at this time. Adding too many tables is not a problem, since you can easily delete them later in uPlan.
-
Click Next.
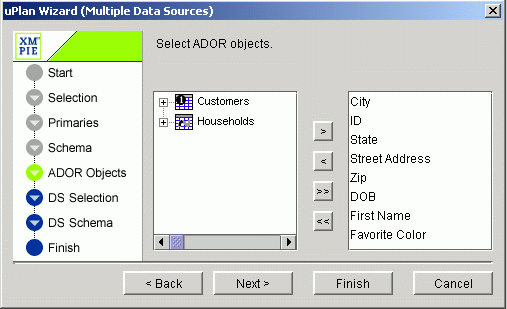
You are now prompted to select the fields you want to include from each table. ADORs will be created for the selected fields.
-
Use the arrow keys to choose the fields you wish to include in your plan file as ADORs. It is highly recommended that you select all fields that may be useful as ADORs, since it is easier to delete them later in uPlan, rather than add in new ADORs. For details, see Working with ADORs.
-
Click Next. In the screen that is displayed, you are prompted to select the second database you wish to use as part of your campaign.
-
Click the Browse button to browse for the file. Alternatively, enter the directory path to the location that includes the second database file required by your campaign.
-
Click Next. Use the arrow keys to select the desired tables from the additional data source that will make up the schema of your plan.
-
Click Next. The final screen displays messages regarding any incompatibilities that may exist between the tables in a database. If you wish to add additional data sources to your plan, you can do this from within uPlan. For details, see Working with Data Sources.
-
Click Finish to create the plan and close the wizard.
When adding the second data source, the wizard cannot deduce the relationship between the various data sources and their tables; hence, the Wizard will not create user views for tables in the second data source. To create user views for the additional data source tables, you can copy the table from the data source schema and paste it into the User Views section.
To retrieve the information, you can then type the appropriate SQL query into the User View’s expression window. For more details, see SQL Queries, under QLingo Language.