Documents
Create an HTML or text document
The online email editor allows you to create HTML and plain text (*.txt) documents. Such documents are typically used as email bodies. You can either create a regular, static document, by simply typing and formatting the text; or create a dynamic document, by inserting ADOR objects.
TXT and HTML documents can be edited in uProduce using the online email editor. This is true both for documents that were uploaded to uProduce and for documents that were created using the Online Email Editor.
To create a document:
-
In the campaign tree, click Documents to display the Documents page.
-
Click New. The New Document page is displayed.
-
From the Document Source dropdown list, select Online Email Editor.
The Online Email Editor is displayed, allowing you to create a new document.

-
Fill in the required document fields.
Option
Description
Document Name
Enter a name for the new document.
Content Type
Specify whether the document is an HTML document, or a text document.
Tip: Some email clients cannot open HTML documents. To make sure all recipients are able open this email body, you can create a document in HTML format and then and then create a similar message in a TXT format. Both documents can then be sent as a Multi-part email message.
Document Contents
Enter the message body.
If you selected HTML format, enter the email message text using the HTML Editor.
If you selected the Text format, use the Text Editor to enter your text.
To create a dynamic document, click the Insert ADOR button to display the Insert ADOR dialog.
-
Edit your document message using the editor, as explained in the section below.
-
You can click the Preview button to view your email design with the selected Port’s live data. In the Preview window, browse through recipient records, to view the document as it will be displayed for a specific recipient.
Notes:
-
To be able to preview a document, you need to select a port as a recipient source.
-
Links may not function properly in the email preview. In order to test links functionality from the email document, or to view the email design as it will be rendered by the actual email clients, you should send a test email.
-
-
When you are done, click Save to save your document.
Online email editor
The online email editor allows you to edit your documents without leaving uProduce. You can choose whether you wish to edit the document in plain text or an HTML format by selecting TXT or HTML in the Content Type drop-down list.
The HTML editor has two working modes:
-
Design: A WYSIWYG HTML editor. In this mode, you can upload static images, insert an email footer and add ADOR objects. You can use the Properties pane in the bottom of the editor to control the HTML tag parameters.
-
HTML: A full HTML editor. In this mode you can directly enter the HTML code. Inserting ADOR objects should be done manually using the curly brackets, for example: {{FirstName}}. Static images can be added using the HTML code convention. The Insert ADOR and Insert Footer buttons are not functional in this mode.
In addition, the Preview button allows you to preview the document as it will be sent to a particular recipient. In the Preview window, you must select a Port to be able to view personalized data of each recipient. Using the Refresh button, you can directly preview a specific recipient by entering its record number in the recipients field as well as edit the document and view the result without reopening the Preview window.
The online email editor provides several enhancements to allow you to easily edit a document:
-
Insertion of ADOR objects
-
Upload of static images (HTML editor only)
-
Insertion of a predefined email footer
Insert ADOR objects
To add dynamic content to your HTML or text document:
-
Click Insert ADOR.
The Insert ADOR dialog is displayed, allowing you to select the ADOR objects you wish to add to your document.
-
Select the ADOR object.
You can use either Text or Graphic ADOR objects in the design. When inserting a Graphic ADOR object, an image placehoder is shown, since the Recipient is unknown at this point.
-
Click OK.
The ADOR object is added to the document.
Insert images
You can add static images to your Email message body using the HTML Editor.
To add a static image to your HTML document:
-
Click the Insert Image icon.
-
In the Browse window, locate the image that you want to insert. The supportable image file formats are: *.gif, *.jpeg, *.jpg, *.png, *.tiff.
-
Click OK.
Add "View in Browser" link
To allow the email recipient to view the email content as a webpage in addition to viewing it in the email client, you can add the View in Browser ADOR object to your document body.
This ADOR object will display a link in the resulting email message. Clicking this link will open the email in the recipient’s default web browser.
You can edit the default “View in Browser” link text.
The View in Browser ADOR object will not be functional when sending emails via the SMTP delivery provider.
Provide personalized URL information in an email
The XMPieRURL ADOR object represents the URL of the recipient’s personalized website. You can place this ADOR object in an email message in order to direct email recipients to their personalized websites.
The XMPieRURL ADOR object will only have a value if you select the Copy from Port option in the Recipients section of the Email Activity page.
Include links to downloadable personalized PDF files
The Insert ADOR list includes a special type of ADOR objects marked by the “XMPie.OnlineDocument” prefix: ADOR objects representing online documents. Online document ADOR objects are used to include downloadable, personalized PDFs in emails (as well as in webpages). If you insert an online document ADOR object into the document you are editing, it creates a link to the online document. If you send this document as an email body, then when the email recipient clicks this link, uProduce will generate a Personalized PDF On Demand using the specified online document.
Note that PDF password protection does not work with PDF on Demand documents.
Insert an email footer
If you are editing a Commercial Email, you must add the Email Footer with unsubscribe information and the physical address of your company. You may do it either by clicking the Insert Email Footer button or by manually editing your footer.
Import/Export a local HTML/Text document
uProduce allows to easily import and export local HTML and text documents:
-
Import:Add to uProduce documents that were created using third-party editors.
-
Export:Share your uProduce document with external parties.
When exchanging an HTML document, you can either import/export it as a package (*.dpkg or *.zip) or as an individual file.
When exporting HTML documents containing static images as a *.zip package, uProduce automatically separates the HTML document and the images: a single HTML document is located in the root directory whereas the images are stored in a separate folder.
When importing document containing ADOR objects, uProduce automatically recognizes the ADOR objects by the use of the curly brackets.
Upload a document
You can upload the dynamic document either as a package (recommended, including XLIM document packages), or as an individual file. The document package file (.dpkg or .zip) includes the dynamic document, all the information pertaining to it, and its related resources. Alternatively, you can upload only the individual document file (*.indd, *.htm, *.html, *.txt or *.xlim).
uProduce performs consistency checks on the document package, to verify that the dynamic objects the document refers to exist in the Campaign plan, and notifies you of any inconsistencies. If you choose to upload the document on its own, you run the risk of not knowing whether the document is compatible with the Campaign’s plan file.
To upload a document to a campaign:
-
Go to the Campaigns page and select the campaign to which you wish to upload a document.
The documents page is displayed (provided that a plan has been uploaded).

-
Click New.
The New Document dialog is displayed.
-
From the Document Source list, select Upload File.
The New Document dialog is displayed, allowing you to create and select documents for the uProduce email mechanism.
-
Enter the path to the document package (*.dpkg or .zip) or layout file (*.indd, *.htm, *.html, *.txt, *.xlim or *.psd), or click the Browse… button to locate the desired file.
-
In Document Name, enter a name for the document you are uploading.
-
Click Upload to upload the document.
A progress indicator is displayed; at the end of the upload process, the document information is displayed in the documents page.
Modify a document
If you wish to make changes to a document, or use a different document, make sure you use the Check In and Check Out feature.
Download a document
-
Go to the Campaigns page and select the campaign from which you wish to download a document.
The documents page is displayed by default (if a plan has been uploaded).
-
Click the document name.
-
Click the Download button.
The Download Document page is displayed.
-
Choose Document Package or Original File as the download type and click Save.
When the download completes, a page is displayed with a link to the selected file.
-
To save the document file, click the green check mark icon in the Download Results page or in the Job Center page.
The File Download dialog is displayed, prompting you to save the file.
Depending on the document format, uProduce will automatically save them in an appropriate file type:
-
InDesign file: *.dpkg
-
HTML file: *.zip
-
-
Click Save and then select the location to which you want to save the file.
Work with online documents
An online document is a document that can generate PDFs On Demand.
When you create an email body or a webpage, you can add a link to a specific online document (as explained in Insert ADOR objects to your HTML or text document). Once a recipient clicks this link, uProduce uses the relevant online document to generate a personalized PDF On Demand.
Place a document online
Any InDesign or XLIM document in your campaign may be placed online. Each campaign may include multiple online documents.
The following procedure explains how to place a document online.
To place a document online:
-
In the campaign tree, click Documents to display the Documents page.
-
Select a XLIM or InDesign document.
The Document Details page is displayed.
-
Click Place Online.
The document’s Place Online page is displayed.
-
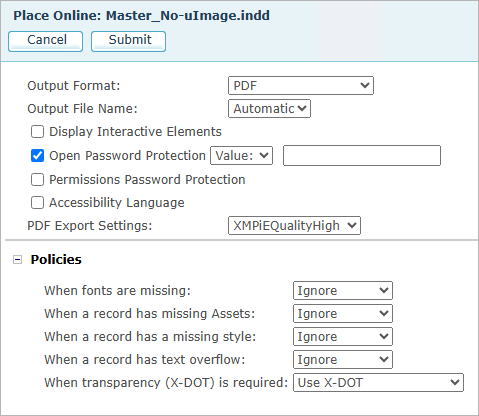
Set the options for placing this document online.
Option
Description
Output Format
Select the print output format: PDF, Interactive PDF, JPG, PNG, EPUB (Fixed Layout) or EPUB (Reflowable).
Output File Name
The file name of the PDF print output file. Choose one of the following names:
-
Automatic: This is the default option. The output file name will be based on the processed document name.
-
Value: Enter the name you wish to use for the resulting print output file.
-
ADOR: Personalize the PDF name by selecting an ADOR object from the dropdown list. The generated PDF name will be the ADOR object’s recipient-specific value (in this example, selecting the “First Name” ADOR object will generate files such as "Henry.pdf").
Display Interactive Elements
For PDF, you can choose to display the interactive elements in the document. Note that these elements will appear but will not be active.
Note: This option is not available for XLIM documents.
Open password Protection
Generate a password protected PDF/Interactive PDF.
Protecting the PDF with a password is possible only when producing single-record PDFs.
Once selecting this option, enter a value or select an ADOR which will be used as the password field.
The output is single PDFs, each protected by the password provided by the ADOR. When opening the PDF, a Password window opens requesting the reader to enter the password.
Note that if the password value of a specific recipient is empty, the document opens without requesting a password.
Notes:
-
The password is assigned to opening or reading the document only. It does not set any other password-protected options such as printing or editing.
-
This option is only available when the output is generated from uProduce.
Permission Password Protection A permissions password (the primary password) requires a password to change permission settings. Using a permissions password, you can restrict printing, editing, and copying content in the PDF.
You can enter a value or select an ADOR which will be used as the password field.
This option is available for PDF and interactive PDF output formats and is not supported in XLIM documents.
Accessibility Language
Select this option to specify to the screen reader in which language to read the PDF.
You can either enter the language or select an ADOR.
This option is available for PDF and interactive PDF output formats, and is not supported in XLIM documents.
PDF Export Settings
Set the quality of the exported PDF.
Policies
Specify how to handle missing items or inconsistencies.
For cases of missing fonts, assets or styles and cases of text overflow, set the dropdown lists to one of the following options:
-
Ignore: Processes this record in spite of the error. The output file will include this erroneous customer information.
-
Fail job: Stops processing this job altogether for all recipients. No output file will be generated.
-
Skip Record (missing assets and styles only): Moves on to process the next record. The output file will not include a document instance for this record.
When transparency (X-DOT) is required, choose whether to use X-DOT in your document, and if so - define how X-DOT is implemented. Available options are:
-
Use X-DOT: use the X-DOT technology.
-
Ignore X-DOT as needed: do not apply X-DOT in this production run in the following cases:
-
The resulting mega object is reusable where at least one of the atomic objects was fixed.
-
The resulting mega object is unique where at least one of the atomic objects is reusable or was fixed.
OR -
The resulting mega object is reusable where at least one of the atomic objects is reusable.
-
-
Ignore X-DOT: do not apply X-DOT in this production run.
-
Fail Job: fail PDF On Demand jobs that include X-DOT.
-
-
Click Submit.
-
The document is placed online and can now be used to generate PDFs on Demand.
Manage an online document
Placing a document online updates the Job Center and the Document Details page. These updates allow you to manage the document.
Online documents in the Job Center
The online document appears in the Job Center as a new job, whose type is ON DEMAND PRINT and whose status is online:
![]()
For detailed information on the Job center, see Job Management.
Online document details page
Once an InDesign or XLIM document is placed online, its Details page is updated as follows:
-
Online-specific actions: the top bar shows the following new buttons:
-
Suspend: Temporarily suspends the online document’s ON DEMAND PRINT job, so PDF On Demand production requests are rejected. This is useful when you wish to edit the online document.
Use this option as follows:
-
Click Suspend.
-
Click Checkout and then edit the document.
-
Click Checkin to submit the updated document.
-
Click Resume to place the suspended document back online.
Tip: Suspend may also be used to temporarily reject PDF On Demand production, to allocate more system resources to a large production job.
-
-
Resume: places the document back online, so it is once again available for generating PDF On Demand.
-
Take Offline: permanently deletes the online document's ON DEMAND PRINT job (which is removed from the Job Center), so the document is no longer available for PDF On Demand production. As a result, the links to this document from any media, whether email or web, no longer work (clicking them generates an error message).
Note: When editing the document, make sure to use the “Suspend/Resume” functionality only (do not confuse it with the “Take Offline” option).
-
-
Online-specific details:
-
The document status is set to online.
-
The Recent Job is set to ON DEMAND PRINT, with the following icon:
 and the
date and time on which the documents was Submitted (that
is, placed online).
and the
date and time on which the documents was Submitted (that
is, placed online).
-
