Managing Accounts
In the context of uProduce, a customer is a service provider who manages marketing campaigns for different clients, known as accounts. Each account may contain multiple campaign objects, which in turn contain the components required for the production of the campaign output: personalized print output files, batch email, websites, etc.
In the dashboard, click an account name to display the campaigns belonging to that account. For example, an account for a fashion house may have campaigns for each of the four seasons: a summer campaign, a fall campaign, a winter campaign, and a spring campaign.
When you log in as an administrator, you can grant users permission to work on existing accounts.
To view the accounts you have permission to access, click the accounts button on the navigation bar. You can use uProduce to manage your accounts by creating new accounts, modifying existing accounts, or deleting accounts.

Create/edit a new account
Any user can create a new account. When creating a new account you select users with whom you will share the account and define email settings.
If you change the account name, make sure you notify the other users who share this account.
To create/edit a new account:
-
In the Accounts page, click New/Edit.
-
Define the account's name, and provide a short description.
-
In the Share Account section, define the users with whom you will share this account.
-
All users (Including new): The account can be accessed by all users including new users created in the future.
Specific users: Select individual users from the list below. Users that appear pre-checked and grayed out have access to all accounts (configured at the account level) and cannot be deselected.
Note: The Share Account section is visible only to administrators. To allow non-admin users to share accounts with other users, set the AllowNonAdminShareWithOtherUsers system setting to true.
-
-
Expand the Email Settings area.
This section defines properties such as the default email provider, the account owner’s address and the Unsubsribe Web address that will appear in commercial emails.
These settings must be configured if your account includes an email campaign. If you do not have an email campaign, there is no need to configure these settings and you can save your work.
-
From the Default Delivery Provider dropdown list, select the default delivery provider for this account. Options listed in the dropdown list represent delivery provider services that have been activated and assigned to this account. For more information, see Defining a Delivery Provider. The default selection here can be overwritten when defining a specific email activity.
-
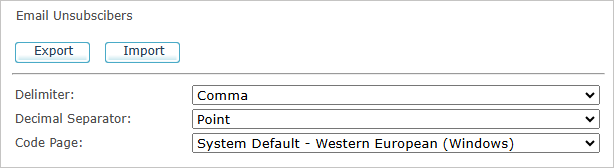
In the Email Unsubscribers section you can manage the account's unsubscribed recipient list.
You can export and download the list of email addresses of recipients who have unsubscribed from marketing emails sent from this account. You can also edit the list and import it again. The generated exported/imported unsubscribed list can be found in the Job Center.
Note: The import process can add new unsubscribed emails or update exiting email status. It does not remove existing emails from the list.
-
In the Placeholder Settings section, define the physical address and the unsubscribe web address that will appear in your commercial emails.

Values set in this section are used in commercial emails. They help you conform to email anti-spam laws such as the U.S Federal CAN-SPAM Act. Please check your country's regulations before sending emails.
Option
Description
Physical address
Custom
Select this option to enter a custom physical address. Specify the following information:
-
Business Name (mandatory)
-
Address (mandatory)
-
City (mandatory)
-
State
-
ZIP Code
-
Country (mandatory)
The values specified in these fields will be assigned to the corresponding XMPie ADOR objects.
Unsubscribe Web address
Target Unsubscribe URL used when an Unsubscribe link is clicked in the email.
Use the generic Unsubscribe page
Select this option to use the Generic Unsubscribe webpage provided by XMPie. This option is supported for all delivery providers.
Custom
Select this option to enter a custom Unsubscribe web address.
Note: The Physical Address and Unsubscribe Web Address ADOR objects are replaced by real values during the send process.
-
-
The Email Footers section displays a preview of the email footer with the company’s Name, Physical Address and Unsubscribe Web Address ADOR objects in HTML and Text formats. You can click the Edit Email HTML Footer or the Edit Email Text Footer to edit the footer text in the uProduce HTML or text editors. To restore the defaults, click the Restore Defaults link.
-
Click the Save button.
The Accounts page is displayed, showing the updated account.
Delete an account
When you delete an account, you also delete all the campaigns, documents, plan files, data files, asset sources, assets, and fonts associated with that account. Therefore, you should exercise extreme caution when you delete accounts, campaigns etc.
To delete an account:
-
In the Accounts page, select the account(s) you want to delete. To select all accounts on the list, click Select All.
-
Click the Delete button.
A message is displayed, asking you to confirm deletion of the account(s).
If you attempt to delete an account that has a job in process, an error message is displayed.
-
Click OK to confirm deletion of the account, along with all of its campaigns and their components.
The account you deleted no longer appears on the accounts page.