Configuring Single Sign-On (SSO)
Single Sign-On (SSO) is an optional feature that allows users to log in to the uProduce Dashboard using their existing corporate credentials - such as a Microsoft, Google, or Okta account - instead of a separate uProduce username and password.
With SSO, your organization can:
-
Provide a seamless login experience integrated with your corporate directory.
-
Enforce your organization's security policies, including multi-factor authentication (MFA).
-
Simplify user management by automatically creating and updating uProduce users from your directory.
uProduce supports two SSO protocols: SAML 2.0 and OpenID Connect (OIDC). Most enterprise identity providers support at least one of these protocols.
Note: This page is intended for uProduce system administrators and IT professionals who configure authentication. End users interact with SSO only during login and do not need to perform any configuration.
How SSO Works
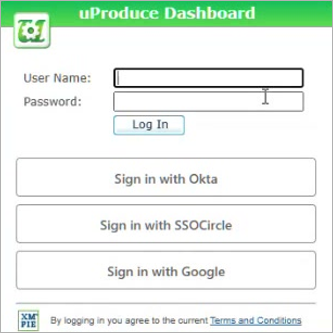
When SSO is configured, the login page displays sign-in buttons for each configured identity provider, alongside the standard username and password fields.
-
The user clicks a sign-in button (for example, Sign in with Okta).
-
The browser redirects to the identity provider, where the user enters their credentials.
-
After successful authentication, the browser redirects back to uProduce and the user is logged in.
Users can also start from the identity provider's portal (for example, the My Apps page in Microsoft Entra ID) and click a uProduce application tile to log in directly. This is called IdP-initiated login and is supported for SAML.
Note: SSO handles authentication only (verifying who the user is). What the user can do in uProduce is still controlled by uProduce user roles and permissions.
Prerequisites
-
The uProduce Dashboard must be accessible via HTTPS. SSO buttons only appear over HTTPS.
-
You need System Administrator privileges in uProduce.
-
You need administrator access to the identity provider (for example, Microsoft Entra ID, Okta, or Google).
-
An active SSO license must be installed on the uProduce server.
Setting Up SSO
Setting up SSO is a two-sided process: you configure uProduce to trust your identity provider, and you configure the identity provider to trust uProduce. The steps below walk you through both sides.
Step 1: Create an Identity Provider in uProduce
-
Log in to the uProduce Dashboard as a System Administrator.
-
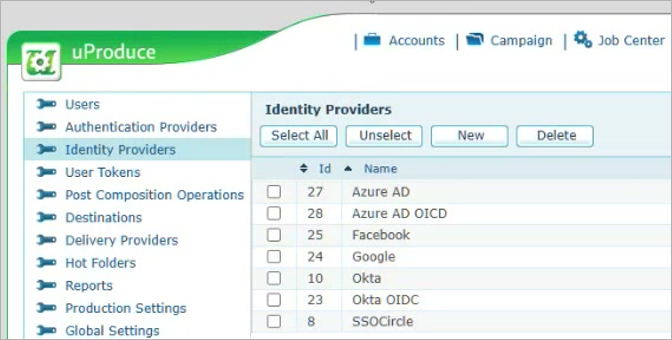
Navigate to Settings > Identity Providers.
-
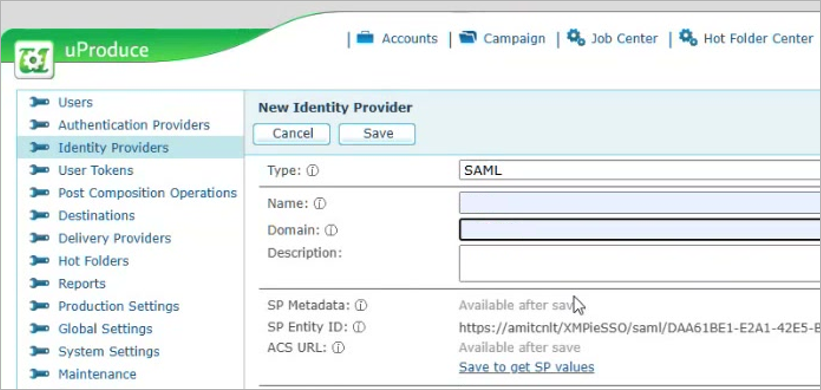
Click New.
-
Fill in the general settings:
Field
Description
Type
Select SAML or OIDC, depending on the protocol your identity provider supports.
Name
A display name that appears on the login button (for example, "Sign in with Okta").
Domain
The domain users use to access the Dashboard (for example, "uproduce.example.com"). uProduce shows this provider's button only when accessed from this domain.
Description
(Optional) Internal notes for administrators.
-
Click the Save to get SP values link. uProduce will generate and display the required Service Provider (SP) values. Copy or note down these values to use in the next step.
Tip: Click the copy button next to each SP value in uProduce to copy it to the clipboard.
Step 2: Register uProduce in Your Identity Provider
In your identity provider's administration console, register uProduce as a trusted service provider and enter the SP values generated by uProduce in the previous step:
For SAML:
-
Enter the SP Entity ID as the Audience URI (or Entity ID).
-
Enter the ACS URL as the Reply URL (or Single Sign-On URL).
-
Alternatively, import the SP Metadata XML file, which contains both values.
For OIDC:
-
Enter the Redirect URI as the Authorized Redirect URI (or Callback URL).
Then, assign the users or groups that should have access to uProduce in the identity provider.
Note: The exact steps and field names vary by identity provider. Refer to your identity provider's documentation for detailed instructions.
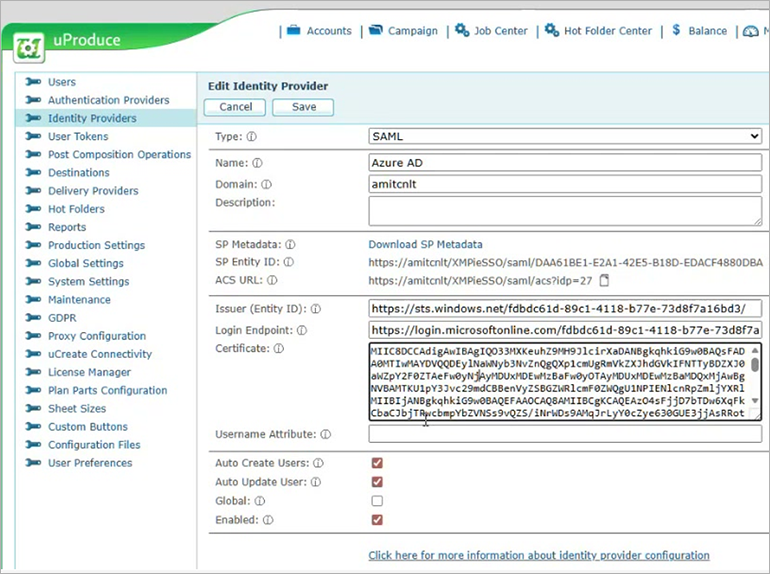
Step 3: Enter Identity Provider Details in uProduce
Copy the following values from your identity provider into the uProduce configuration.
For SAML identity providers:
|
Field |
Description |
|---|---|
|
Issuer (Entity ID) |
The identity provider's unique identifier, found in the provider's metadata or setup page. |
|
Login Endpoint |
The Single Sign-On URL where authentication requests are sent. |
|
Certificate |
The provider's X.509 public certificate (Base64). You can paste it with or without the BEGIN/END headers. |
|
Username Attribute |
(Optional) The SAML attribute containing the username. Leave empty to use the NameID. |
For OIDC identity providers:
|
Field |
Description |
|---|---|
|
Client ID |
The client identifier assigned when you registered the application. |
|
Client Secret |
The client secret. Stored encrypted in uProduce. |
|
Authorization Endpoint |
The provider's authorization URL (found in /.well-known/openid-configuration). |
|
Token Endpoint |
The provider's token exchange URL. |
|
User Info Endpoint |
(Optional) URL for retrieving additional user profile information. |
|
Scopes |
(Optional) OAuth scopes. Default: "openid profile email phone address". |
|
Username Claim |
(Optional) The claim containing the username. Default: "sub". Common: "email". |
User and login options (at the bottom of the page):
|
Field |
Description |
|---|---|
|
Auto Create Users |
Automatically create a uProduce user account on first SSO login. When enabled, if uProduce does not have a user account for the authenticated user, a new regular user (not an administrator) will be created with the profile details from the identity provider. |
|
Auto Update User |
Update user profile details (name, email, phone, address) from the identity provider on each login. Empty values from the provider do not overwrite existing data. |
|
Global |
Show this provider's button on the login page for all domains, not just the specified domain. |
|
Enabled |
Show or hide this provider's button on the login page. |
Note: Users created automatically will have access to uProduce accounts that are configured to share with "All Users (Including new)". To give auto-created users immediate access to specific accounts, configure those accounts' sharing settings before enabling this option. See Managing Accounts for details.
Step 4: Test the Login
-
Open the uProduce Dashboard in a browser using HTTPS and the domain you configured.
-
Verify that the sign-in button appears on the login page.
-
Click the button and complete the login with your identity provider credentials.
-
Verify that you are logged in to uProduce with the correct user account.
Multi-Domain Environments
If multiple organizations access the same uProduce server through different domains, each organization can have its own identity provider. uProduce displays the appropriate sign-in buttons based on the domain in the browser's address bar.
-
Users accessing from "acme.example.com" see ACME's identity provider.
-
Users accessing from "contoso.example.com" see Contoso's identity provider.
-
Providers marked as Global appear for all domains.
Managing Identity Providers
To view all configured identity providers, navigate to Settings > Identity Providers.
From this page you can:
-
Edit a provider - Click the edit icon to change any setting. If you change the Domain, update the SP values in your identity provider as well.
-
Disable a provider - Clear the Enabled checkbox to temporarily hide the sign-in button without deleting the configuration.
-
Delete a provider - Select the provider and click Delete.
Network Requirements
SSO communication occurs through browser redirects. The uProduce server does not need to be publicly exposed on the internet - as long as the user's browser can reach both uProduce and the identity provider, SSO will work.
Important: For OIDC only: the uProduce server must be able to make outbound HTTPS calls to the identity provider's token and user info endpoints. Verify that firewall rules allow this outbound traffic.
If you use a reverse proxy, the domain configured in the identity provider must match the external-facing URL in the browser, not the internal server address.
Limitations
-
SSO is supported for browser-based Dashboard login only. REST API authentication uses token-based access and is not affected by SSO configuration.
-
IdP-initiated login is supported for SAML only, not for OIDC.
-
The user attributes available for automatic profile updates depend on the identity provider and its configuration.
Troubleshooting
|
Issue |
Possible Cause |
Solution |
|---|---|---|
|
No sign-in buttons on the login page |
Dashboard accessed over HTTP, or no enabled providers for the current domain. |
Access the Dashboard over HTTPS. Verify that a provider is configured and enabled for the domain. |
|
"SSO is not licensed" error |
SSO license is not activated. |
Contact your administrator to activate the SSO license. |
|
Authentication fails at the identity provider |
SP values (Entity ID, ACS URL, or Redirect URI) do not match. |
Verify that the values in the identity provider exactly match those shown in uProduce. |
|
Login fails after authenticating |
No matching uProduce user and Auto Create Users is disabled. |
Create the user in uProduce, or enable Auto Create Users. |
|
User authenticated but gets wrong permissions |
User was auto-created with default permissions. |
Check which accounts are shared with "All Users (Including new)" and adjust sharing settings as needed. |
|
User cannot authenticate at the IdP |
User is not assigned to the uProduce application in the identity provider. |
Assign the user or their group to the application in the identity provider. |
|
OIDC connection error |
Server cannot reach the provider's token endpoint. |
Check that the server has outbound HTTPS access to the provider. |
|
SAML certificate error |
The provider's certificate has expired. |
Download a fresh certificate from the provider and update it in uProduce. |