
 View what's in this topic
Proofing the Print Output File
You can use the uProduce proof feature to check the final product while putting together your campaign. Proofs are also a good way to preview the final outcome of your document.
The proof procedure evaluates all ADOR objects in your plan and inserts their values into the document, thereby producing real-life examples of your print output file.
When this process completes, click the icon to open a new browser window with a list of links to the documents. For print documents, the link is to either *.pdf file or *.jpg files. For web-based documents, the links are to a series of *.html files.
To proof a document:
-
Open the desired campaign.
The Documents page is displayed.
-
Click the document name.
-
Click the Proof button.
The document’s Proof page is displayed.
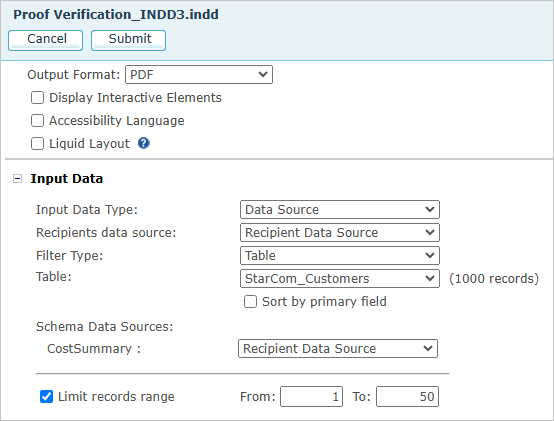
-
Select the desired options.
Option
Description
Output Format
Select either PDF, Interactive PDF, JPG, PNG, EPUB (Fixed Layout) or EPUB (Reflowable) as the format of the proof file.
Notes:
-
PNG format handles background transparency.
-
Interactive PDF, JPG, PNG and EPUB formats result in the creation of separate files per each record.
-
EPUB proofs are downloaded to your computer since they cannot be viewed in a browser.
Liquid Layout
Adobe InDesign includes a feature called Liquid Layout which enables the designer to create rules in the document that determine how the design will change if the page size changes.
If your document is designed to work with Liquid Layouts and is saved/uploaded to the uProduce server, then when you proof or process the document you can check the Liquid Layout option and set the required page height and width.
Note that this feature is not available for XLIM documents, and if the InDesign file does not have any rules defined for Liquid Layout, then changing the page size with the Liquid Layout setting will create output with the new page size, but the document will not be scaled or modified to fit the selected page size.
You can find out more about setting up an InDesign document for Liquid Layouts at Liquid layouts and Alternate layouts.
Display Interactive Elements
For PDF, you can choose to display the interactive elements in the proof. Note that these elements will appear but will not be active.
Accessibility Language
Select this option to specify to the screen reader in which language to read the PDF.
You can either enter the language or select an ADOR.
This option is available for PDF and interactive PDF output formats, and is not supported in XLIM documents.
Output Resolution
If you set the output format to JPG or PNG, you can control its resolution. Choose one of the following options:
-
Low (72 DPI): Useful for web productions.
-
High (300 DPI): Useful for print productions.
-
Custom: Enter the DPI value that suits your specific needs (for example, enter 144 to create large thumbnails).
-
Auto: This option calculates the best online display resolution based on the InDesign document size.
Input Data
See Input Data.
Limit Records Range
Select the checkbox to enter a range of records for which you will create a print output file.
Clear the checkbox to produce a print output file for all records in the data source.
Note: You can add the bleed option to the proof. To do so, refer to the SetOutputParameter and SetOutputParameters functions in the uProduce API.
-
-
Click the Submit button. A page is displayed, showing information on the job status.
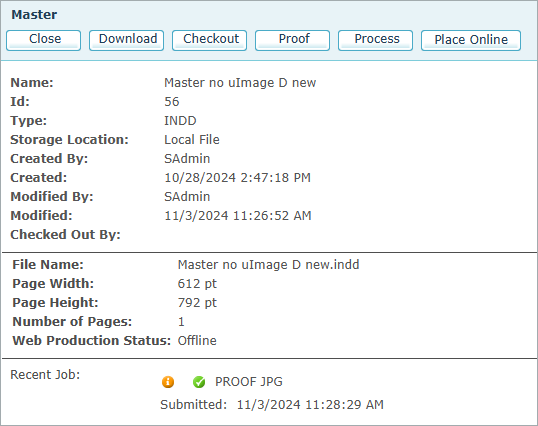
A
 sign
next to the Recent Job field
indicates that messages have been produced relating to the job. Click
this sign to view the messages.
If the process of preparing the proof is successful, the icon
is displayed next to the Recent Job field in
this page and in the Job Center.
-
To proof the document instances, click the
icon
to the left of the proof job listed here or in the Job Center page. The
Job Results page lists links that represent
personalized document instances for the records you have selected. -
To proof your results, click the links of the generated files in the Job Results list.