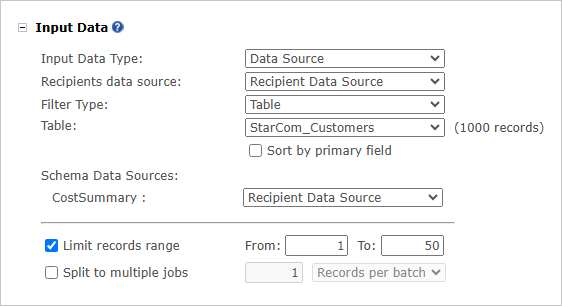
Input Data
Select the port or data source containing the recipient data you wish to use to generate the print output file. In addition, set the range of recipient records to be included in this job.
|
Option |
Description |
|---|---|
|
Input Data Type |
Select one of the input data types: Copy from Port, Data Source, Flat ADOR Data. |
|
Copy from Port |
Connect to a previously defined port in the campaign. Ports are used to define the input data setup for the resolving of ADOR values used by personalized websites (RURLs), connectivity, and more. For more information on how to create ports in uProduce, see Ports. |
|
Data Source |
From the Recipients data source list, select the data source that includes the information for which you want to produce the print output file/proof set. |
|
Flat ADOR Data |
Select to generate the output from a flat ADOR data file. A flat ADOR data file is a file that contains the ADOR values. When producing the document using the flat ADOR data file, the plan logic is skipped and the ADOR values are used directly to populate the document placeholders. You can choose a table for the selected flat ADOR data file, or manually enter an SQL query. |
|
Filter Type |
Select one of the following filter types: Table, Plan Filter, Query. |
|
Table |
If no recipient table is defined for the selected data source, click the Add table link to add one. If the selected data source has recipient tables, select a table in the dropdown list. Note that only tables that have been defined as recipient tables appear in this list. If the selected table is not compatible with the plan’s schema, you will be requested to map it. If your data source includes another table you wish to use, click the Add Table link in the dropdown list. Note: If no recipient table is defined but you have already processed the document in the past, the Table (No.) dropdown list will contain the last used table (if it still exists), together with the option to add tables. To learn how to add a recipient table, see Adding Recipient Tables and Mapping them to a Plan’s Recipient List Schema. Sort by Primary Field: Select to sort table records by the primary field configured in the plan. |
|
Plan Filter |
If any filters have been created for this plan in uPlan, choose one of these filters to pinpoint the relevant group of. Important: To enforce consistent order and avoid unexpected results, it is mandatory that the plan filter query includes the ORDER BY clause. Without it, in certain cases (e.g. automatic or manual split production), some recipients may receive multiple outputs, while others receive none. |
|
Query |
Manually enter an SQL query. For example, assume you have a table name that contains a JoinedDate field. To print the job only for those who joined after April third, 2018, enter the following query: select * from Table where JoinedDate > ToDate('3/4/2018','dd/mm/yyyy') order by ZipCode Important: To enforce consistent order and avoid unexpected results, it is mandatory that the query includes the ORDER BY clause. Without it, in certain cases (e.g. automatic or manual split production), some recipients may receive multiple outputs, while others receive none. |
|
Schema Data Sources |
This option appears only if your plan defines additional data sources (besides the data source). Select the data source you want to use for each data source schema defined in your plan. |
|
Limit Records Range |
Select the checkbox to enter a range of records for which you will create a print output file. Clear the checkbox to produce a print output file for all records in the data source. |
|
Split to Multiple Jobs |
Select this check box to automatically split the job into multiple batches, and then choose how to perform the split:
The batch ID is added to the name of each print output batch file. Note: If you save your production settings as a template, the parameters of this and the above section will not be included in the template since they are campaign-specific. |