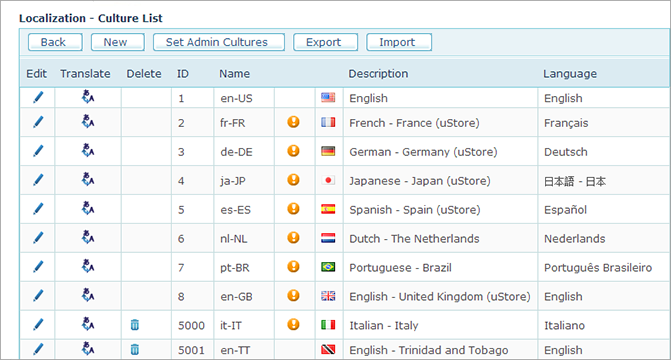
The Localization page in the Presets view displays all cultures defined in the system. These include out-of-the box cultures and additional cultures that have been added.
In the Localization page you can add cultures, and localize the Storefront and Back Office to any language as reflected in system messages, labels, menu items, etc (i.e., static items). The static text is the text that appears /is available in all uStore stores and Back Office.
You can ease the localization process by importing and exporting localizations as Excel sheets.
You can also localize dynamic store text (for example, product groups, products). These localization options are defined in the Stores view and are specific for each store.
To view a list of all cultures, in the Presets view click Localization.
The Culture List
contains all cultures that are currently defined in your uStore system.
The cultures with missing localizations are marked with the  icon. For each culture
a flag, a full culture name (French-France),
a culture code (fr-FR)
and a language name in the native language (Français)
are displayed. Clicking the Edit
icon. For each culture
a flag, a full culture name (French-France),
a culture code (fr-FR)
and a language name in the native language (Français)
are displayed. Clicking the Edit
![]() icon allows you to edit these definitions.
icon allows you to edit these definitions.
You can add a culture, edit culture properties, translate Storefront and Back Office labels and menus to the selected language and delete a culture. Note that out-of-the box cultures and cultures already used in stores cannot be deleted.
Administrators are able to select the locale they want to use when they log in to uStore Back Office based on the settings you define here.
Store users are able to select the locale they want to use when they log in to the Storefront based on the settings defined when setting up a store. See Adding a Culture.
Administrators are able to select the locale they want to use when they log in to uStore Back Office based on the settings you define in this topic.
To set the back office cultures:
1. In the Presets view, click Localization.
The Localization - Culture
List page opens.
2. Click the Set Admin Cultures button.
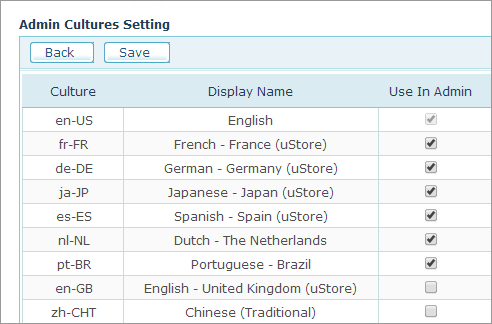
3. In the Admin Cultures Setting page, select
the languages you want available on the Back Office Login
page.
The Login page will now display
flags of the selected language.
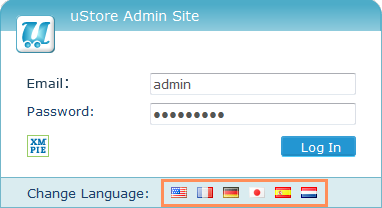
In the Login page, the user will click a flag icon in the Change Language bar to choose the uStore Back Office locale as reflected in system messages, labels, menu items, etc.
In this page the user selects the application locale. The setup language for each store is defined separately per store.
You can add a culture to uStore from the list of predefined cultures. The available cultures are defined in the Culture List table.
If you do not find the desired culture in the list, or if you wish to use several dialects of a language, and thus address different segments of the population (for example, youngsters vs. elders), you can create a new culture or a new instance of a language.
For example, you may want to create two stores for different dialects of the en-US language. In this case, you should add two instances of the en-US languages and distinguish each with a different name. To create a new language or a new instance of a language, see Setting Up the Culture List Table. Then, you can localize each store with a different dialect using uStore Localization Tool, as described in Localizing System Tables.
To add a culture:
1. In the
Presets view, click Localization.
The Localization - Culture
List page opens.
2. Click
the New button.
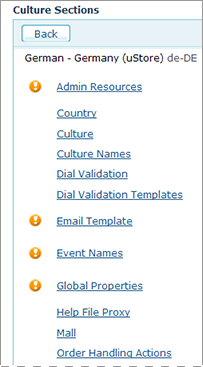
The Culture Sections
page is displayed.
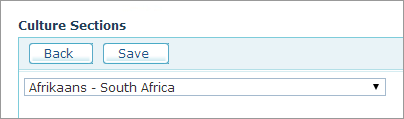
3. Select
the culture you want to add from the list and click Save.
The Culture Sections page
is displayed where you can now localize uStore tables with the newly added
language, as described in Localizing System Tables.
To edit properties of an existing culture:
1. In
the Presets view, click Localization.
The Localization
- Culture List page
opens.
2. Click
the Edit ![]() icon next to the culture you want to edit.
icon next to the culture you want to edit.
The Culture Edit page
is displayed.
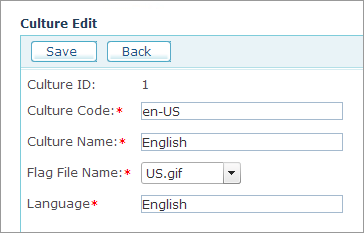
3. The Culture Edit page includes the following fields:
– Culture Code: Culture name, using the .NET conventions. For example, enter ‘en-US’ for English - United States.
For more details, go to: http://msdn.microsoft.com/en-us/library/system.globalization.cultureinfo(v=vs.110).aspx
– Culture Name: The name of the Culture that will be displayed to the store administrator. For example, English-United States.
– Flag File Name: The flag file name you wish to assign to this culture. The flag files are located in: ...uStore\App\uStoreShared\Skins\Images\flags.
The flag file icon will be available for selection in the Storefront Login page and in the top right corner of all other pages.
– Language: The culture name in the native language.
4. Click Save.
When you first log in to a store, you are presented with a Welcome page displaying a personalized welcome message (see uStore Storefront Main Page). By default, the English message says Hello {FirstName}, displaying the first name of the user logged in to the store. You can modify this message to include other user properties.
To change the uStore welcome message:
1. In the Presets
view, click Localization.
The Localization
- Culture List page
opens.
2. Click the Translate
![]() icon
next to the language for which you want to modify the welcome message.
icon
next to the language for which you want to modify the welcome message.
The Culture Sections
page is displayed.
3. Click the Resources link, and in the Culture Edit [culture name and code] page search for ID 345 (in the ID column) or Header_ WelcomeMessage (in the Context column).
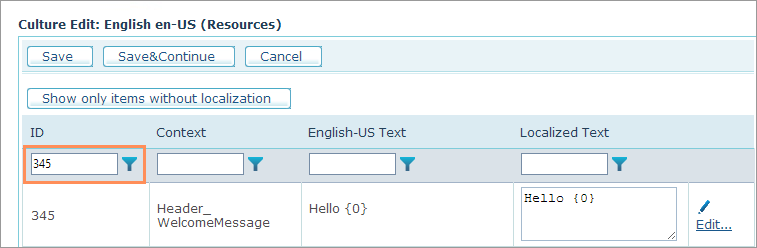
4. The default text is Hello {0}, where {0} represents
First Name. Click the Edit ![]() icon to type in text in the Localized
Text field, or add other user properties as follows:
icon to type in text in the Localized
Text field, or add other user properties as follows:
No. |
User Property |
{0} |
First Name |
{1} |
Last Name |
{2} |
Job Title |
{3} |
E-mail Address |
{4} |
Department |
5. Click Save.
uStore tables can be localized for each language that exists in uStore. You may localize only the Storefront or only the Backoffice tables, or both.
To localize system tables:
1. In the Presets
view, click Localization.
The Localization
- Culture List page
opens.
2. Click
the Translate ![]() icon
next to a language.
icon
next to a language.
The Culture
Sections page lists all available system tables of the uStore
system that can be localized. The tables that have missing localizations
for some of the text fields will be marked with the icon.
3. To localize a table with missing
localizations, click its link.
The localization page
for the selected system table is displayed.
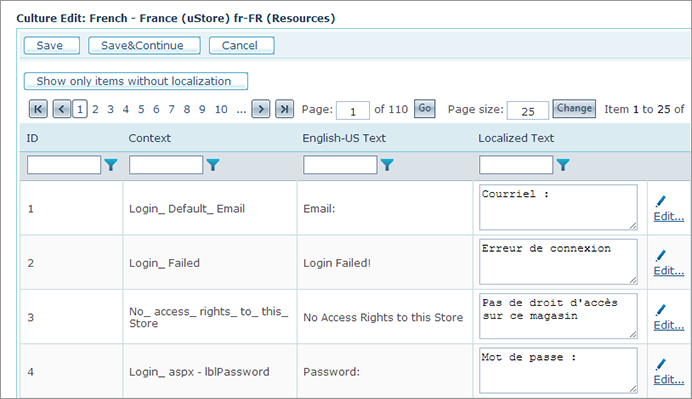
The Culture Edit page lists all text strings that are available for a selected system table, their ID number and an entry field where you can enter text in the local language. That text will be displayed in the store instead of the default English text.
– You can filter
down the presented text string list by using the filtering option at the
top of each column. To apply a filter to the list, click the Filter
![]() icon next to the required column header and select the filter from the
displayed list. Some filters allow you to further pinpoint the desired
results by specifying a value or a text string of one or more required
fields in the records returned from the database. For example, the "Context"
filter allows you to enter a text string to look for in the listed records.
icon next to the required column header and select the filter from the
displayed list. Some filters allow you to further pinpoint the desired
results by specifying a value or a text string of one or more required
fields in the records returned from the database. For example, the "Context"
filter allows you to enter a text string to look for in the listed records.
– You can sort any column in the resulted record list in ascending or descending order by clicking the required column header. Clicking it once will sort the list in ascending order; clicking it again will sort it in descending order.
– You can display all unlocalized records identified by the [no localization] label in their Localized Text field by clicking the Show only items without localization button.
4. All tables can be localized by simply entering new text in the local language. To do so, click the Edit link to the right of the text string you want to replace and enter the new text in the box that appears. You can also enter the text directly in the Localized Text column.
5. If the record you want to localize contains several localizable fields, click Edit More… to open all the linked localization text fields and localize them as necessary.
If you need to localize only the Storefront or only the Backoffice, this list will help you identify which tables you need to translate.
|
Excel Tab Name |
Storefront |
Backoffice |
Admin Resources |
ResourcesCulture_AdminApp |
|
|
Country |
Country_Culture |
|
|
Culture |
Culture_Culture |
|
|
Culture Names |
CultureList_Culture |
|
|
Dial Validation |
DialValidationType_Culture |
|
|
Dial Validation Templates |
DialValidationRegExp_Culture |
|
|
Document Repository |
FileSubmissionRepository_Cultur |
|
|
Email Template |
MessageTemplate_Culture |
|
|
Event Names |
EventKeyPoint_Culture |
|
|
Global Properties |
GlobalProperties_Culture, |
|
|
Help File Proxy (legacy only) |
HelpFileOriginator_Culture |
|
|
JDF Node Set |
JDFNodeSet_Culture |
|
|
Mall |
Mall_Culture |
|
|
Order Handling Actions |
OrderHandlingAction_Culture |
|
|
Order Handling Statuses |
OrderHandlingStatus_Culture |
|
|
Permission Types |
ACL_PermissionType_Culture |
|
|
Plugins |
PluginDef_Culture |
|
|
Product Units |
ProductUnitType_Culture |
|
|
Province |
Province_Culture |
|
|
Receipt |
DefaultReceipt_Culture |
|
|
Recipient List Model |
RecipientListModel_Culture |
|
|
Report Parameters |
ReportParameter_Culture |
|
|
Reports |
Report_Culture |
|
|
Resources |
ResourcesCulture_CustomerApp |
|
|
Tax |
Tax_Culture |
|
|
UI Controls Names |
UIControlType_Culture |
|
|
Note that if you cannot find a specific tab in the Excel (for example tax definitions or document repository), you should first add one instance of that item (tax, document) through setup, and then download the Excel again to see the tab.
uStore offers you the possibility to export localizable application strings into an Excel file. After the Excel file is translated, it can then be imported back to uStore.
4. In the Presets view, click Localization.
The Localization - Culture
List page opens.
5. Click the Export button.
The Culture Export
page is displayed.
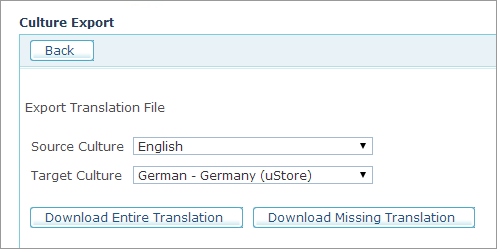
6. Select the source culture (<language> - <country>) from the Source Culture list.
7. Select the target culture from the Target Culture list.
8. If you wish to export all the source strings including those that have already been localized, click the Download Entire Translation button. If you wish to export only the strings that have not been localized to the selected target language, click Download Missing Translation.
4. In the
Presets view, click Localization.
The Localization - Culture
List page opens.
5. Click
the Import
button.
The Culture Import
page is displayed.
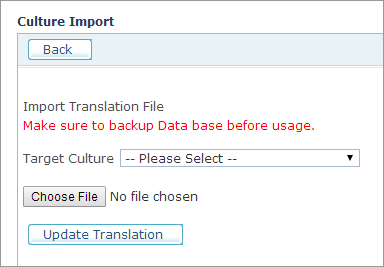
6. Select the target culture in the Target Culture list.
7. Click Choose File to locate the translated Excel file.
8. Make sure you backed up your database before importing the translations.
9. Click
Update Translation.
The new translations will be inserted into the database.
Enabling additional languages in the Storefront
