Setting Up Document Repositories
Note: This is not available for StoreFlow Cloud customers.
Setting up document repositories enables the uStore administrator to define external file repositories for composite products. The administrator sets up the repository location, which file types can be uploaded and whether the visitor can change the order of the pages or edit product properties on specific pages of the uploaded file. The store visitors will be able to upload documents from these repositories when ordering a composite product.
To set up a document repository:
-
On the toolbar click Presets, and then select Document Repositories Setup.
The Document Repositories Listpage is displayed. -
Click New to add a new document repository.
-
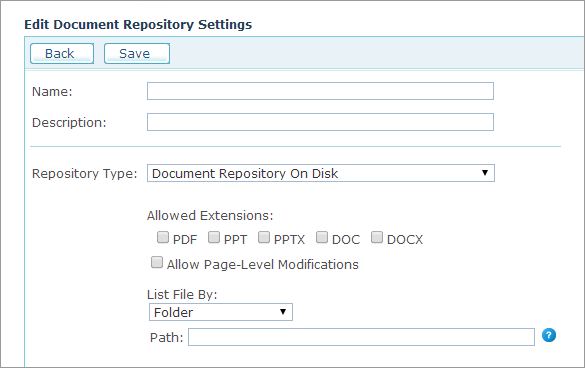
Enter the repository Name and Description.
-
In the Repository Type field, select Document Repository On Disk. This is a predefined out-of-the box repository type provided by uStore.
-
In the Allowed Extensions section, select the file extensions that are allowed to be uploaded.
uStore supports upload of the following file extensions: PDF, PPT, PPTX, DOC, DOCX. -
If you wish to allow store customers to modify the uploaded files, select Allow Page-Level Modifications.
If this option is enabled, customers can change page order and modify product properties on specific pages. -
In the List File By list, select the mode in which the contents of an external document repository will be retrieved and define the required parameters for the selected mode. There are four available options:
-
Folder: Allows uploading documents from a folder located on a uStore server. In the Path field, enter the folder path on a uStore server.
-
Network Path: Allows uploading documents from a folder located in a network that can be accessed by a uStore server. Enter the following parameters:
-
Path: Enter the folder path in the network.
-
Username,Password,Domain: If the network path requires authentication, enter the username, password and domain name required to access the network location defined in the Path field.
-
Info File: Allows uploading documents from a folder whose structure and contents are represented using an XML info file. In the Path field enter the path to the folder in which the XML info file (folderinfo.xml) resides. For more details on folderinfo.xml see Set up info file parameters.
-
HTTP Web Handler: Allows uploading documents from a remote server (for example, Dropbox) using the HTTP Web Handler file representing the folder path and contents. In the URL field, enter the URL of a remote folder in which the HTTP Web Handler file resides. For more details, see Set Up HTTP Web Handler parameters.
-
-
Click Save.
Once you have set up your document repository, you can enable it for use by a specific upload product. For more details, see Setting Up Upload Products.
Set up Info file parameters
The folderinfo.xml file is used to represent the structure and contents of a particular folder. This file can be used in the following cases:
The real folder name can be replaced by a virtual display name.
The real file name can be replaced by a virtual display name.
You can decide which files inside a specific folder will be visible in the repository and which files will be hidden.
You can define a custom thumbnail icon for a file.
The folderinfo.xml file has the following structure:
<FolderInfo>

   <subfolders>

     <folder folderName="<Folder Name>" path="<Folder
     Path>" iconClass="fileExtensionFolder"
     iconPath=""></folder>

   </subfolders>

   <files>

     <file fileName="<File Name>" extension="<File
     Extension>" path="<File Path>" iconClass="<File
     Extension Type>"iconPath="<Icon Path>"></file>

   </files>

</FolderInfo>
|
Parameter |
Value |
|
folderName |
The display name of a folder. The display name can be different from the actual folder name. |
|
path |
The actual file or folder path. The path must be located under the folder in which the folderinfo.xml resides. |
|
iconClass |
When defining the folder parameters, the iconClass parameter must have fileExtensionFolder value. When defining the file parameters, the iconClass parameter must have fileExtension<Extension Type> value, for example fileExtensionpptx, if the file extension is PPTX. |
|
iconPath |
The full path to the location of the icon file. |
|
fileName |
The display name of a file. The display name can be different from the actual file name. |
|
extension |
The file extension. For example, PPTX, PPT, DOCX, DOC, PDF. |
Example
In the following example, we set the document repository to contain a folder named Giftcards with a file named Birthday.pptx. The file has a thumbnail icon which is located at https://play.google.com/intl/en-US_us/about/images/giftcards/birthday_120x120.png.
<FolderInfo>

   <subfolders>

     <folder folderName="Giftcards" path="My Files"
     iconClass="fileExtensionFolder" iconPath="">
     </folder>

   </subfolders>

   <files>

     <file fileName="Birthday" extension="pptx"
     path="Projects/Giftcards/Birthday.pptx"
     iconClass="fileExtensionpptx" iconPath="https://
     play.google.com/intl/en-US_us/about/images/
     giftcards/birthday_120x120.png"></file>

   </files>

</FolderInfo>
Set up HTTP Web Handler parameters
An HTTP Web Handler file is used to represent the structure and contents of a remote folder. For example, you might use a Web Handler file to fetch contents of a remote repository, such as Dropbox.
When a customer wishes to upload a document from a remote document Repository implemented using an HTTP Web Handler, uStore sends a request to the Handler file to fetch the requested folder. When a customer clicks a file, an additional request is sent to fetch the file.
The HTTP Web Handler file expects to receive the following two parameters:
-
path: returns the repository path. When you fetch the root folder, the path parameter is empty.
-
mode: returns file or list values.
-
list: returns folderinfo.xml. This value is used to retrieve the folder contents.
-
file: returns file. This value is used to retrieve the actual file.
-