Setting Up an Account for UPS Delivery Service
Set UPS account in uStore
-
In Presets > Delivery Setup >Delivery Provider list, click the UPS link in the list of delivery providers to add a new UPS account or to configure an existing account.
The Delivery Provider Details page is displayed.
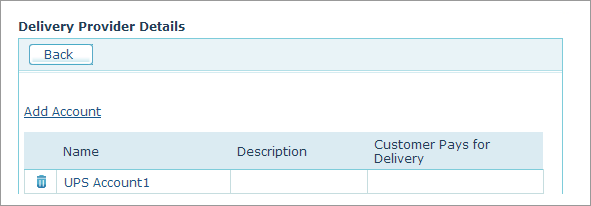
You can edit a UPS account by clicking its name in the list.
-
Click the Add Account link.
The Account Setup page is displayed.
-
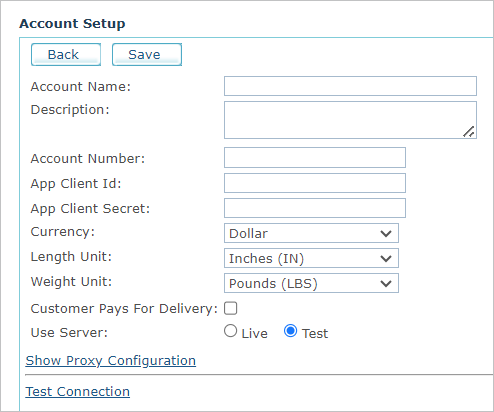
Fill in the following information:
-
Account Name: Name of the account.
-
Description: Description of the account.
-
Account Number, App Client Id, App Client Secret: Provided by UPS when you create a new application.
-
Currency: Select the currency that will be used to calculate delivery cost as provided by UPS. The Currency list includes all the currencies that are defined for the uStore mall. To define additional currencies, refer to Defining Currencies. Note, the currency type you select here must be identical to the one used at the store.
-
Length Unit, Weight Unit: Measuring units used for defining the package dimensions and weight. You can select the metric system (i.e., centimeters and kilograms) or the equivalent English system (inches and pounds) commonly used in the US.
-
Customer Pays for Delivery: When selected, charges the customer with the delivery expenses. The following are two examples that describe two available scenarios.
-
Scenario A: Public Store (B2C)
The uStore owner has a UPS account that he uses in his store. In such case you should select the Customer Pays for Delivery checkbox to charge the customer with the delivery expenses.
-
Scenario B (Secured Store (B2B)
The Store owner has a UPS account that he uses in his store. For example, the store was created for Company X that already has a UPS account number (as opposed to scenario A where the uStore owner has a UPS account number) and the store customers are Company X’s agents. In this case, Company X should not be charged twice for shipping; hence you should leave the Customer Pays for Delivery checkbox unselected.
-
- Use Server: SelectLiveto use the production server. Select Test to use the test server
-
-
Click Show Proxy Configuration,and fill in your proxy details (Proxy Address, Proxy Port, Proxy User, Proxy Password) if uStore is located behind a proxy server. Note that the Proxy Port must refer to Port 443 (HTTPS).
-
Click Test Connection to test connection to the UPS service.
If you have negotiated rates with the UPS delivery service and wish to apply them, go to Presets > System Setup > Global Configurations, and search for UPS_UseNegotiatedRates in the Name column. This will return the following two items:
-
UPS_UseNegotiatedRates_Backoffice
-
UPS_UseNegotiatedRates_StoreFront
Set UPS_UseNegotiatedRates_Backoffice to true to use UPS negotiated rates in the uStore backoffice create delivery screens. Set to false to NOT use UPS negotiated rates in the uStore backoffice create delivery screens.
Set UPS_UseNegotiatedRates_StoreFront to true to use UPS negotiated rates in the uStore storefront. Set to false to NOT use UPS negotiated rates in the uStore storefront.
Create a UPS application
A UPS application is required in order for uStore to work with UPS.
After you have created your UPS account, proceed to create an application as follows:
-
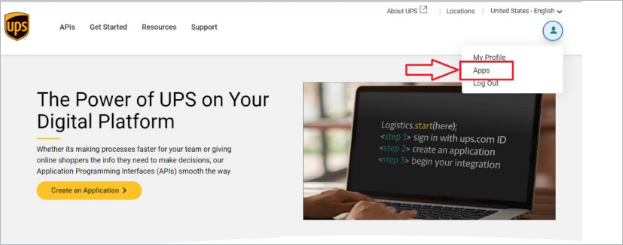
Go to the UPS developer page, and log in to your account.
-
Open the Apps menu.
-
Click the Add Apps link.
-
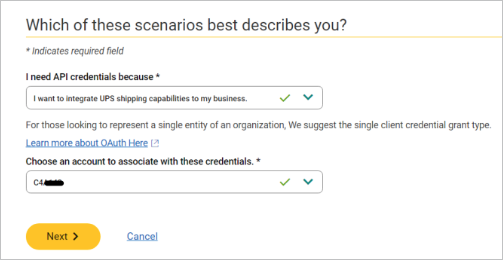
Select I want to integrate UPS Shipping capabilities to my business, and click Next.
-
Fill in your contact information, and click Next.
-
Enter the app name (e.g. uStore<store name>), and from the right column add products.
Mandatory products are:
-
Authorization (selected by default)
-
Address Validation
-
Rating
-
Shipping
-
Tracking

-
-
Click Save.
-
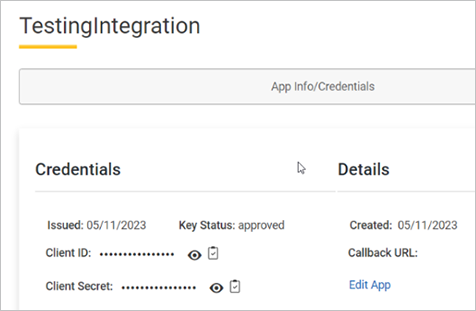
After successfully creating the app, copy the app details: Client ID and Client Secret. These will be used in uStore when setting a UPS account.