The Manage Groups functionality enables you to add new root groups to the group tree and define additional sub-groups for each root group. A root group is the main group in the group hierarchy that may include additional sub-groups.
To add root groups to your store:
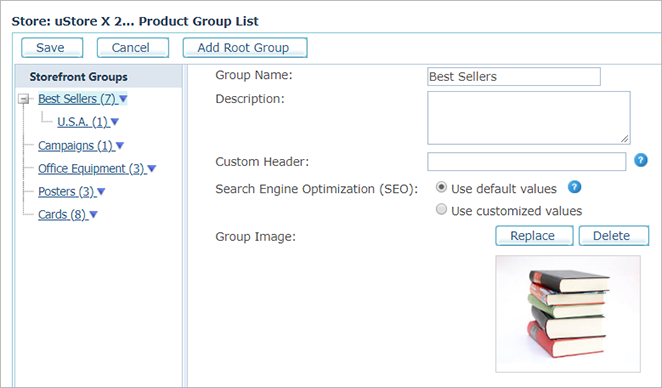
1. Click the Manage Groups link, located under
the Storefront Groups title.
The Product Group List page is displayed.
The number in parenthesis next to the Product Group name indicates the
number of products in this group.
2. Click the Add Root Group button, and fill in information for the new group, as described in the following steps.
3. In the Group Name field, enter a meaningful name that indicates the type of products the group will contain (for example, "Best Sellers"). The product group name will be displayed in the Storefront.
 The names of groups, or sub-groups of the same hierarchy, must be
unique.
The names of groups, or sub-groups of the same hierarchy, must be
unique.
4. In the Description field, enter a description of the group (legacy stores only). The description will not be displayed in the Storefront.
5. The Custom Header field is supported for Legacy stores only. In the Custom Header field (Storefront groups only), define a custom header that will be displayed for that group in the store. Enter a local path that points to the header you want to use. You can use HTML for static content display or ASCX for dynamic content that is personalized for every customer.
Make sure the file you are using, whether an HTML or an ASCX file, resides in the uStore application installation folder which is located, by default, in: D:\xmpie\ustore\app\customerapp
Enter /ustore/ followed by the name of the file and its extension. Do not enter app/customerapp/ after /ustore/. For example: StoreHeader.html. If you located the file in a sub-folder within the customerapp directory, add the sub-folder before the file name. If the file StoreHeader.html is located in: D:\xmpie\ustore\app\customerapp\MyFolder, enter the following path: /ustore/MyFolder/StoreHeader.html
For further explanations on how to use ASCX files, refer to the uStore SDK documentation.
6. In the Search Engine Optimization (SEO) section (Storefront groups only), select the required option for improving the volume and quality of traffic to your website from search engines. SEO definitions include three main meta tags: Title, Description and Keywords. The SEO configuration will take action at the Storefront in Product Group pages, and will appear the same as defined for the store setup.
– Use default values – select this option if you want to use the default SEO definitions. The default values are as follows:
Title: <Product Group Name> - <Store Name>
Description: <Product Group Description>. If no description is available, this field is empty.
Keywords: No keywords are defined by default.
– Use customized values – select this option if you want to set up customized values for SEO. Then, click the Customize link and in the SEO: Customize Meta Tags window enter the default values:
Title: Mandatory. <Product Group Name> - <Store Name>. You may modify the <Product Group Name> part of the title.
Description: Mandatory. The default value is < Product Group Description>. If no description is available, this field is left empty. You may enter a customized description (up to 300 characters).
Keywords: Optional. This field is empty by default. You may enter keywords, separated with comma. The Keywords field may contain up to 300 characters.
7. ![]() For uStore NG stores, assign
an image to each group. This image will be associated with the group name
in the Storefront's homepage.
For uStore NG stores, assign
an image to each group. This image will be associated with the group name
in the Storefront's homepage.
Group images are saved in uStore's shared folder.
If a group image is not defined, a placeholder image is used in its place in the Storefront.
8. Click Save.
The Product Group List page displays the updated
product group name.
You can now add sub-groups to the root group, delete a group and change the group list hierarchy using the Manage Group Options menu.
In uStore NG themes, the last root group (for example, the above images shows “Cards” ) that contains online products to which the store user has permissions to view will be shown as the “Featured” group in the store at the bottom of homepage.
Group management options include:
· Adding a sub-group. Note that the names of sub-groups of the same hierarchy must be unique.
· Deleting a root group or a sub-group.
· Moving a group up or down in the group tree by dragging and dropping.
To manage product groups:
1. Click
the small triangle  next to the
group you want to manage.
next to the
group you want to manage.
The Manage Group Options menu is displayed.

2. Select the required option.