Setting Up Static Documents
Static products require several files prepared in advance: a document file that will be used for printing, a proof file of the document for display, and product image thumbnails.

To set up a static document:
-
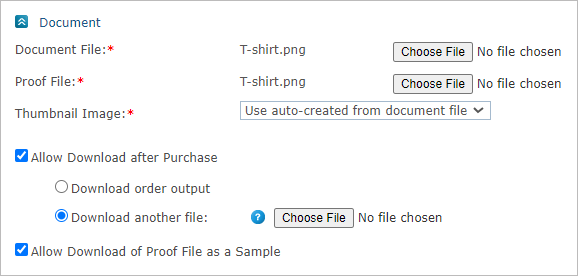
Open the product you wish to edit, and in the Product Setup page go to the Document section.
-
In the Document File field, click Choose File to specify the location of the document file.
If you are using this file for print production (it is sent to a prepress workflow or printed after downloading it from the Orders queues), it should be the print-ready version of this product (typically a PDF, but it doesn’t have to be).
If you are not using this file for production, it can be an image of the product (for example, a PNG of a T-shirt).
You can replace the document that has been defined for the product only if an ordering process of the product has not yet begun.
-
In the Proof File field, click Choose File to specify the location of the proof file.
This file can be made available to the customers, allowing them to review a reader-version of this document. Reviewing is especially useful when the customer needs to approve the document they are ordering.
-
In the Thumbnail Image area, select the thumbnails that will represent the product in the storefront. Use one of the following options:
-
Use auto-created from document file to automatically create thumbnails from the document file (supported only for PDF, JPG and PNG file types).
The first two PDF pages (or any number you’ll set) will be automatically converted to JPG thumbnails, instead of you having to upload them manually. The number of thumbnails which will be created is defined in the StaticProductPDFToThumbnails key of the Global Configurations table.
-
Upload Thumbnails to manually upload thumbnails (JPG, GIF or PNG) that have been previously created.
The default display name for uploaded thumbnails is "Page [page number]". If you want to rename the uploaded product images, select the Set the thumbnail displayed name manually checkbox above the table. Once selected, the Display Name column becomes a text box and you may edit it. For example, the first page of the document could be called Front Cover or Cover.

-
-
Select the Allow Download after Purchase checkbox if you wish to enable the customer to download output files, such as generated PDF files.
-
Download order output: Select this option to enable the shopper to purchase the production output files (rather than having the print provider print them).
-
Download another file: Select this option to enable the administrator to upload a file that will be available for download by the shopper. The output download is available in the Order Details page at the store after the purchase order has been submitted.
Note that the possibility to download an output of the product that has been placed offline or deleted may have an expiration period configured in the ProductDownloadExpirationDays property in Presets > System Setup > Global Configurations. uStore will start counting the expiration period when the product is placed offline or deleted. When the download period expires, the download icon will be disabled. When hovering over the icon, a tooltip will be displayed, with an explanation about the expiration of the download period. If the product is placed online again, the expiration will be turned off.
-
-
Select the Allow Download of Proof File as a Sample checkbox to enable the customer to download a low resolution version of a proof file.
