Assigning Permissions to the User Group
A user group is defined by a set of access permissions for its member users. uStore offers a list of permissions that can be allowed or denied for each user group. The permissions are defined in the Permissions tab of the User Groups Setup page.
Note: If you enable users to log in to your store using LDAP credentials, make sure that you assign the appropriate permissions to the LDAP groups that you create. To learn more about LDAP login, see LDAP Authentication.
To set up user group permissions:
-
On the menu bar, click Users and then select Groups.
The User Groups page is displayed.
-
Select the to which you want to assign permissions.
-
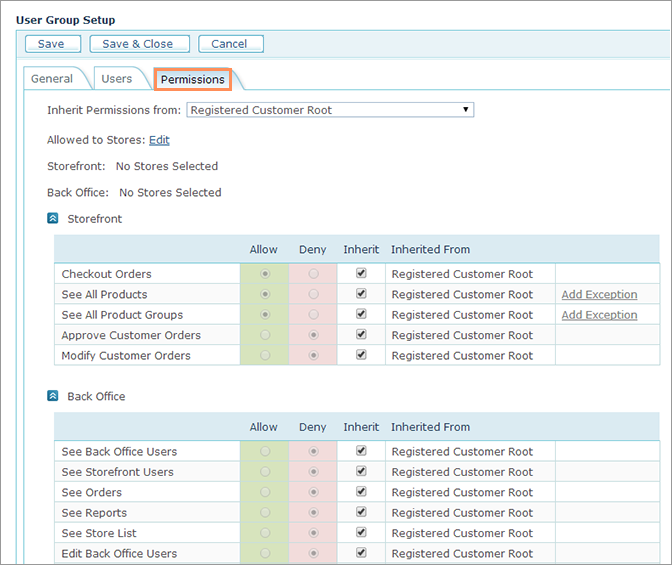
In the User Group Setup page, click the Permissions tab.
-
In the Inherit Permissions from list, select an existing user group from which the selected group will inherit permissions.
-
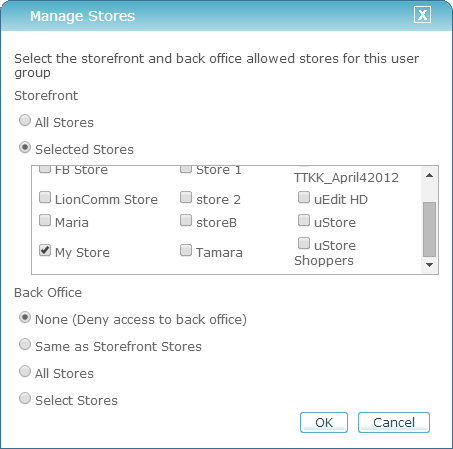
Click the Edit link next to the Allowed to stores field to set user group permissions for specific stores.
The Manage Stores window is displayed.
-
Select the permissions for storefront and backoffice stores for the user group:
-
Storefront
-
All Stores: Select this option to grant permission to all online stores.
-
Selected Stores: Select this option to grant permission for specific stores. When this option is selected, the list of available stores is displayed. Select the stores for which you want to grant access.
Note that you cannot deny permissions to a store for a user group that is selected as Approver for orders made in this store. For more information, see Setting Up an Order Approval Procedure for a Store.
-
-
Backoffice
-
None: Select this option if you want to block access to backoffice stores.
-
Same as Storefront Stores: Select this option if you want to grant the same permissions as for the storefront stores.
-
All Stores: Select this option if you want to grant access to all backoffice stores.
-
Select Stores: Select this option to grant permission to specific stores. When this option is selected, the list of available stores is displayed. Select the stores to which you want to grant access.
-
-
-
Click OK.
Store permission are updated in the User Group Setup page.
-
If you want to modify the inherited permissions, proceed to define permissions in the Permissions table.
The permissions are split into two sections: storefront and backoffice. The storefront permissions are store-related, whereas most of the backoffice permissions are general.
There are two kinds of permissions:
-
Individual: Refers to an individual item or action (for example, Checkout Orders, See Reports).
-
Gross: Refers to the totality of items or actions (for example, See All Order Actions, See All Order Queues, etc.). Gross permissions can contain exceptions.
-
-
For each item in the table, select one of the following options:
-
Allow: Grant the selected permission to the user group.
Note: Granting a permission applies to all related actions under that permission.
For example, selecting “See Store List” allows the user group to access the Stores page, preview store details, and modify store content. -
Deny: Deny the selected permission from the user group.
-
Inherit: If the user group inherits permissions from another user group, all the permissions will be marked as inherited from the parent user group, the Inherit checkbox will be selected and the Allow or Deny options will be selected and disabled. If you want to modify the inherited selections, clear the Inherit checkbox and select the Allow or Deny option.
-
Inherited From: Displays the name of the user group from which the permissions were inherited. This field is enabled only if the Inherit checkbox is selected.
-
Add Exception/Remove Exception: For gross permissions referring to a totality of settings, it is possible to define exceptions. For example, if the permission is "See All Products", you can define new permissions: "See All Products except products in Group 1".
Clear the Inherit checkbox and then click the Add Exception link to define exceptions for the gross permissions. A window is displayed showing the tree of stores and user groups assigned to them.
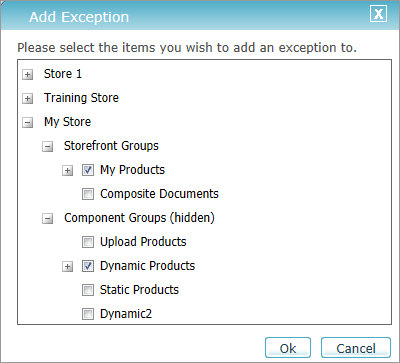
Browse the tree, select the items that will be defined as exception, and click OK.
The exceptions will be added under the main permission in the Permissions tab:

To remove the exception, click the Remove Exception link.
-
-
Click Save or Save & Close.