Printing a Document on uProduce
When working connected to uProduce, you can leverage the power of the uProduce production engine by printing your documents on uProduce.
To print a document on uProduce:
-
Open the document you wish to print.
-
From the Dynamic Content menu, select Generate VDP Output.
The Dynamic Print dialog is displayed. Settings in this dialog box vary according to the selected print output file format.If default print options have been set, they will be displayed in this dialog. You may change these values, and if needed revert to the default values using the Defaults button at the bottom of the dialog box.

Note that not all settings are supported by XLIM document production.
-
From the Data Source list, select the data source that includes the recipient information from which you wish to produce the print output file.
-
From the Table list, select the recipient table.
-
From the Format list, select the print output file format or proofset.
Notes:
-
The print format you choose here determines the available print options. Note also that for some print formats, the automatic production optimization is disabled.
-
The available print output formats vary according to the document format (InDesign or XLIM).
-
EPUB export setting are defined when exporting the document to the EPUB format.
-
-
If you want to compress the output file to a ZIP file, select the Compress Output (ZIP) checkbox. This is useful when expecting a production output of large files or when the output files are to be packed into a single file.
-
In the Records section, specify the records to be printed by choosing one of the following:
-
All: produce a Print Output file for all the records in the Data Source.
-
From, to: enter a range of records for which you will create a Print Output file.
-
-
In the uProduce area specify the following parameters:
-
Display Interactive Elements: For PDF and PDF/VT, if you wish to display the interactive elements in the document, select this option. Note that these elements will appear but will not be active.
-
Split into: If you wish to split the job into multiple batches, select this checkbox, and then select Batches or Records per batch. Then, enter the number of batches or the number of records per batch. The batch ID is added to the name of each Print Output batch file.
-
Accessibility Language: Select this option to specify to the screen reader in which language to read the PDF. You can either enter the language or select an ADOR whose value contains the language. This option is available for PDF and interactive PDF output formats, and is not supported in XLIM documents.
-
Resolution: If you select the JPG or PNG format, you can control the resolution. Choose one of the following options:
-
Low (72 DPI): useful for web productions.
-
High (300 DPI): useful for print productions.
-
Custom: enter the DPI value that suits your specific needs (for example, enter 144 to create large thumbnails).
-
The Auto option calculates the best online display resolution based on the InDesign document size.
-
-
Create a separate output file for each record: If you select the PDF or PDF/VT, select this checkbox to create a separate PDF file for each recipient. This is useful for electronic distribution of output files.
Notes:
-
For Interactive PDF, EPUB, JPG and PNG documents, separate files per record are automatically created and compressed to a ZIP file.
-
By default, uProduce production engine automatically splits the job between all the available uProduce instances to optimize the production speed. However, if you select this checkbox, the production optimization will be disabled for this job.
-
-
Generate Flat ADOR Data: Select this option to generate a CSV file that contains meta data of the output. Each row in the CSV relates to a single recipient, and includes information such as number of pages and ADORs.
You can select the delimiter (comma, tab, semicolon, etc.) of the file.
-
Trigger Completion Email: Select this option to trigger an email notification when the printing job finishes. The resulting email contains all the information about the job, the document, the database, the assets, everything including a UNC share path to the output files created.
-
Output File Name: In this section, select one of the following options:
-
Select Automatic to use the document name.
-
In the Custom field, enter the name you wish to use for the resulting Print Output file. If you wish, you can select the Append Job ID check box to append a job ID to the file name.
-
Select the content object option and choose the text content object according to which the file name will be automatically generated.
-
-
Job Priority: Set up the job priority. Priority controls the order of the job in the waiting queue. It may also be used to interrupt currently running jobs in favor of a rush-job.
Choose between four priority options:
-
Low: submit the job with a low priority. The job will be submitted to the lowest level of the waiting queue.
-
Normal: submit the job with a normal priority (the default option for Process jobs). The job will be placed among other normal jobs in the waiting queue (this is the default option).
-
High: submit the job with a high priority. The job will be placed at the top area of the waiting queue.
-
Immediately: submit a "Rush Job". The job will be processed immediately. If all production instances are busy, one of the currently running jobs will be paused in favor of processing the "Highest" job. If all instances are currently handling "Highest" jobs, the job will be placed at the top of the waiting queue until one of the instances becomes available.
-
-
Copy Output to Destination: Select this option if you wish to copy the print output file, and then select to which destination.
The available destinations are defined in the uProduce Settings view.
All output streams will be sent to the selected destination. -
Comments: In this field, you can add free text comments which will be included in uProduce's job center’s details area, and in the triggered email when the job completes. This can be useful to add job processing related information.
-
-
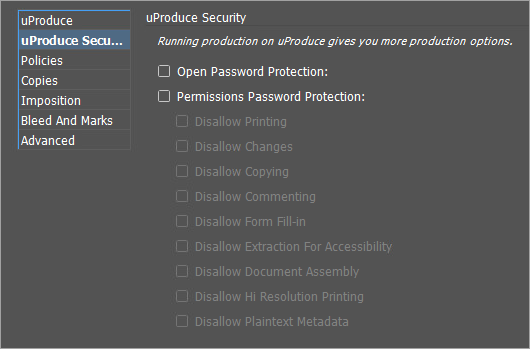
On the left, click the uProduce Security tab, and set the following options:
-
Open Password Protection: Select this checkbox to generate a password protected PDF/Interactive PDF.
Protecting the PDF with a password is possible only when producing single-record PDFs. Once selecting this option, choose which textual content object will be used as the password field.
The output is single PDFs, each protected by the password provided by the content object. When opening the PDF, a Password window opens requesting the reader to enter the password.
Note that if the password value of a specific recipient is empty, the document opens without requesting a password.
Notes:
-
The password is assigned to opening or reading the document only. It does not set any other password-protected options such as printing or editing.
-
This option is only available when the output is generated from uProduce.
-
-
Permission Password Protection: A permissions password (the primary password) requires a password to change permission settings. Using a permissions password, you can restrict printing, editing, and copying content in the PDF.
You can enter a value or select an ADOR which will be used as the password field.
This option is available for PDF and interactive PDF output formats and is not supported in XLIM documents.
-
-
Define print production properties.
-
Click OK to start printing.