Tagging a Design Object with a Table Content Object
The table content object consists of columns. The column types may be text, text file or graphic content objects. The recipient-specific values of these content objects are typically extracted from a secondary data source and not from the main data source. For example, the main data source may serve as the recipient list, while the secondary data source may provide additional information on each recipient, such as their monthly use of cellular phones.
The same table content object data may be displayed in your document in two different formats - tabular or graphic (chart), depending on the type of frame you are tagging - text or graphic:
-
To create dynamic tables, tag a text frame with a table content object.
-
To create dynamic charts, tag a graphic frame with a table content object. See Working with uChart.
Use a table content object to create a dynamic table
You can insert a table content object into your design in two different ways:
-
Create a new dynamic table, using a table content object.
-
Apply a table content object to an existing, static InDesign table.
In both cases, in addition to the content objects assigned to the dynamic table’s columns, you may assign other content objects and static design elements to the cells of the dynamic table.
To create a new dynamic table:
-
Click InDesign's Type Tool icon, and then draw a rectangular area in the document. Alternatively, place the cursor in an existing text frame in the document.
-
In the Dynamic Content panel, double-click the desired table content object.
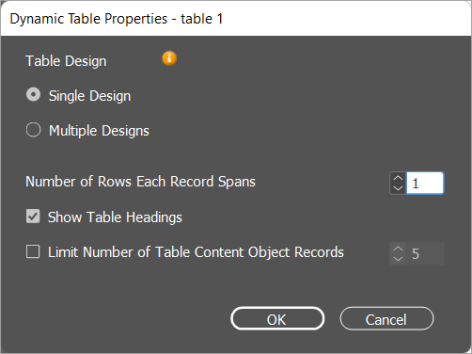
The Dynamic Table Properties dialog box opens.
-
Select one of the following options:
-
Single Design: Apply a single design to all table content object records.
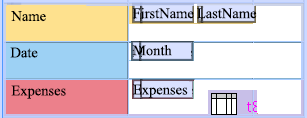
You can set how many rows each record spans. A single record may span a single or multiple rows. In the following example, each record spans 1 row:

However in this example, the record spans 3 rows, and the table has been designed to display the data accordingly. Each table content object record will receive this three-row design:
You may include the names of the table content object’s columns in this table’s header row. You can also specify the maximum number of records allowed per recipient in the Limit Number of Table Content Object Records field. Use this option when you wish to show only a few entries, out of all entries that may be displayed for a specific recipient.
-
Multiple Designs: Apply a different design to each table content object record.
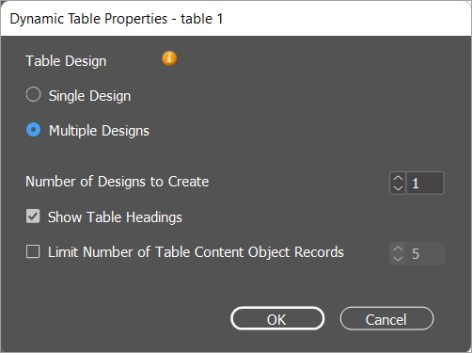
Define how many designs you wish to create. Each table row will represent an individual design (design 1, design 2, ...).
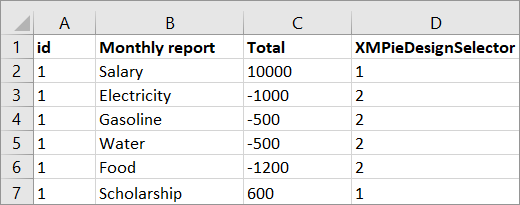
In the table content object data source, create an XMPieDesignSelector column, and assign each record the required design by entering the design number.
In the following example, two designs have been created (1- green for revenue, 2 - red for expenditures). In the data source, in the XMPieDesignSelector column, assign each row the required design based on the value of the Total column.

Notes:
-
You must set the Dynamic Content panel to None before starting to design
-
If the value 0 is placed in XMPieDesignSelector column, the record will not show.
-
You may assign several designs to each record by placing a comma separator between the numbers (e.g. 1,4). In such a case, the record will appear twice, one with design 1 and the second with design 4.
-
-
-
Click OK to close the Dynamic Table Properties dialog box.
A dynamic table is inserted into your document, with the selected table content object assigned to it.
-
Design the row(s) to your liking: You can add text, text file or graphic content objects, and static and dynamic design elements. You can split and merge cells (excluding those of the XMPieDesignSelector column), and apply a design to more than one row.
Note: You can apply copyfitting as well as suppress trailing spaces on empty content to table cells. Table copyfitting and suppress trailing spaces inherit their settings from the setting that was applied to the dynamic story, in which the table is placed.
More topics
Tagging a Design Object with a "Multi-Page PDF" Content Object
Watch a video
Watch part 1 and part 2 of the table with multiple row styles video