Working with Proof Sets
The uPlan application allows you to generate a proof set file based on the plan and database files. A proof set file includes a consistent set of values for each recipient, where this set includes actual values for each of the ADORs defined for the campaign. This allows you to check your plan and queries.
Later, you can open the proof set in a design application that supports uCreate Print and see how the document looks with values from the proof set. You can view these sample documents provided the proof set was generated on the same computer as the design application or the assets are located in a publicly accessible place. If the assets are not available, you can still generate the proof set, but will be unable to view these assets within the document.
If the generated proof set contains references to assets that are located on the same computer where you generated the proof set, and you want to use this proof set on a different computer, you will have to do one of the following:
-
Make sure the assets are available in the same location on the computer you are using, or
-
If you are using uCreate Print for InDesign, you can use the Set Assets Folder option. For further details, see the uCreate Print documentation.
During proof set generation, all QLingo expressions and SQL expressions are fully validated and executed; relevant execution errors and missing assets are reported at this time.
The process of generating a proof set consists of two steps:
-
Linking the plan to Data: This step is necessary if you did not use the Wizard to import your data source(s), or if your plan includes Graphic or Text Files ADORs.
-
Generating a proof: set In this case the actual values for each ADOR are calculated.
You can also generate different batches of proof sets, for cases where you need a proof set containing a specific number of records.
Link the Plan to Data
To create a proof set and validate your plan, you need to ensure that your plan is linked to a data source. If you used the Wizard to import your database schema into uPlan, the uPlan Wizard automatically links your plan to this database. In this case, you may wish to use this option to associate your plan with a different database.
When working with 2G technology, you need to link your plan to a data source downloaded from Circle.
Additionally, if your plan includes Graphic or
Text File ADORs, you will need to specify the asset source location in
which uPlan should search for these files. The assets specified in your
plan file may not necessarily include a file extension or data path. In
these cases, uPlan searches for the assets according to a unique search
algorithm. Using this algorithm, uPlan will populate the ADORs with the
actual values, creating a proof set that can be later used for both Web
and print documents. For each asset, uPlan will search for the file type
most applicable to each media (Web, print).
For more information, refer to the uProduce documentation.
To link the plan to data:
-
Open the plan file in uPlan.
-
From the Data menu, select the Link to Sample Data option.
The Link to Data dialog displays a list of the data sources used in your plan. The first data source in the list, listed as schema, represents the recipient information data source.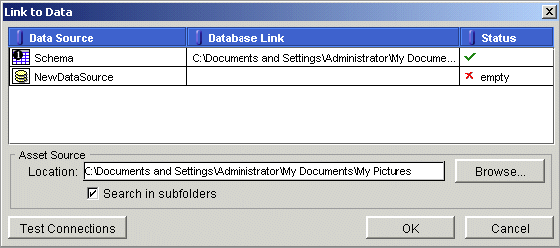
-
Click the Database Link field of the database link that is missing or broken, and then click the […] button to open the secondary Link to Data dialog.
-
Select the Database type and then click the Browse button to browse for the file. Alternatively, enter the directory path to the location that includes the database file required for your campaign. In case of remote databases (MS SQL Server and Oracle) enter the connection parameters.
When working with 2G technology, first download the data source from Circle and then browse for this file to link the plan to it.
-
Repeat the last two steps for all database links that are missing or broken.
-
When you link to a remote database (for example, Oracle and SQL Server), click the Test Connection button to check the connection to the specified database. A message is displayed advising you of the current status for this connection.
-
In the Assets Source Location field, enter the path to the location of the sample files, or click the Browse button to choose the location of these files. During proof set generation, uPlan will search for the assets in this location. You can also specify that uPlan should search for the assets within sub folders.
-
Click OK to save your settings. You can edit the settings at any time to create a new proof set, based on new settings.
Generate a Proof Set
You can generate a proof set once your plan is linked to a database. You can choose a filter and range that determine the number of recipients and records used to generate the proof set. You can also specify that you wish to generate proof set batches, where each proof set contains a specific amount of records.
By default, the uPlan Wizard will create a filter that includes all recipients in your data sources; this is the first filter listed in uPlan.
The proof set is generated using all data sources that are linked to your plan. If you have data sources that are not linked, you will be prompted to link them at this time.
To generate a proof set:
-
From the Data menu, select the Generate Proof Set option.
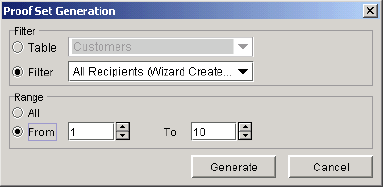
The Proof Set Generation dialog is displayed.
-
Make any necessary modifications.
Option
Description
Table
Choose a table from the drop-down list. Values for the ADORs associated with the recipients in this table will be used to generate the proof set.
Filter
Choose a recipient filter from the drop-down list. Values for the ADORs associated with the recipients in this filter will be used to generate the proof set.
Range
Under Range, select All to create a proof set for all records. Or, enter a range in the From and To fields
-
Click Generate to create the proof set. You will be prompted to assign a name to the proof set.
-
Enter a name for the proof file and click Save. A progress bar displays the current status of your proof set generation.
Your plan and queries will be validated during generation.
-
You can view the proof set at the end of the process by clicking the Double click to view link from the Output pane.
The Proof Set Viewer opens to display the generated data.
-
Click File > Exit to close the proof set viewer.
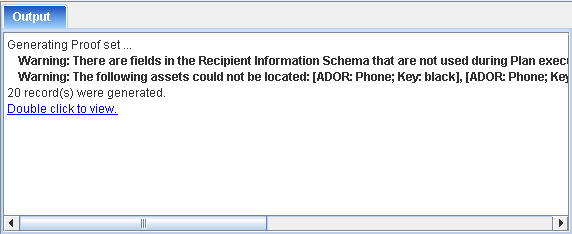
The Output pane includes any warnings that might affect a proper proof set production.