Working with an Email Activity
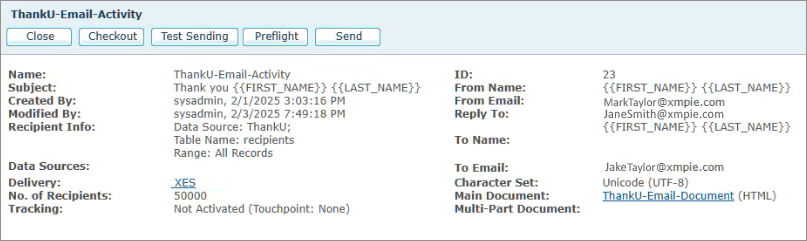
To work with an email activity, go to the Campaign tree, click Email to display the Email Activities page and then click the email activity of interest. The Email Activity Details page is displayed, showing information on the selected email activity:
Here you can:
Edit an email activity
The Edit Email Activity page allows you to edit an email activity.
To edit an email activity:
-
Click Email to display the Email Activities page.
-
Click an email activity on the list to display its details.
-
Click Checkout to take the email activity offline and then click Checkin to edit it.

-
Edit the required field values. Click Save to save your settings and check in the email activity.
Test an email activity
Before sending out an email batch, it is recommended to test it to avoid production errors and unnecessary expenses.
uProduce offers several ways of testing emails:
-
Test Sending: Sends a sample set of emails to the tester’s email address so the tester can view the resulting email in various email viewers (for example, Outlook or mobile phone email Viewer).
-
Preflight: Simulates the email production and reports errors without actually sending any emails.
-
Sending an Email Message: Sending emails is only performed if the number of errors detected during the Preflight Validation does not exceed the defined error threshold.
Test sending
The purpose of test sending is to view the email in different email viewers and to verify that it is displayed correctly and works as expected. You can test an email activity by sending a range of emails to a single email address using the Test Email Activity. Typically, this would be a dedicated mailbox set up for this purpose.
Note that test emails are not tracked.
To test an email activity:
-
Click Email to display the Email Activities page.
-
Select an email activity from the list to display its details.
-
Click Test Sending.
-
In the Email field, enter the email address to which you want to send the test email. Separate multiple email addresses with semicolons (;).
-
In the Range section, select whether to send the email batch to all the recipients or a specific range of recipients.
You can send a maximum of 50 email messages per test.
-
Click Send to send the emails. Email test results are displayed in the lower pane of the Email Activity Details page.
-
Check the Show Tests checkbox to display the Test Sending job status in order to verify that there are no errors. If errors are found, fix them and repeat the Test Sending procedure again.
Preflight email messages
Preflight refers to the process of testing the email production procedure prior to sending. This simulates the sending procedure and validates various aspects of the process. The following are the most important validations performed by preflight:
-
Validity of email addresses
-
For those delivery providers that require a mandatory subject, the Preflight checks if the Subject field is not empty.
-
If the Email message body is a URL, the Preflight verifies that the URL page can be retrieved.
-
If the email is Commercial, the Preflight validates that the message body contains the ADOR objects required by the US CAN-SPAM Act or analogous regulations.
Preflight is an important step because it prevents production delays caused by email being sent to only part of the recipients in the recipient list. Once the email documents have passed the preflight check, they are ready to be put into production.
During the preflight process, uProduce runs through most of the production steps as if it were sending the emails. The emails however are not sent, and will not reach the recipients. This process causes most errors and warnings that could occur during production to surface at the preflight phase, giving you a chance to resolve them before production starts. The preflight check is done through the Email Activity page.
To preflight the email documents:
-
Before sending an email, go to Campaign > Email and click the email activity on the list to display its summary page.
-
In the Email Activity page, click the Preflight button.
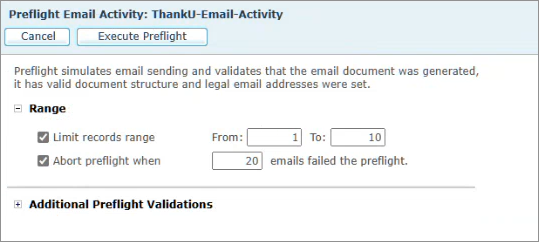
The Preflight Email Activity page is displayed.
-
Specify the preflight options.
Option
Description
Limit Records Range
Select the checkbox if you wish to perform preflight for all recipients selected in the Recipients field of the email activity.
If you wish to perform preflight for a specific range of email recipients, specify the start and end number. For example, if there are 100 recipients and you want to perform preflight for the first 10%, specify from 1 to 10.
Abort Preflight When
If you wish to specify the preflight threshold, select this option and enter the number of failed emails beyond which the preflight will stop.
Additional Preflight Validations
Specify if you wish to validate the email message body.
HTML Validation
Check this option if you wish to validate the HTML message body.
Report
Select if you wish to report Errors only or Errors and Warnings.
-
Click Execute Preflight.
The preflight process starts to run.
-
Check the Show Tests checkbox to display the preflight job status in order to verify that there are no errors. If errors are found, fix them and repeat the preflight sending procedure again.
Note: For customers with the Usage Model, the system charges a Production Unit (PU) for each preflight email. For example, if you purchased 10,000 PUs and preflighted 3,000 emails, you are left with 7,000 PUs even though you did not really send an email.
Send an email message
The Send Email Activity page enables you to send an email with or without the preflight validation to all recipients in the recipients list or to a specified range. It also enables you to activate email tracking, just before you send an email blast (that is, a batch of emails sent in a single send operation). In addition, you can split the email send task into several batches to divide the task between several uProduce servers.
To send an email activity to recipients:
-
Click Email to display the Email Activities page.
-
Click an email activity on the list to display its details.
-
Click Send. The Send Email Activity page is displayed.

-
In the Range section, select the Limit records range checkbox if you wish to send to all recipients selected in the Recipients field of the email activity.
If you wish to send to a specific range of email recipients, specify the start and end number.
-
If you wish to split the job into several batches, select the Split to multiple jobs checkbox and then enter the number of batches. When working with uProduce MI system (license and delivery provider), this checkbox is selected and the default number of batches is predefined by the system.
-
If you wish to perform preflight before the send, in Preflight Validation before Send, select the Execute Preflight before Send checkbox and specify a threshold of errors detected during preflight beyond which the send operation will not start. The threshold can specified either as a percentage or as a number:
-
To specify a percentage threshold, select Don’t Send if...% percent of recipient emails failed the Preflight.
-
To specify a number threshold, select Don’t Send if... Recipients emails failed the Preflight.
-
-
In Additional Validations, select the HTML Validation checkbox if you wish to validate the email message body and in the Report field select if you wish to report errors only or errors and warnings.
-
Click Send to start the sending procedure. Email results are displayed in the lower pane of the Email Activity Details page.

Note: Test and preflight jobs are also displayed if the Show Tests checkbox is selected.
|
Option |
Description |
|
Information Icon
|
If there is any special information concerning this job, one of the following icons is displayed:
|
|
Job ID |
The unique identifier of this job in the uProduce system |
|
Status |
The job’s production status - Waiting, In Progress
etc. |
|
Processed |
Number of Recipients processed during the operation. |
|
Sent |
Number of emails that were sent successfully. For Preflight, the “---” sign will always appear in this field since there is no Send operation involved. |
|
Failed |
Number of failed emails. |
|
Type |
The type of this email production job, which may be one of the following:
|
|
Started |
The date and time on which this job’s production has started. |