Advanced Production Options
Set advanced print parameters to determine the specific variant of your print output format, to suit the workflow and the specific print controller you are using.
Note: The available options vary, depending on the chosen print output format.
|
Option |
Description |
|---|---|
|
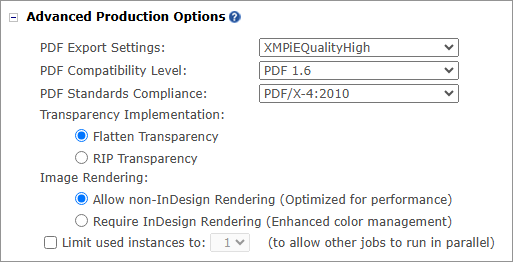
PDF Export Settings |
Choose the job options file for producing this PDF. All job options files installed on the uProduce server are available for selection. For information on managing and using job options, see Work with PDF Job Options. |
|
PDF Compatibility Level PDF Standards Compliance |
These are advanced parameters. If you are unfamiliar with them, please leave the default values, or go online for further reading. |
|
Transparency Implementation |
Define how transparency is implemented in the output, by choosing one of the following options:
|
|
Image Rendering |
Choose the method of rendering images in the XMPie print output:
|
|
Limit used instances to (to allow other jobs to run in parallel) |
By default, uProduce production engine automatically splits the job between all the available uProduce instances to optimize the production speed. It is possible to limit a job to use only a specific number of instances, so that another job can also be run at the same time on the idle instances. The production optimization is not available in the following cases:
|
|
Use uProduce Global Caching |
For PPML, VPS, Postscript, VIPP and PDF output formats, you can optimize the production speed by enabling the Use uProduce Global Caching option. This option caches the graphic descriptions of reusable elements in the process of producing print output files. For more information, see Working with uProduce Global Caching. |
|
Embed |
Specify which of the following elements should be embedded in the print output file. Note that the available options depend on your image rendering setting. |
|
Complete Fonts |
Choose whether to embed fonts or not:
This option controls the embedding of all fonts except for Chinese, Japanese and Korean (CJK) fonts. If the document uses CJK fonts, they are always embedded as subsets, regardless of this setting. |
|
Assets Resources |
Choose whether to embed assets and /or Resources in the print output file. When the check box is unselected, the print output file includes references to external asset /Resource files resulting in a “thinner” VPS, VIPP, or PPML file. If your printer’s RIP (Raster Image Processor) supports external assets/Resources, you may choose the Do Not Embed options. Note that when Require InDesign Rendering (Better color management) is selected, assets and resources are always embedded (so these check boxes are disabled). |
|
Supplied Resources in PPML Stream |
Choose whether to embed PPML Resources in the PPML print output file:
|
|
Use RIP Global Caching |
For PPML/PS 2.1, PPML PS/1.5, VPS, PDF, PDF/VT-1 and PDF/VT-3 print output formats, you can select the Use Global Caching option to create the print stream in a way that enables the RIP to make use of cached elements from previous runs. The cached elements are shared between runs of the same document (with possible differences of the target data set). For more information, see RIP Global Caching. |
|
Project Name |
Name the project to be generated in the VIPP print output format. This name enables the RIP to locate referenced images of the VIPP file that reside in the corresponding project folder. Choose Automatic to use an automatically-generated name, or choose the text field and enter the name you wish to use. |
|
Extract reusable content to external files |
Create external files that hold the document’s reusable elements, which are referenced by the VIPP, PPML and VPS print output file, to optimize the document’s processing by certain print controllers. This option is useful for troubleshooting errors in the PPML file. |
|
Extract unique content to external files |
Create external files that hold the document’s unique elements, which are referenced by the VIPP and PPML print output files, to optimize the document’s processing by certain print controllers. This option is useful for troubleshooting errors in the PPML file. |
|
Tag each record as a document group |
If your RIP supports document groups, determine the way to mark a document set (in PPML version 2.1) or a job (in PPML version 1.5) in the PPML file.
|
|
Tag fixed background as a master page |
This option applies only to Xeikon RIPs. It allows you to mark a background that is used for all records in a way that enables the RIP to process the print output file more efficiently. If the document contains one or more Spread Visibility rules, no tagging as master page is performed, even if this option is checked. |
|
Add metadata to each record |
Add recipient information values of any content object (except for tables) as metadata. These metadata are stored in the PDF/VT Metadata node of each recipient. |
Work with PDF job options
When processing a print output file, where the print format is either PDF, Legacy PDF (deprecated), PDF/VT-1 or PDF/VT-3, you can control its PDF generation settings. These settings include choices of image compression parameters, fonts handling and output intent color profiles.
These settings are controlled by choosing an Adobe Job options file. Job options files contain PDF generation settings and are normally created and edited in either Adobe InDesign or Adobe Distiller.
Use job options
uProduce uses PDF job options to print and proof PDF, PDF/VT-1 and PDF/VT-3 documents. uProduce provides two default job options files:
-
XMPieQuailityHigh: high quality, default for creating print output through the Process page.
-
XMPieQuailityProof: proof quality, default for creating proofs through the Proof page.
For process jobs, you can replace the default
job options file with other files.
This is done by going to the Process page’s
Advanced section and changing the selection
in the PDF Export Settings list.
For proof jobs, you cannot replace the default job options file. However, you can edit its settings, as explained in the following section.
Modify or add new job options
You may wish to set different selections for
the PDF generation settings.
For example, you may wish to select a specific color profile for the output
intent. To do this, either modify the existing job options files, or add
a new job options file (for Process jobs only). This is done by changing
the contents of the uProduce job options folder.
Job options files are placed in the following uProduce folder:
<XMPie Installation Drive>:\XMPie\XMPieData\Shared\Settings\JobOptions
You can modify existing job options files, to change the way these files create PDF print files. For example, to change the PDF generation settings of a Proof job, edit the XMPieProofQuaility file.
You can also add new job options for Process jobs. The new files you place in the JobOptions folder are added to the Process page’s PDF Export Settings list.
Note: When adding new job options, make sure that no InDesign instances are running.
Work with job options on extension servers
If you are working in a PersonalEffect Cluster configuration, the uProduce Director that manages the Cluster synchronizes its JobOptions folder with those of all Extension Servers. There is no need to manually update the JobOptions folders on the Extension Servers.
While job options are handled automatically, you are required to handle color profiles manually. A job options file allows you to choose a color profile that serves as the output intent for PDF output. Color profiles are NOT synchronized by the uProduce Director on all Extension Servers. Therefore, if you use a non- system-default color profile, you must install it on all Extension Servers.
Restrictions on job option selections
The XMPie production process requires certain hard-coded settings, which override the settings in the job options file. You should be aware of these restrictions when you modify job options or add new ones. These overridden settings depend on the type of file you are processing, with some uProduce internal considerations:
-
Single-Record PDF: when generating a separate PDF for each recipient (that is, when going to the Process page’s Production section, setting Print Format to PDF and enabling Separate file for each record), there are no restrictions.
-
PDF: when generating batch PDF print output for more than five records, the production process creates a PDF file. In this case, the Adobe InDesign job options are applied to the file, with the following exceptions:
-
Optimize for fast web view: set to off.
-
Acrobat Compatibility Level and Standard are ignored.
-
Marks and Bleeds: all settings are ignored.
-
-
Others: when generating batch PDF print output for five or less, the production creates a PDF directly with InDesign. In this case, the following settings are ignored:
-
Optimize for fast web view: set to off.
-
Marks and Bleeds: all settings are ignored.
-
Note that in certain cases a PDF will be generated, for example when using Imposition.
-
-
PDF/VT-1 and PDF/VT-3 Print Format
-
Optimize for fast web view: set to off.
-
Acrobat Compatibility Level and Standard are ignored, as PDF/VT-1 and PDF/VT-3 require specific settings.
-
Marks and Bleeds: all settings are ignored.
-
-
Legacy PDF (deprecated): when generating batch PDF print output for more than five records, the production process creates a PostScript file, which is later transformed into a PDF file through a mechanism called "Distilling". In this case, any job options apply to Adobe InDesign, but not to Adobe Distiller, are ignored. Note that any settings that are implemented in PDF, but not in Postscript, are ignored as well.