· Click the Orders view, and in the Order
List page click the link of the required item in the Item
ID column.
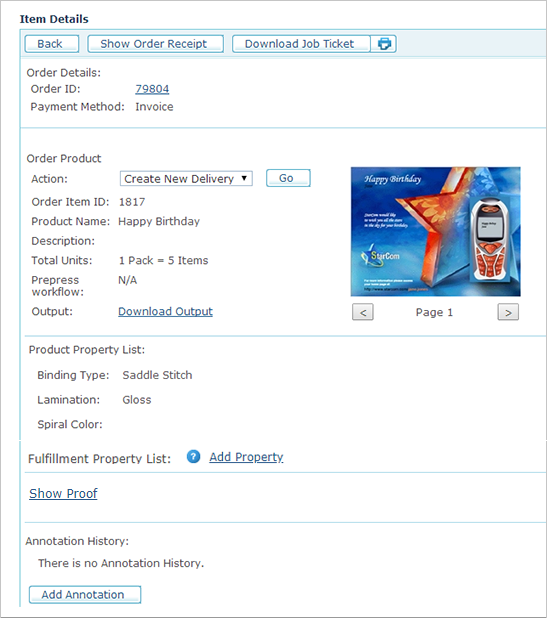
The Item Details page
opens, providing a detailed report of an ordered item.
You can also access the item details from the Order Details page,
which lists all items included in the order.

This page displays the following order information:
· Order ID: The unique identifier of the order in which this item is included. You can instantly find a specific order by searching for its exact Order ID.
· Payment Method: Indicates the payment method chosen by the customer: Invoice or Credit Card.
· In Queue: The queue in which the item is currently located.
· Action: Enables you to change the order queue.
Actions that require a recipient list (such as Process or Aggregate) cannot be carried out if the recipient list had been deleted as a result of automatic deletion (e.g. GDPR).
· Order Item ID: Each Order ID may contain multiple items (i.e. ordered products). Therefore, each instance of the ordered product receives a unique identifier.
· Product Name: Name of the product.
· Description: Detailed description of the product.
· Total Units: Number of ordered units. "Units" can refer to single units or packs.
· Prepress workflow (not for email products): Displays the prepress workflow setup selected for the ordered item as follows:
– [WorkflowName]: The name of a prepress workflow appears when a prepress workflow was defined for the item.
– Not selected: When prepress workflow was set up for the item, but a default workflow was not selected.
– N/A: When the prepress workflow was not set up for the item.
When you open this page from the Ready for Prepress queue, the Select Workflow link is displayed enabling you to select a new prepress workflow or change the default selection.
· Manufacturer: The manufacturer of this item.
· Output: Click to download the output (PDF) file from uProduce.
· Product Property List: Displays the product properties that were defined for the ordered product and their values (i.e. customer selections).

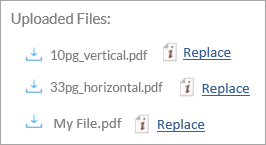
· Uploaded Files (Composite products only): Lists all Upload documents of the composite product.
You can perform the following:
– Download the file which was selected in the Storefront in its original format.
– View preflight results for each document.
– Replace each of the files. The new file must have the same number of pages and orientation of the original file. After replacing a file, you can generate a new proof for the composite product with the replaced file.

This section is available only when the item is in the Orders Waiting for Fulfillment, Orders Pending and Ready to Produce queues.
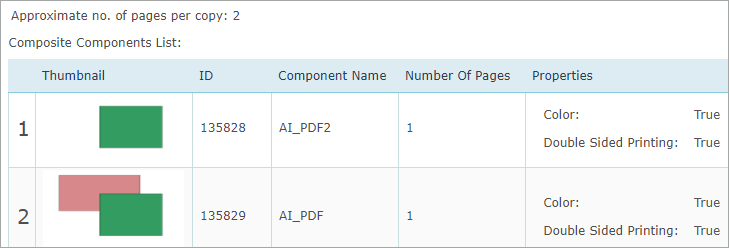
· Composite Components List (Composite products only): Displays a list of all the components of the Composite Product and its properties. In addition, the approximate number of pages per copy appears. Blank pages are included in the count.

Note that this is only an approximated number since you may have set different recipients to receive different pages, causing a different page count.
When you view this page in the Ready for Prepress queue, you can click the Prepress Workflow link to select a new prepress workflow or change the selected workflow.
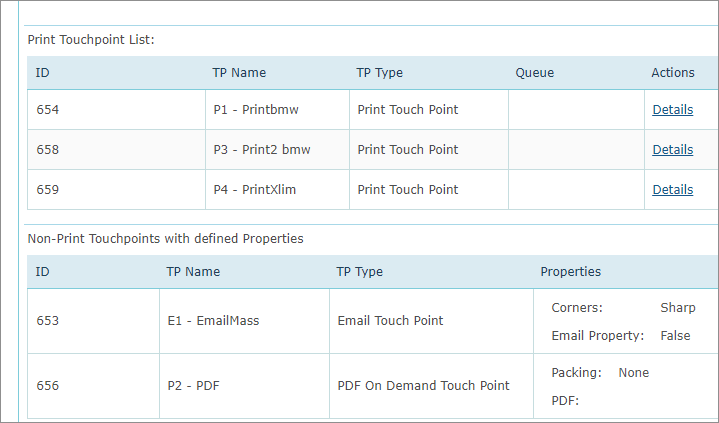
· Touchpoint Lists (XM Campaign products only):

– Print Touchpoint List: Displays the IDs of the print touchpoints (which are different from that of the XM Campaign product), the touchpoint names, and a link to the print touchpoints' uStore item details.
Since production of the print touchpoint is in Circle and not in uStore, if the Circle administrator has not yet processed the touchpoint, the print item will not appear in any uStore queue (hence the Queue cell is empty). When production of the print touchpoint is completed in Circle, the print item will land in the relevant queue in uStore: "Ready for prepress", "Ready for delivery" or "Failed", in case of failure. The Queue cell will then be populated with the queue name.
– Non-Print Touchpoints with defined properties: Lists non-print touchpoints that have properties assigned to them.
· Proofing List (Dynamic and Composite products): Provides information about the Product Proof (Proof time, Job ID and Proof status. Clicking the Show Proof link displays the document image in a separate window.

· Fulfillment Property List: You can add ad-hoc production information for the ordered item, on top of the information provided via product properties. This information will be presented in the job ticket of the order item, and will be available for reporting. The fulfillment property is set in Global Product properties.
· Add Annotation: You can add an annotation to the any order, product or product queue transition. uStore saves a history of all annotations, allowing you to keep track of this information.
uStore also enables you to take advantage of the annotation capability to obtain valuable information on noteworthy product queue transitions. For example, this may include the transition from the Pending queue to Cancelled queue. You can do this by defining such annotations as mandatory for performing the queue transition. These mandatory queue transition annotations are defined in the Order Handling Action Table, which is included in the Presets view’s System Setup tool. See System Setup: Customizing uStore Tables.
· Show Order Receipt: View the customer’s receipt by clicking Show Order Receipt button at the top of the page.
· Download Job Ticket:
Download the Order Job Ticket as a Word document. This document contains
a General Comments field where
you can add your comments.
To customize the Job Ticket template, go to Presets
> System Setup > Message Template and edit the Create Printed Job ticket on new Order Creation
template (see Setting
Up the Message Template Table).
· Print: Print the Order’s Job Ticket in order to attach it to the Order. To customize the Job Ticket template, go to Presets > System Setup > Message Template and edit the Create Printed Job ticket on new Order Creation template (Setting Up the Message Template Table).
The information in the downloaded or printed Job Ticket document represents the Job status at the time of download/print operation. For example, the Order Status may change during the job processing.
· Recipient List: This section appears only if the Storefront user has uploaded a recipient list during the ordering process. You have the option to download this list, replace it, or return to the original list, in case you had replaced it.
In case the recipient list had been deleted as a result of automatic deletion, you cannot download it or return to the original. You can only upload a new recipient list. In such as case, the date of the upload is considered as the creation date of this recipient list.