
 View what's in this topic
Creating an Authorize.Net Clearing Model
Authorize.Net has two types of accounts that can be used as a clearing method in uStore: a merchant account (real and/or live) and a sandbox account (developer/testing).
It is recommended that you use a sandbox account for testing until you are ready to switch to the merchant account to process live transactions.
Your merchant account will need to include the payment gateway option to connect to the Authorize.Net platform. For more information, see http://authorize.net.
Notes:
-
Authorize.net does not support any top-level domain name with more than 6 characters. The top-level domain names are the characters that follow the last period in the domain name.
For example: https://training.xmpie.sandbox will not work because "sandbox" is more than 6 characters. However, https://training.xmpie.store will work as "store" is less than 6 characters.
This is also true for shorter domain names, that do not contain a subdomain name – https://xmpie.sandbox will not be allowed but https://xmpie.store will.
-
The "Authorize and Hold for Review" option is not supported by uStore.
-
Authorize.Net does not work correctly if the store does not have a Friendly URL.
-
An Authroize.Net account can be used for a single uStore system only. If you have more than one system, you should obtain separate Authorize.Net accounts, one per system.
Set up a Sandbox account on Authorize.Net
Notes:
-
These instructions were written in July 2020. We will do our best to keep them up-to-date. Should you have questions, please contact XMPie Support for help.
-
Authorize.net does not support any domains with more than 6 characters after the "."
For example, https//:xmpie.training will not work.
The sandbox functions like Authorize.Net's production environment. However, no actual card processing is performed. The sandbox only simulates connections to the card networks, but no actual card payments are processed.
Sign up for a sandbox account to test the service and the processing of test orders through uStore.
To create a sandbox account:
-
Go to https://developer.authorize.net/hello_world/sandbox.html.
-
Fill out the initial form with your details.
The following screen will then be displayed:
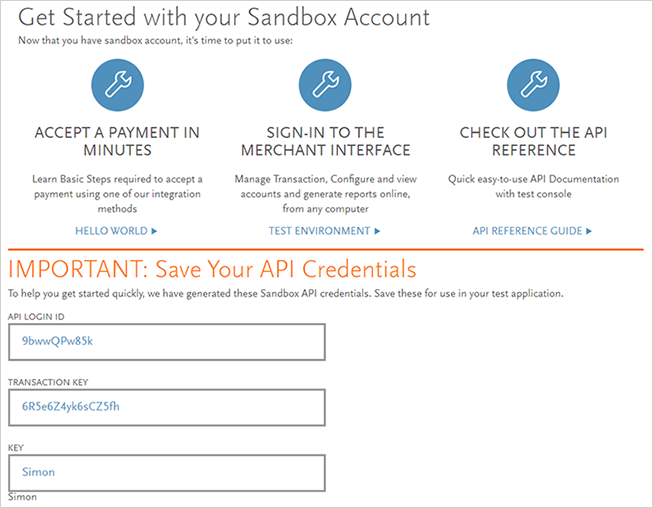
Note that "Simon" is not a signature key. You will need to generate one at a later stage.
You will also receive an email. Use the link in the email to log into the sandbox interface, if you have not done so already.
-
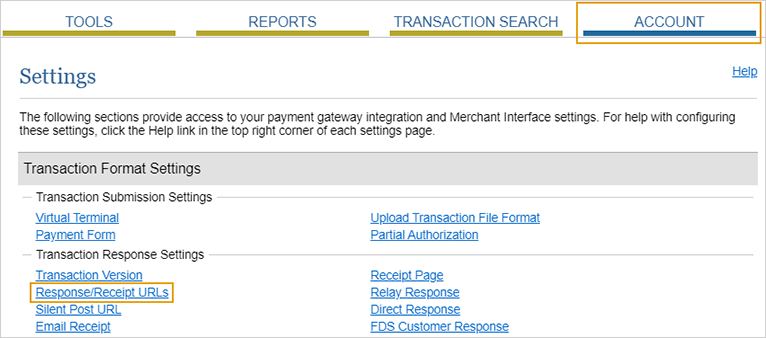
Click the Account tab, and then select Response/Receipt URLs.
-
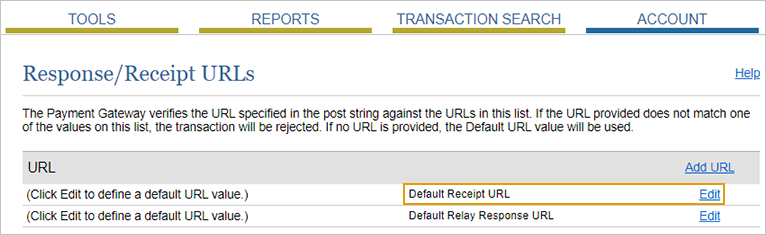
In the Response/ Receipt URLs page, click Edit to define the URL value for the Default Receipt URL.
-
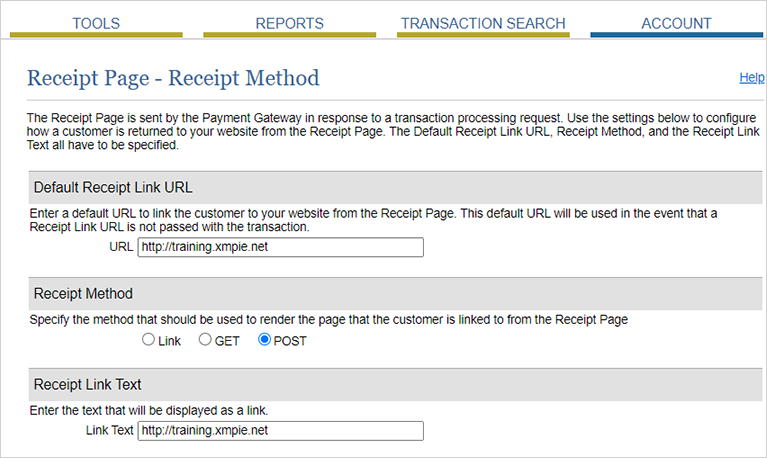
In the following screen, fill in the general URL used for your stores, and change the method to Post.
You can use different text for the link text, if desired. Be sure to use HTTPS:// if you are using an SSL with your store(s).
-
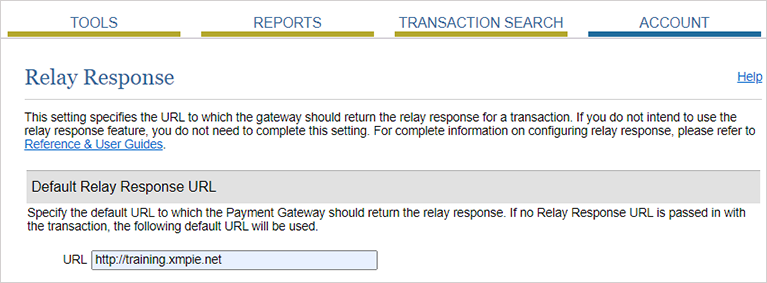
Click the Account tab and navigate again to the Response/Receipt URLs page to define the Relay Response URL.
If you have more than one domain name (i.e. multiple stores with different domain/subdomain names), navigate again to the Response/Receipt URLs page, and click the Add URL link.
If you are using HTTPS:// you should add those as the primary (first two) addresses.
You do not need to add the folder names for friendly URLs, only the domain names.
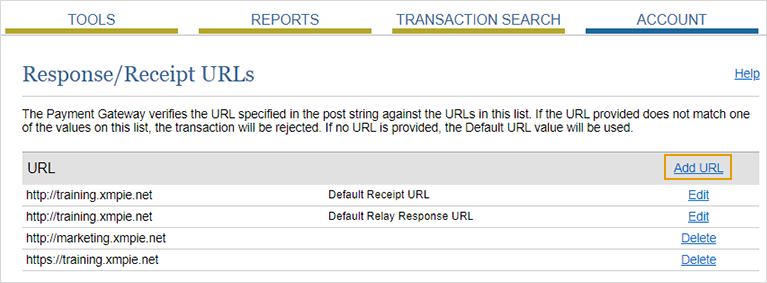
This image shows https:// as an added URL. It has been added so later when SSL is added, it will be ready for testing.
-
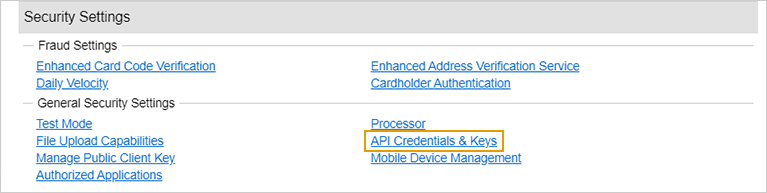
Click the Account tab, and then select API Credentials & Keys.
-
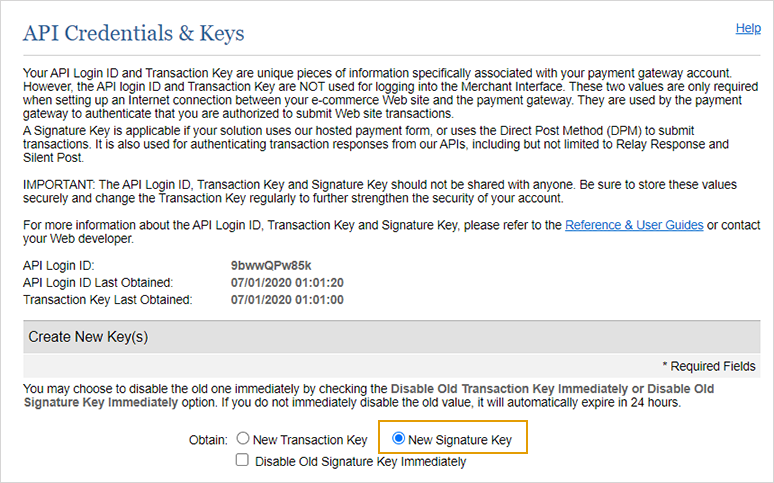
In the API Credentials & Keys screen, select New Signature Key.
You may disable the old key.
-
You will now be prompted to verify your identity. A PIN will be sent to your email. While the pin email is immediate, you only have 30 minutes to complete this step.
-
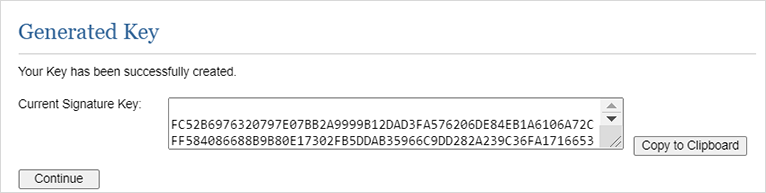
You have now been given a new key to use. Copy it to the clipboard.
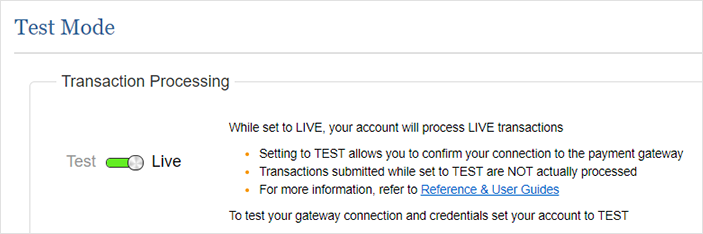
Your sandbox account is now in live mode. You can see this if you go to the Account tab > Security Settings >TestMode.
Configure Authorize.Net payment in uStore
-
In the left panel click Global Settings, and then select Clearing Model Setup.
The Clearing Model list opens.
-
Click New to create a new clearing method (or edit an existing one).
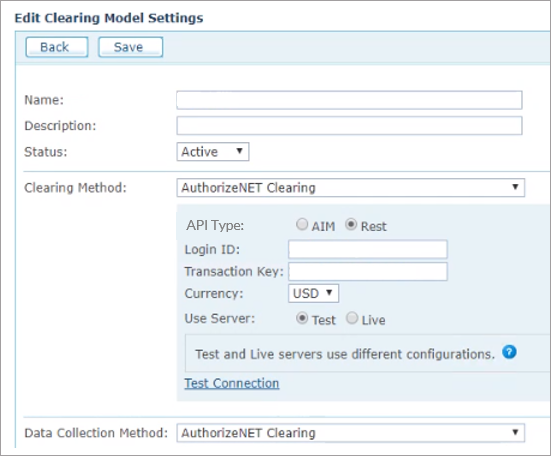
The Edit Clearing Model Settings page is displayed. The fields displayed in this page vary according to the selected clearing method.
-
Fill in all fields, as described in the table below.
Field
Description
Name
Enter a label that will be displayed to the store users in their shopping cart. For example: Credit Card (Authorized.Net)
Description
(Optional) Enter a description that is displayed in the backoffice when setting up a store’s clearing method.
Status
Select Active to make the clearing model available for the stores. Inactivate the setting to hide this model.
Clearing Method
Select Authorize.Net Clearing. You will be prompted to fill in information which is exclusive to Authorize.Net clearing configuration.
API Type
The Rest API type is selected by default.
The AIM (deprecated) API type is no longer supported. If an existing clearing model still uses it, switch that model to Rest.
Note: Once a clearing model has been saved with Rest selected, the AIM option is disabled for that model and you cannot switch back.
The Signature Key and the relay response fields apply to AIM only. They are not displayed when Rest is selected.
Login ID
API Login ID to the Authorize.Net account.
This information is available from the Authorize.Net interface: select Account > API Credentials & Keys (under Security Settings > General Security Settings).
Transaction Key
Transaction key created for your Authorize.Net account.
This information was available at the setup of your account. If needed, create a new key on the Authorize.Net interface. Go to Account > API Credentials & Keys (under Security Settings > General Security Settings), then use the Create New Key section.
Note that if you are using this key on other systems, you will need to be reconfigured those systems. The old key will work for 24 hours, if you do not disable it immediately.
Signature key
(AIM only)Signature key created for your Authorize.Net account.
If needed, create a new key on the Authorize.Net interface. Go to Account > API Credentials & Keys (under Security Settings > General Security Settings), then use the Create New Key section.
Note that if you are using this key on other systems, you will need to be reconfigured those systems. The old key will work for 24 hours, if you do not disable it immediately.
Currency
The Authorize.Net clearing model supports payments in US Dollars only.
The primary currency (defined in Store setup > Appearance > Localization) of the store using this clearing method must be set to US Dollar, otherwise the payment will not be processed. (see Defining Localization Settings)
Use Server
Select Live to use the Authorize.Net merchant account’s Payment Gateway. (This account will be "Live" in the Authorize.Net account settings, under Test Mode.)
Select Test to use the Authorize.Net sandbox account’s payment gateway. (This account will be "Live" in the Authorize.Net account settings, under Test Mode.)
Relay response from uStore
(AIM only)If selected, the credit card receipt page will be displayed based on the Relay Page HTML setting. This page will be displayed to the customer for the number of seconds defined in the Auto redirect setting, after which the customer will be redirected automatically back to the store.
At any stage, if you want to design your own receipt page, leave Relay response from uStore selected and modify the Relay Page HTML with your own code. In addition, change the number of seconds before the redirect, if desired.
If the checkbox is cleared, the credit card receipt page will be displayed based on your Authorize.Net account settings (Transaction Format Settings > Transaction Response Settings > Receipt Page), and it will not redirect from this page automatically. This page will display a button/link (configured in the Response/Receipt URLs) that the customer will need to click. Clicking the link will prompt the user to verify whether they want to leave the page and return to the store.
Relay Page HTML
(AIM only)If the Relay response from uStore checkbox is selected, you can use the default HTML receipt template provided or modify it with your own HTML code.
Auto-redirect to store after...seconds
(AIM only)If the Relay response from uStore checkbox is selected, you can define the number of seconds before the customer is redirected automatically from the Relay Page to uStore. By default, the Relay page is displayed for 10 seconds.
Test Connection
Click the Test Connection link to verify that your connection to the Authorize.Net account is working.
Data Collection Method
The default Authorize.Net Clearing should not be changed.
-
Click Test Connection and then save this new clearing method to add it to your store(s).
-
To apply a clearing method to a store, go to the store's setup page and add this new payment method in the Clearing tab.
Note that if you do not see the payment method you've just created in the list, it is most likely that the store has order approval enabled and will not be able to use credit cards as a payment method.
If you are using Rest API, enter the URL of the external domain by which Authorize.Net communicates with uStore.
-
Go to Global Settings> System Setup > Global Configurations.
-
Locate the UstoreDomainWebHookURL key, and enter the domain name.
The URL should contain an HTTP or HTTPS protocol and IP address or domain name, for example https://mystore.example.com. The address must be reachable from the internet.
Troubleshooting
Payment in Authorize.Net fails
Authorize.Net reports the outcome of a payment back to uStore through a webhook in your Authorize.Net account. If payment fails, the webhook may be missing.
You do not have to create the webhook yourself. Click Test Connection in the clearing model: uStore checks whether the webhook exists in the Authorize.Net account and creates it if it does not. If the test reports that Authorize.Net cannot communicate with uStore, the address uStore offered is not reachable - see Authorize.Net cannot communicate with uStore.
If the webhook still does not appear in the Authorize.Net account after a successful test, add it manually. In the authorize.net site, go to Account > Settings > Business settings > Notification settings > Webhooks, and add:
https://<yourDomain>/uStore.CommonControls/Clearing/AuthorizeNETPaymentWebHook.aspx
Make sure the webhook is active, and select all events.
Authorize.Net cannot communicate with uStore
When you test or save the clearing model, uStore reports that Authorize.net cannot communicate with uStore, and names the domain it tried to use.
Authorize.Net calls back into uStore when a payment is processed, so uStore has to be reachable from the internet at an address that Authorize.Net can resolve. This presents itself as a credentials problem, and is not one.
-
Go to Global Settings > System Setup > Global Configurations and check the UstoreDomainWebHookURL key. It must hold the public address of the installation, including the protocol and with no path - for example https://mystore.example.com.
If the key is empty, uStore reports the message without contacting Authorize.Net at all. If it holds an address that Authorize.Net cannot reach, Authorize.Net reports the address as inaccessible and uStore displays the same message.
-
Confirm that the store has a friendly URL configured. See Enabling Store-Friendly URL.
-
On the uStore application server, confirm that TLS 1.2 is enabled for outbound connections, and that outbound port 443 to Authorize.Net is open.
If the clearing model was configured before uStore moved to the Authorize.Net REST integration, regenerate the transaction key in the Authorize.Net account - and the signature key, if the model is still set to the AIM API type - enter the new keys in the clearing model, and click Test Connection to register the webhook again. This resolved the problem in one reported case.
Orders move to the Rejected Clearing queue
Authorize.Net is a delayed clearing method. After checkout, the order waits in the Delayed Payment queue while uStore checks the status of the transaction with Authorize.Net. If Authorize.Net declines the transaction, or returns an error for it, uStore moves the order to the Rejected Clearing queue. The rejection comes from Authorize.Net, and not from uStore. See Rejected Clearing.
To find out why, check the transaction in the Authorize.Net account. If the reason is not clear, download the uStore log files from Global Settings > XMPie Services and open a support case, quoting the numbers of the affected orders. See XMPie Services. The logs do not always record a reason for the rejection, so the order numbers matter.
If orders stay in the Delayed Payment queue instead, check that the Authorize.Net account is not set to Authorize and Hold for Review. uStore does not support this option, and logs an error for these orders.