Setting Up an Email Template
By default, each event is assigned with an appropriate email template that defines the appearance and message of the sent email. uStore provides you an Email Template Editor, which enables you to customize and edit email templates according toyourcorporate identity and any special requirements that you may have. Email templates that you design can be used for multiple triggers.
To create a new email template:
-
At the bottom part of the Edit Rule Settings page, open the Select Email Template list.
The list displays all templates that have been defined for the given event. Two types of templates can appear in this list:
-
System (original) templates, which are marked by an asterisk (*) symbol. These templates are provided by uStore. You cannot delete or edit them. If you want to base your new template on a system template, you must first create a copy of it and then edit it.
-
Manually-designed templates. These templates can be edited. Alternatively, you can duplicate a template and create a new template based on it.
The following example shows the system "Inventory Changed" template, and a manually-designed template that was based on it:

-
-
Select a template from the list:
-
If you are selecting a system template, click Duplicate
 to first create a copy
of the template in the Copy Email Template
window, and then edit the copy in the template editor.
 -
If you are selecting a manually-designed template, click Edit
 to edit the template in the template editor or Duplicate
  to first create a copy of the template, and then edit the copy.
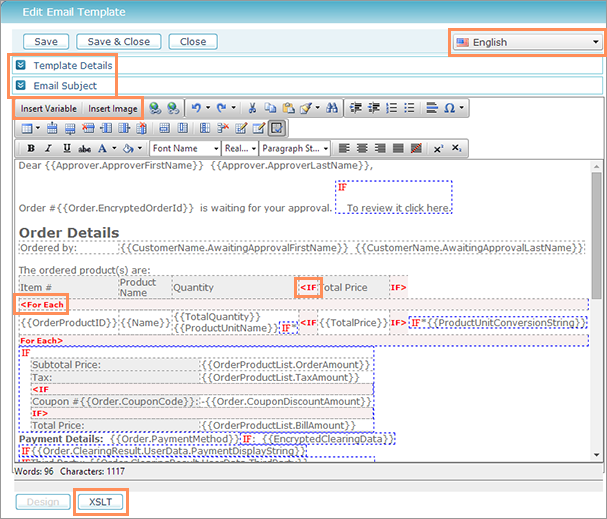
The selected template is now displayed within the Edit Email Template window, ready for editing.

The design area includes various conditions. To learn about the conditions, see Code Representation in the editor below.
Note that the code labels displayed in the editor will not appear in the actual email.
At the top right corner, choose the language in which you want to edit the template, and then edit the content using the available editing options. You can edit the template using either the Design or the XSLT mode.
-
-
You can expand the top two sections - Template Details and Email Subject - and edit them too.
-
To add variables, click the Insert Variable button on the toolbar and select a variable from the list. The list contains variables that have been added for the specific template.
In XSLT, variables are translated into <xsl:value-of>.
Note: In addition to the list of predefined variables, uStore supports adding more variables to the design. This can be done by changing the SQL queries that are used to fetch the data, and the configuration of the variable fields. To add variables that do not appear in the list, see Creating a New Message Template SQL.
-
To add an image, click the Insert Image button and upload an image. The supported image formats are: JPEG, PNG and GIF. To edit image settings (for example, size), right-click the image and select Properties. In the Properties dialog, edit the relevant settings.
Note: When adding an image into the template, the domain part of the URL is taken from Presets > System Setup > Mall > uStore Server IP field. Therefore, for the image to be seen in the email message, the value of this field should be a public internet address.
-
Click Saveor Save & Close.
Notes:
-
Manually-designed templates can be deleted, whereas system templates cannot be deleted.
-
A manually-designed template cannot be deleted if it is in use by a rule.
Code representation in the editor
IF condition
Parts of the template may be displayed or hidden according to a certain logic. These settings will be enclosed by a red IF label.
If the IF condition is within a table, the conditioned section will appear between an opening and a closing IF, as can be seen in the following examples:
An IF condition which is not within a table will be surrounded by a blue dashed frame, and the IF label will be placed at the top left corner:

To edit the IF conditions, switch to XSLT mode. In XSLT this will be shown as an <xsl:if> element.
For Each loop
A loop over a collection of items is enclosed by an opening and closing For Each label.
When the system creates an actual email, it will iterate each item in the collection and display the selected variables of each item.

To edit the For Each conditions, switch to XSLT mode. In XSLT this will be shown as an <xsl:for-each> element.
More topics
Attaching a Job Ticket/Output File (PDF) to a Message Template
