Composite Product Properties
Composite products have a couple of default properties:
-
The Binding Type property is a selection of the different binding types. It can be edited or removed.
Note: If you use Binding Type in the preview campaign, when defining a composite product, you must use the same names for the property options that are used in the preview campaign.
-
The Binding Side property is a global product property. It determines on which side of the page the binding will be, the long side or the short side. It can be edited or removed, but is mandatory when Binding Type is used.
Design a property icon
You can design and display an icon to appear in the storefront next to the composite property name. You must design two images per property, one reflecting the selected status and one reflecting the unselected status of the property.
To create a property icon:
-
Using any graphic software, open a file to create a new image. The image size should be 20 pixels x 20 pixels.
-
Save the images with the following names:
-
Unselected status: PropertyName.PNG
-
Selected status: PropertyName_selected.PNG
-
-
Save images in the Property Options Icon Management window.
Create property option overlay images
You can design an Overlay image that will overlay the composite component document thumbnail in the storefront for a more reliable product preview.
You must define four graphic overlays images:
-
Long side binding on portrait document
-
Short side binding on portrait document
-
Long side binding on landscape document
-
Short side binding on landscape document
To create a property option overlay image:
-
Using any graphic software, open files to create the four images. The image size should be 423 pixels x 527 pixels.
Note: The image size for the document icon is 403 pixels x 507 pixels and is displayed in the center of the overlay image. Make sure that the overlay image is transparent to enable the document display.
-
Save each image in the Property Options Icon Management window with the name Overlay_PropertyName_OptionName_XXXXX, where XXXXX reflects the binding side and layout of the document.
The following are examples of image files for Overlays for the property option Spiral Color_Black:
|
Icon |
Status |
File Name |
|---|---|---|
|
|
Long side binding on portrait document |
Overlay_Spiral Color_Black_Long_Portrait.PNG |
|
|
Short side binding on portrait document |
Overlay_Spiral Color_Black_Short_Portrait.PNG |
|
|
Long side binding on landscape document |
Overlay_Spiral Color_Black_Long_Landscape.PNG |
|
|
Short side binding on landscape document |
Overlay_Spiral Color_Black_Short_Landscape.PNG |
These overlay images are displayed over the component thumbnails if the Show Properties checkbox is selected in the document builder page of the composite order flow in the storefront.
Note: For the Perforation property, the images for the long side and the short side would be the same because the property is defined for Left and Right and not Top Bottom/Long Short.
Create a dependency between product properties
A property can be a sub-property of any property that has a gallery list/grid view input control. When ordering in the store, the sub-properties are only displayed once you select the property option on which they are dependent.
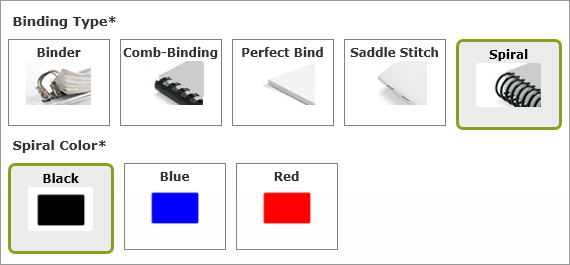
For example, you may want to define a property, Spiral Color, as being dependent on the Binding Type property. The options for Spiral Color would only be displayed if you select the Spiral option from the list of Binding Type options displayed:

Add a property display to the composite preview campaign
The following is an example of how to add the display of the Perforation property to the composite preview campaign.
To add a property display to the preview campaign:
-
Add a column to the Excel data source, naming it with the property name (case sensitive). In this example, the column should be named Perforation.
Note: For component properties, add two columns, one for the left side and one for the right side of the printed page (Left Perforation and Right Perforation). For composite components, you only need to add one column (Perforation) as it will affect all composite pages.
-
Add the Property Option names to the column. In this example, the Perforation property has two options, Left and Right. Add these options to selected records in the Excel Table. This will enable you to view the Left and Right Perforation options in the campaign proof.

-
In the InDesign document for the preview campaign, create a layer for each option and create an image representing the option. In this example, create a layer for Perforation-Left and another layer for Perforation-Right.

-
Create a visibility content object using the relevant rule. In this example, the layer Perforation-Left, will only be visible if the selected property option is Left.
-
Save the campaign as CPKG and upload to uProduce.
-
Generate a proof and update the file and its proof for the uStore composite product.


