Setting Up Dynamic Document Templates
Prerequisite: Before you add a dynamic product, make sure to run a proof and process job for the document.
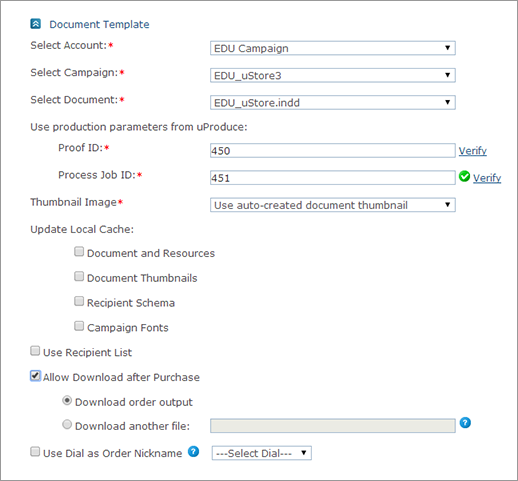
To set up a dynamic document template:
-
Open the product you wish to edit, and in the Product Setup page go to the Document Template section.
-
Select the Account, the Campaign and the specific Document you want to use. Only the accounts, campaigns and documents that are available for the uProduce user, set in the Store Setup page, are displayed in the corresponding dropdown lists.
Notes:
-
You can replace the document that has been defined for the product only if an ordering process of the product has not yet begun.
-
In order to work with FreeFlow Core, the selected document must be in PDF format.
-
-
The Use Production Parameters from uProduce fields indicate the Proof Job ID used for displaying the product in the storefront, and the Process Job ID used for production. The system automatically retrieves the last job performed by the uProduce user as defined in the Store Setup page.
Notes:
-
If the process job created in uProduce includes a destination, note that this destination will soon be deprecated and it is therefore recommended to use a post composition operation instead. For existing dynamic products, create a new process job which uses the post composition operation, and update the process job ID accordingly.
-
Note that for 3D preview, the proof must include one record of PNG type.
-
You may modify the Job ID if you want to use production parameters from a different job. In case you modified the Job IDs, click the Verify link to check if the entered ID is correct.
-
If your store is GDPR compliant, when saving the product settings, all uProduce data sources used by production parameters of print and proof jobs are marked as permanent, and therefore are not deleted by the automatic deletion mechanism of uProduce. This is because the lifespan of the products is usually much longer than 30 days, and the data sources used are either sample data sources, or additional data sources that don’t contain PII.
-
-
In the Thumbnail Image area, select the thumbnails that will represent the product in the storefront. Select one of the following options:
-
Use auto-created thumbnail: Use the default thumbnails created in uCreate. The thumbnail image is taken from the document’s DPKG. This is the default selection.
-
Select thumbnail from a recent job: Choose this option if you want to select a thumbnail of a specific job to be presented in uStore for a product.
When selecting this option, you have to enter the Job ID. Using the Job ID, uStore will retrieve the thumbnail from uProduce, save it and display it in the storefront Preview page.

Click the Preview link to see the selected product thumbnails. The Proof window is opened where you can browse through product thumbnails.
-
Upload thumbnails: Select this option to manually upload thumbnails that have been previously created.
The default display name for uploaded thumbnails is "Page [page number]". If you want to rename the uploaded product images, select the Set the thumbnail displayed namemanually checkbox above the table. Once selected, the Display Name column becomes a text box and you may edit it.

-
-
In the 3D Preview - uC3D section (Labels & Packaging option), do the following:
-
3D Object: Upload the 3D model file. The file can be in either .dae, .zae or zip format. If the 3D model uses static images (e.g. cardboard pattern, stand-up pouch's normal map), upload a zip file that contains the .dae model and the assets.
-
Advanced Configuration: A default JSON that describes the configuration of the model is present when creating the product. For complex models or scenarios you will have to edit this configuration. Click here for detailed instructions.
-
-
In the Update Local Cache section you can set uStore to update the local cache. Update the cache to reflect the latest changes in the uProduce server. You can set uStore to update local cache only when you edit a product; when you create a new product, this option will not be displayed.
-
Select the Use Recipient List checkbox if you want to personalize your document using a recipient list, clear it if you only want to customize it. If you clear this checkbox, the Recipients page is omitted from the Product’s purchasing steps options in the storefront. Accordingly, customers will not be asked to use or to upload a recipient list.
Once an order has been placed for the product in the storefront or the product is in draft mode in a shopping cart, the Use Recipient List checkbox can no longer be cleared.
-
Select the Allow Download after Purchase checkbox to enable the customer to download output files, such as generated PDF files. The output download is available in the Order Details page at the store and in the Order Confirmation email (detailed template) after the purchase order has been submitted.
-
Download order output: Select this option to enable the shopper to purchase the production output files (rather than having the print provider print them).
Note: If your store is GDPR compliant, the output will be available only 30 days after its creation.
-
Download another file: Select this option to enable the administrator to upload a file that will be available for download by the shopper.
Note that the possibility to download an output of the product that has been placed offline or deleted may have an expiration period configured in the ProductDownloadExpirationDays property in Presets > System Setup > Global Configurations. uStore will start counting the expiration period when the product is placed offline or deleted. When the download period expires, the download icon will be disabled. When hovering over the icon, a tooltip will be displayed, with an explanation about the expiration of the download period. If the product is placed online again, the expiration will be turned off.
-
-
If you want to select a dial to be used as the order nickname, select the Use Dial as Order Nickname checkbox.
The customized value of the selected dial is displayed in the shopping cart. For example, if the selected dial is <First Name>, a possible order nickname would be "John".
You define the dials that will be available for customization on the Customization Wizard page.