Print touchpoint basics
This topic describes how to work with print touchpoints to generate personalized printed documents.
The tasks you perform include associating a dynamic document with a print touchpoint and defining recipients lists and production settings.
You can trigger immediate output to multiple recipients or set a schedule in which output to selected recipients is based on time, date and frequency.
To generate personalized documents, you first select a print touchpoint and then upload a single document, a document package or a campaign package. Once the document is uploaded, it becomes associated with the touchpoint you selected. The same document can then be used by other print touchpoints in the project.
Configuring print touchpoints for outbound production is performed in the Production window in the Build tab. Once you connect your project to the uProduce system, you can access the Production dialog box directly from the touchpoint.
Note: You can define production parameters only if you have first connected your project to the uProduce system.
During the production process, you can view the status of the current project in the Run Center, from where you can also view warning messages and download project documents for printing.
Configure print touchpoints
-
In the diagram, click the Production icon
 above the touchpoint to open the Production
dialog box.
above the touchpoint to open the Production
dialog box.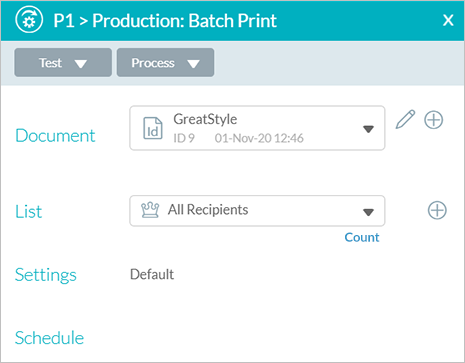
-
In the Document dropdown list, select an existing dynamic document or create a new one (see "Uploading a print document to the touchpoint" below).
-
From the List dropdown list, select an existing recipient list or click the Add
 icon
to add a new list (see Adding
a list). By default, All Recipients
is selected. To edit an existing list, select it in the dropdown list
and click the Edit
icon
to add a new list (see Adding
a list). By default, All Recipients
is selected. To edit an existing list, select it in the dropdown list
and click the Edit  icon.
icon. -
In the Settings section, accept the default parameters or click the arrow to modify the production settings. See Print touchpoint production settings.
-
Set up scheduling definitions, if necessary. By default, scheduling is not active and the email is sent immediately. To define scheduling, see Scheduled production. The scheduling becomes active once the project is set to Live.
-
Click Save to save the touchpoint changes.
-
Click Close to close the dialog box.
Once a document has been associated with a touchpoint and the touchpoint has been saved, this document becomes available for preview when clicking the node title link in the diagram.
Upload a print document to the touchpoint
To generate personalized documents for each recipient, you upload the document and associate it with a print touchpoint. There are two ways to upload a document to the uProduce system:
-
From Circle
-
From uCreate Print
A document can be shared by multiple touchpoints, if required.
You can upload an individual document or a document package (recommended). The document package file includes the document, all the information pertaining to it, and its related resources. If you choose to upload the document on its own, you run the risk of losing all the resources associated with the document.
-
Single document: You can upload a single document file with any of the following extensions: .indd, .xlim, .indx. If your single document uses non-standard fonts and / or alternating graphics, you need to upload these items manually to the system to enable the system to locate them during the production process. In addition, if you choose to upload a single document, Circle cannot verify that the content objects in the document are consistent with those defined in the plan file. A mismatch between the content objects and the plan file could result in a failed production process for the associated touchpoint.
-
Document Package (*.dpkg): A document package file has a .dpkg extension and includes the following components:
-
Dynamic Document: The uCreate Print document you created in InDesign
-
Resources: Graphics files that are static, that is, files that are not referenced by content objects
-
Assets: Graphic and text files that are dynamic, that is, files that are referenced by the content objects
-
For example, the Asset Sources folder might contain three different images for three different membership types, such as Normal, Gold and Platinum.
-
Fonts: The font set used in the dynamic document
-
Content objects: Content objects are design objects, for example text or graphics, that derive their content and / or appearance from the content object's value.
-
Dimensions of the print output
-
Thumbnails of the print output
-
Circle checks the document package to verify that the content objects in the dynamic document match those defined in the plan file. If there are inconsistencies, you will be unable to upload the package. Before attempting to upload the document again, you first need to either correct the document or modify the plan file.
To upload a print document to the touchpoint:
-
In the diagram, click the Production icon
above the touchpoint to open the Production
dialog box.
-
Click the Add icon
in the Document field to upload
a new document.Note: Clicking the dropdown list displays a list of documents that were previously uploaded.
The New Document dialog box is displayed.
-
Click Choose File and navigate to the file you want to upload.
On uploading a package file (*.dpkg), the system checks the document to verify that its content objects are consistent with the plan file used with the current project.
The document name is displayed in theDocument Namefield.
-
Optionally, rename the document in the Document Name field.
-
Click Upload.
You are returned to the Production dialog box with the name of the uploaded document displayed in the Document field. The document’s ID number, the date it was last modified and the user who modified it are displayed under the document name.
Note that the Document ID is the same in uProduce and in Circle.
When the Document field displays a document name, the Edit icon becomes available. See Modifying a document for details.
Note: You can replace the document associated with the touchpoint with a previously uploaded document by clicking the dropdown list and selecting another document from the list.
Modify a document
You can download a single document or a document package for editing.
When you download a document with or without its resources, the original versions remain in the system until you replace it with the edited versions.
You can edit the downloaded document's content and name. You cannot change the document's format. When you have finished editing the document, you can upload it to replace the original version.
Although the content and / or the name of the document might have changed, the document's ID number remains the same.
Note: The system assigns an ID to the document’s ID when it is uploaded.
If the document is associated with other touchpoints, their output reflects the modified version.
Download a document for editing
-
In the diagram, click the Production icon
above the touchpoint to open the Production
dialog box.
-
Select the document you want to edit from the Document dropdown list.
-
Click the Edit
icon in the Document
field.The Edit icon becomes available when a document name is displayed in the Document field.
The Document dialog box is displayed.
Note: If the document was uploaded as a package (.dpkg), clicking the Edit icon also displays the current document's details, including its ID number, page dimensions, number of pages, creation and modification dates and the name of the user who modified it.
-
Click the Download icon
 to display
the Download menu.
to display
the Download menu. -
Select one of the following:
-
Download File: Downloads a copy of a single document.
-
Download Package: Adds the Download tab to your browser. When the download is successfully completed, the package name is displayed in the tab.
You can now save the file locally and begin editing.
-
Upload the edited document
-
If necessary, navigate to the Document dialog box and click the Upload icon
 .
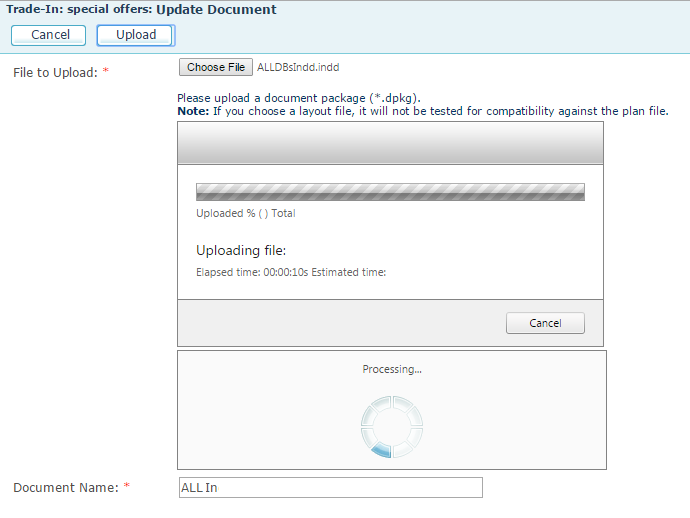
.The Update Document dialog box is displayed. The original name of the document is displayed in the Document Name field.
-
Optionally, change the file name in the Document Name field.
-
Click Choose File, navigate to the edited document or document package and click Open.
-
In theUpdate Documentdialog box, clickUpload.
The Upload counter displays the status of the uploading file.
-
In the Document dialog box, click Close.
You are returned to the Production dialog box. The edited version of your document is now displayed in the Document field.