Testing and processing a print touchpoint
After you have created and uploaded the documents to your touchpoint, defined the list and the settings, you can now test your print touchpoint.
Testing is useful to check your output before the actual production. It allows you to override the output format settings in order to be able to visually check the output for the formats that cannot be viewed online. You can also test without passing the output to the hotfolder and without tracking events.
Once you have finished testing, you can choose to manually execute the touchpoint production or schedule its execution.
Test a print touchpoint
-
In the diagram, click the Production icon
 above the touchpoint to open the Production
dialog box.
above the touchpoint to open the Production
dialog box.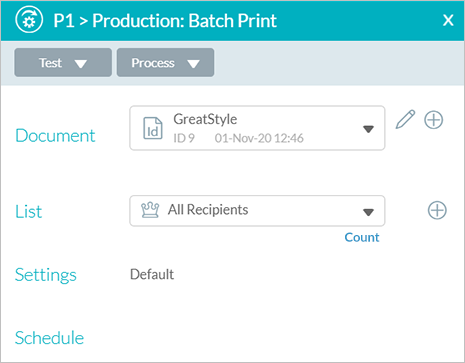
-
Click Test.
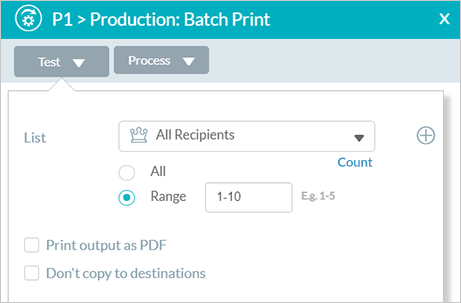
The Test dialog box is displayed.
-
From the List dropdown list, select the filtered list for which you wish to execute a test. To create a new filtered list, click the Add
 icon. See Adding
a list.
icon. See Adding
a list. -
Select a range of recipients. By default the range of 1-10 is selected. Initial testing is usually performed for a few records at a time in order not to waste time on producing the entire list.
-
(Optional). Check the Print output as PDF checkbox if you wish to override the output format defined in Settings (see Setting print format). This is useful to visually check the output since some formats (for example, VIPP) cannot be viewed online.
-
(Optional). Check the Don't copy to destinations checkbox to override the destination settings. This is useful to avoid copying output to hot folders and possibly triggering post production processes. Checking this checkbox sets the Copy Output To settings to No Copying and unchecks the Copy to checkbox for the JDF settings (see Setting up an output destination).
-
Click Test.
The test is performed. The priority of testing is always Immediate to make sure you do not wait long for your test results. Tracking is never recorded and no notifications are sent while testing.
-
The last run details are displayed in the Last Run area at the top of the Production dialog box.

Test runs can be toggled to be shown or hidden in the Run Center.
Manually process a print touchpoint
-
In the diagram, click the Production icon
above the touchpoint to open the Production
dialog box.
-
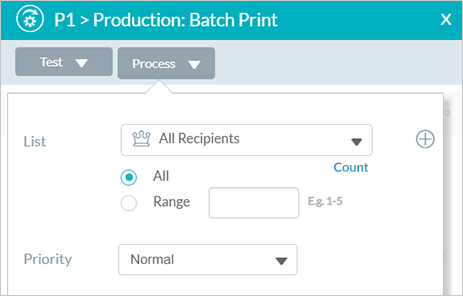
Click Process.
The Process dialog box is displayed.
-
In the List dropdown list, make sure that the selected list is correct. You can select a different list to run production for a subset of recipients (for example, those recipients that were skipped in the previous run). To create a new filtered list, click the Add icon
. See Adding
a List. -
Select a range of recipients. By default All is selected. To define a specific range, select the Range radio button and enter the range of recipients (e.g. 1-5).
-
From the Priority dropdown list, select the priority for the current print run. Priority impacts the order of the run in the waiting queue. It may also be used to interrupt runs that are already in progress s in favor of a rush-job. The default is Normal.
Choose between four priority options:
-
Immediate: submit a "rush job". The run will be processed immediately. If all production instances are busy, one of the runs in progress will be paused in favor of processing the "Immediate" run. If all instances are currently handling "Immediate" runs, the run will be placed at the top of the waiting queue until one of the instances becomes available.
-
High: submit the run with a high priority. The run will be placed at the top area of the waiting queue.
-
Normal: submit the run with a normal priority. The run is queued with other normal runs in the waiting queue.
-
Low: submit the run with a low priority. The run will be submitted to the lowest level of the waiting queue.
-
-
-
Click Process.
Clicking Process closes the Process dialog box and executes production.
The last run details are displayed in the Production dialog box.
