Creating a Print File of a Dynamic Document
uCreate enables you to generate a print output file that includes all document instances that result from a given data source.
The dynamic print option is available provided that your document is already linked to a data source, a proof set file, or if you are using content samples or input data samples.
The dynamic print option allows you to create a print output file (also known as theprint stream), which contains personalized instances of your InDesign dynamic document. This print file is generated using values from your linked data source, proof set file, content samples or input data samples.
The print output file may be in any of the print or variable information (VI, in short) data printing formats: PDF, PDF/VT-1, PDF/VT-3, PostScript, VPS, PPML, VIPP, VDX or JPG. The print output file is further processed by a print server (that is, the RIP), which produces a series of hard-copy printed document instances, each representing the variations made for a specific individual.
To print the InDesign dynamic document, with data source values:
-
Open the document you wish to print.
-
From the Dynamic Content menu, select Generate VDP Output.
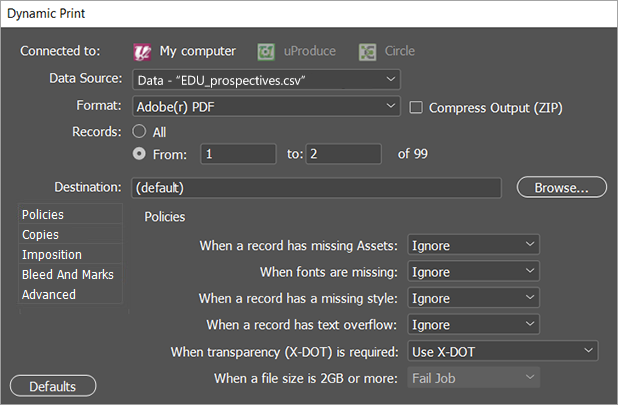
The Dynamic Print dialog is displayed. Settings in this dialog box vary according to the selected print output file format.
-
If default print options have been set, they will be displayed in this dialog. You may change these values, and if needed revert to the default values using the Defaults button.
-
At the top of the dialog, enter the following:
-
Data Source: Select the data source that includes the recipient information, from which you wish to produce the print output file.
-
Format: Choose the format in which to produce the print output file, depending on what is available for your system. Note that the print format you choose here determines the available options.
-
Compress Output (ZIP): Check this box if you want to compress the output file to a ZIP file. This is useful when expecting a production output of large files or when the output files are to be packed into a single file.
-
Records: Specify the records to be printed by choosing one of the following:
-
All: produce a print output file for all the records in the data source.
-
From, to: enter a range of records for which you will create a print output file.
-
Destination: The folder in which to create the resulting print output file.
Click Browse... to locate the full path to the folder. By default, the print output file is saved in the output folder next to your document (in a folder named using the current date and time).
-
-
Define print production properties.
-
Click OK to start printing.
More topics
Using Dynamic Media Selection for Printing