
You can add a data source by uploading a database file to uProduce, or by specifying a connection to a remote database. At any stage, you can add additional data sources or delete a data source. You are not limited to using a single data source per campaign. Before you begin, make sure your data files are compatible with the plan file used in your current campaign.
To add a data source to a Campaign:
1. Go to the Campaigns page and select the campaign to which you wish to add a data source.
2. In the Campaign tree, click Data Sources to display the data sources page.
3. Click
the New button.
The New Data Source dialog is displayed.
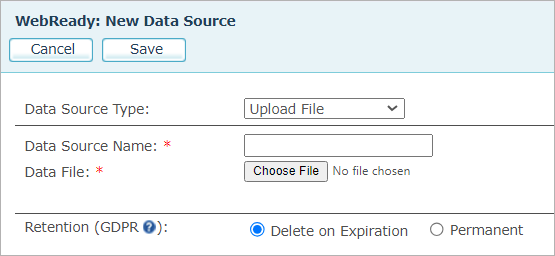
4. From
the Data Source Type list, choose the type of
data source you wish to add.
For MS Access, MS Excel or delimited text file data
source, make sure the Upload File option is selected.
uProduce displays the data source settings that are relevant to the chosen data source type.
5. Set the required field values as follows:
Option |
Description |
File Data Sources |
|
Data Source Name |
The new data source’s logical name. |
Data File |
Click the Choose File button to locate the data file. If the data source name field is empty, browsing to the database automatically sets the name as well. |
Retention (GDPR) |
If GDPR has been enabled: · Select Delete on Expiration to delete the data source by an automatic deletion mechanism after the defined number of days, according to GDPR regulations. · Select Permanent to have the system retain the data source, i.e. it will not be deleted. If GDPR has not been enabled, select Non Permanent to enable deletion of the data source through maintenance (for example, data sources that have been created for a single production only). Note that if you enable GDPR at a later point, all non-permanent data sources will be subject to deletion by the GDPR mechanism. |
MS SQL Server Data Sources |
|
Data Source Name |
The logical name of the new data source. |
Server |
The server’s logical name or IP address. |
Database |
The Database’s name. |
User |
The user name for connecting to the database. |
Password |
The password for connecting to the database. |
Test |
Checks the connection with the server. A feedback window notifies you whether the connection succeeded. |
Oracle Server Data Source |
|
Data Source Name |
The name of the new data source file. |
Host, Port |
The name of the host machine running the server and the Port used for the database connection. |
SID |
The Oracle session ID. |
User |
The user name for connecting to the database. |
Password |
The password for connecting to the database. |
Test |
Checks the connection with the server. A feedback window notifies you whether the connection succeeded. |
6. Click Save to upload the database or save the remote data source settings.
The system automatically searches for tables that may serve as Recipient Lists. These tables will be displayed in the Recipient list tables section. You can also add more tables to be used as Recipient Lists. For information on adding Recipient Tables and matching them with the plan’s Recipient Schema, see Adding Recipient Tables and Mapping them to a Plan’s Recipient List Schema. Tables selected as Recipient Lists can be later selected for production, for example, for email and print batch.
7. When the upload has completed or your settings have been saved, the data source information is displayed in the data source details page.

8. Click Close to return the data sources page.
All file-based data sources are uploaded to uProduce as "Local" to enable simultaneous and interactive access by multiple users.
9. Repeat this procedure to add all the required data sources to your Campaign.
Notes:
· If needed, change the retention state of the data source.
· If you wish to make changes to a data source or use a different data file, make sure to use the Check In and Check Out feature. For more details, see Checking Files In and Out.
Adding Recipient Tables and Mapping them to a Plan’s Recipient List Schema