Creating an Email Message
Note: The email settings defined on the account and campaign levels will affect the email behavior, such as the default delivery provider and the unsubscribe web address.
The email message body is similar to the letter you place in an envelope. The email activity (described in Creating an Email Activity) is similar to the envelope where you define "To" and "From" details.
uProduce allows you to create both static and dynamic email messages. You can create either HTML or text email messages in uProduce.
Use a URL as an email message
You can use remote text, HTML and RTF documents as your email message body by specifying their URL in uProduce. The URL you specify may be a static web page or a personalized web page.
To use a URL as an email message:
-
Go to the campaigns page and select the campaign in which you wish to use a URL as an email message.
-
In the campaign tree, click Documents to display the documents page.
-
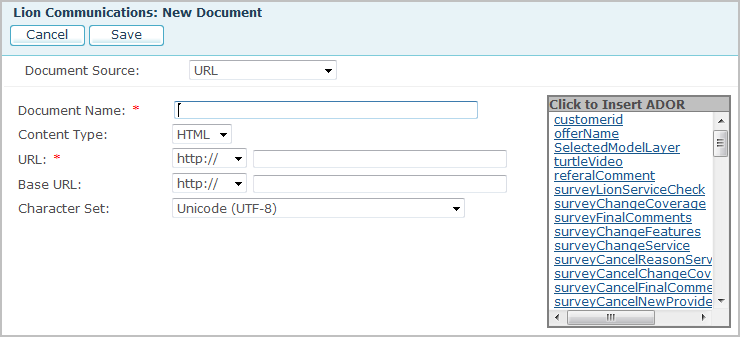
Click New. The New Document page is displayed.

-
Enter the required field values. Click Save to save your settings.
Option
Description
Document Source
Select URL.
Document Name
Enter a name for the new URL-based document.
Content Type
Specify whether the remote document is an HTML document,
an RTF document or a text document.URL
Select the protocol of your web page (HTTP, HTTPS or File) and specify the URL of the referenced document.
If you use a personalized web page, you can click an ADOR object in the ADOR object list on the right to insert it to the URL you specify. You can also enter the ADOR object name manually in double curly brackets, for example,
www.MyDomain.com/{{FirstName}}, whereFirstNameis the name of the ADOR object.URLs that contain ADOR object values are referenced to their respective personalized web page. For example, www.MyHomePage.com/John.
Base URL
Select the protocol of your base URL (HTTP, HTTPS or File) and specify the URL to which relative links in your document are referenced.
If you use a personalized web page, you can click an ADOR object in the ADOR object list on the right to insert it into the base URL you specify. Alternatively, you can enter the ADOR object name manually in double curly brackets, for example,
www.MyDomain.com/{{FirstName}}, whereFirstNameis the name of the ADOR object.Character Set
Select the character set to use for presenting the remote document.
Proxy Server
Enter the proxy details of your website if it is located behind a Proxy server.
The email message body can be edited using the uProduce HTML and text editor. For details, see Create an HTML or Text Document.
Edit an email message
Once it is created, you can edit an email message using uProduce Checkin/Checkout mechanism. For more information on how to check files in and out, see Checking Files In and Out.
To edit an email message:
-
In the Documents page, choose the relevant document from the list.
-
Click the Checkout button to check out the file you wish to edit.
When files are checked out, other users will not be able to check the same file out, or check-in other files instead. In the page that is displayed, the Checkin and Undo buttons are added. These buttons are only visible to the user who actually checked the file out.
Other users will not see the Checkin, Checkout, or Undo buttons; rather they will see the name of the person who checked the file out.
If no changes were made to the file, click Undo to cancel the checkout action.
-
Once you are done modifying the file, click Checkin to upload it to the uProduce server or to modify the file within uProduce, as follows:
-
If you use a URL as an email message, you can modify the document name, URL, base URL, character set and proxy server settings.
-
If you use text, RTF and HTML files as an email message, you can:
-
Select Edit and then modify the document name and the document contents.
-
Select Upload and then upload a document to replace the existing one.
-
-
