Setting Up Triggers
uStore backoffice contains triggers that dispatch actions at specific events.
The combination of an event and an assigned action is known as a rule. For example, you can create a rule that is defined for an order submission event, which triggers an email send action. Moreover, you can create a rule that submits an order to production the moment it is checked out by the customer. The messaging mechanism enables you to apply filters to events to narrow down the triggers that will eventually execute actions.
To create a new trigger with an email send action:
-
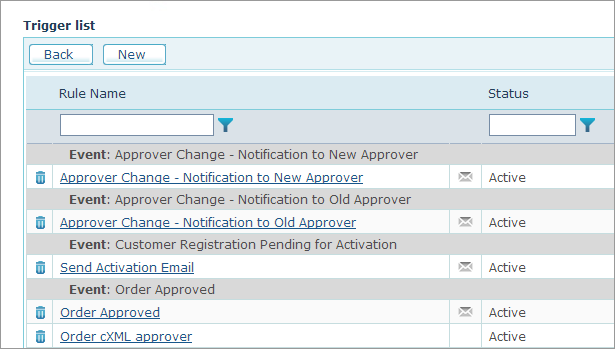
In Presets, click the Trigger Setup link.
The Trigger list page opens, displaying a list of events and the triggers that have been defined for each.
-
Click the New button.
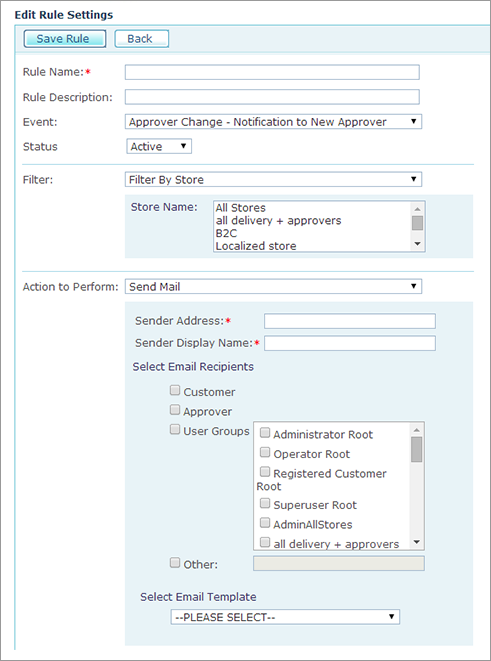
The Edit Rule Settings page opens.
-
Enter a Rule Name and Rule Description.
-
From the Event list, select the required event.
-
From the Status list, activate or deactivate the trigger by selecting Active or Inactive respectively.
-
From the Filter list, define a filter for an event to narrow down triggered actions.
The filter list is dynamic and depends on the event you select. By default, all filters share the same properties, i.e., allowing you to filter down events by stores, whether all stores or specific stores. The Order State Transition event, for example, includes further refining options, allowing you to select the origin state (From State) and the target state (To State) that triggers an action.
-
From the Action to Perform list, select the action you want to perform in response to the occurring event. For most events, the action will be Send Mail. Additional actions for specific events are Order Details XML and JDF XML.
-
Fill in the following:
-
Sender Address: The email address that appears in the From field of the received email. To this address customers will be able to reply upon delivery of the email message that uStore sends.
Make sure you use a genuine email address, but one that is not used for logging into the system.
-
Sender Display Name: The name of the sender, which appears in the From field of the received email.
-
-
UnderSelect Email Recipients, select the recipients of the email. You can select from predefined email recipients or user groups, or you can enter new email addresses in the Other field. It is possible to enter a number of email addresses separated by semicolons.
-
From the Select Email Template list, select the required template. This list is dynamic and depends on your event selection. Each event is assigned with an appropriate email template that defines the appearance and message of the sent email.
-
If you want to create a new template to better suit your needs, you can copy the given template and edit the new template instance, as detailed in Setting Up an Email Template.
-
Click Save Rule.
List of events
-
Approver Change: Notification to New Approver: When the customer replaces the approver in the Storefront with a different approver, send email to the new approver.
-
Approver Change: Notification to Old Approver: When the customer replaces the approver in the Storefront with a different approver, send email to the previous approver.
-
Auto launch XM Campaign: Once a campaign enters the Pending Campaigns queue, it is automatically launched and its' instance becomes live in Circle. The order item moves to the Campaigns in Progress queue. If you wish to launch XM campaigns manually, inactivate this trigger.
-
Customer Registration: A customer has performed registration (only if the "Enable Registration" option has been selected for this store). For further details, see uStore Authentication.
-
Customer Registration pending for Activation: A customer has performed registration but his registration must be activated (only if the "Require activation by email" option has been selected for the store). For further details, see uStore Authentication.
-
Delivery Creation: An email is sent when a new delivery is created.
-
Inventory Changed: The inventory level of a product that is managed by inventory was changed. For further details, see Setting Up Product Inventory.
-
Inventory Level Is Low: The on-shelf inventory level of a product that is managed by inventory reached the predefined limit. For further details, see Setting Up Product Inventory.
Note that if the customer didn’t complete the payment and quit the clearing provider, an email will still be sent to the administrator informing that the inventory level has reached the predefined limit.
-
Order Approved: The order has been approved.
-
Order Cancelled: T he order has been cancelled by the customer or operator.
-
Order Rejection: The order has been rejected.
-
Order Sent to Approval: The order has been sent to the approver.
-
Order State Transition : An order has been moved from one queue to another. For further details, see Handling Orders.
-
Order Submission in Customer Application : A customer has submitted an order at the store.
-
Password Recovery : A customer has recovered his password to a uStore account.
-
uStore customers are able to recover forgotten passwords by clicking the Forgot your password? link in the Log in page of a store. When clicking that link, an e-mail message is sent to the customers in which they can click a link to reset their password.
-
Note that you should not use the admin's email as the sender's address. Use no-reply@yourdomain.com or anything else you would prefer, which isn’t the admin’s email address.
-
Redirect Clearing Failed: An email is sent approximately two days after the order has been submitted, in cases where uStore wasn't able to receive information from the clearing provider as to why the clearing failed.
-
Unassign Group from Approval Process: An email is sent when the administrator changes the approval process setup for a group from required approval to non-required approval.
-
uProduce Connectivity Error: Send email when connectivity with uProduce has been lost.
-
USADATA Clearing Failed: An email is sent immediately after an order was submitted, in cases where uStore wasn't able to receive information from USADATA.
-
User Creation in Admin Application : A user has been created in the Back Office. For further details, see Setting up Users and User Groups.
-
User Details Update In Admin Application: Details of the user have been modified in the Back Office.
-
User Details Update In Storefront: User has updated his details in the Storefront.
-
uStore License Error: The store(s) cannot go online since a uStore license is missing on uProduce, or because the number of uStore connections allowed by the license has been exceeded. Once this issue is resolved, stores that were previously online will automatically become online again.
-
Order is Ready for Fulfillment: This event is fired once the order gets to the Pending queue, before it splits into order items. There are no out-of-the box actions available for this event, but it allows integrating new actions for handling a complete order, such as sending a notification to an ERP system once per order.
More topics
Creating a New Message Template SQL
Exporting Order Information as XML or cXML (Order Details XML Action)