Managing Users
All uStore users must be assigned to user groups from which they inherit access permissions to storefront stores and backoffice operations.
The Users List page displays a list of all users in the system, and allows you to filter the list.

Add a new user
This process enables you to create and maintain the different types of users in your uStore environment.
Note: The list of fields displayed in the User Setup page is defined in Presets > User Details Setup. For more information, see Setting Up User Details Fields.
To create a user:
-
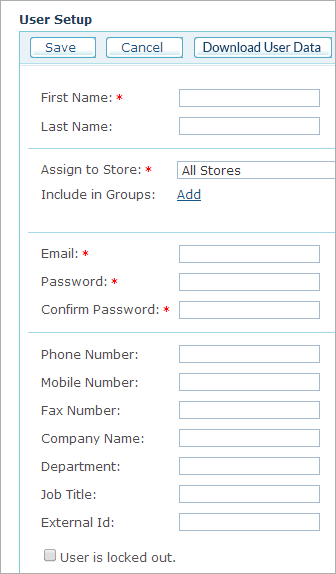
On the menu bar, click Users and then select Create New User.
The User Setup page is displayed.
-
Configure the following user properties:
-
First Name: user’s first name.
-
Last Name: user’s last name.
-
Assign to Store: Determines if the user credentials are valid for all allowed stores or for a specific store only. In the latter case, uStore allows you to have several users with the same email address assigned to different stores. When you assign the user to all stores, uStore allows only one user with the same email address. User assignment to a store does not override the permissions setup in the user group.
-
Include in Groups: Lists all user groups defined for this user in the uStore system. By selecting the desired user group, you can determine which stores this user will be able to access. To start using uStore, a user must be part of at least one user group. To add a user to one or more user groups, click the Add link, and in the Add to Group window select the user group to which you want to add the user.
-
Email: Serves as this user’s user name when logging in to uStore backoffice or uStore storefront.
Note: To edit the regular expression used in order to validate the user email address, see UserEmailValidation_RegEx in the Global Configurations Table.
-
Password: Serves as this user’s password when logging in to uStore.
Each user must be included in a user group to have permission to uStore.
A group has permissions to either storefront stores, where each store may have a different password policy, or to the backoffice (for example, administrators), which has a password policy of its own.
When entering a password in the Password field:
-
If the user is part of a storefront group, the password must match the password policy of the group's allowed store.
-
If the user is part of a backoffice group, the password must match the backoffice password policy (defined in Presets > System setup > Global configuration > Admin Password policy).
-
If the user is included in both storefront and backoffice groups, the administrator policy will always take precedence over the storefront password policy.
-
-
Confirm Password: Re-enter the password that you entered in the Password field.
-
You can optionally enter the following fields: Phone Number, Mobile Number, Fax Number, Company Name, Department, Job Title.
-
External ID: Enables you to distinguish a user with an identification number. This is useful when creating custom made plug-ins for your store.
-
User is locked out: This checkbox is available for locking out a user. The lockout may happen automatically if the password policy of the store to which the user registered is set to lock out users after a certain number of invalid login attempts. Once the user is locked out, this checkbox is automatically checked and the "User is locked out" message appears in red. The Store administrator can unlock the user’s account by clearing this checkbox.
-
Download User Data: Downloads an XML file containing user details, including personal information, such as name, email, phone number, billing and shipping addresses, and order details. This option may be useful for GDPR purposes.
-
-
Click Save.
Import and download users
Import users
The uStore backoffice application enables you to efficiently create all required users by uploading a users list instead of manually defining one user at a time.
Using the Import function you can browse to the location of your users list. To make sure your list is compatible with the required user list structure, download the user list template.
Notes:
-
Only XLS files are accepted for user list upload.
-
Emails should be unique in the list.
To import a user list:
-
In the Users List page, click the Import button.
The Import User List window is displayed.
Browse for your custom user list file (in Excel format). To prepare your user list, you can first download a user list template (UserListTemplate.xls) by clicking the Download a User List Template link, fill it in and then upload it to uStore.
The following fields must be filled in: FirstName, Email and Password in the Excel file. If you assign additional fields as mandatory (in Presets > User Details Fields Setup), these must be filled in as well.
If you wish to prepopulate the user's billing/shipping address, these fields must be filled in:
-
BillingDisplayName / ShippingDisplayName
-
BillingPersonName / ShippingPersonName
-
BillingAddress1 / ShippingAddress1
-
BillingCity / ShippingCity
-
BillingCountryCode / ShippingCountryCode
-
BillingZip / ShippingZip
-
BillingPhone / ShippingPhone
-
-
In the Assign to Store field, select the store to which you want to assign the imported users. This is a mandatory step: users cannot be granted permissions in the application without being assigned to a particular store.
-
In the Add to Group field, select the user group to which you want to add the imported users. This is a mandatory step: users cannot be granted permissions in the application without becoming members in a certain user group. Make sure that the selected user group has permission to enter the assigned store.
-
Click Upload.
You can also import users from the User Group Setup page. In that case, the imported users will be automatically added to the selected user group. For more information, see Assigning Users to the User Group.
Download users
The uStore backoffice application enables you to download a list of users. The downloaded file lists all uStore users with all their fields.
To download a user list:
-
In the Users List page, click the Download button.
A UserList.xls file is downloaded.
Notes:
-
If several billing or shipping addresses are defined, this file will display only the first address (one billing address and one shipping address).
-
The Password field, being confidential, is exported empty.
Add users to groups
-
In the User List page, select the users that you want to assign to a user group.
-
Click the Add to Group button.
The Add to Group window is displayed. -
In the Add to Group list, type or select the required user group.
-
Click OK.
Note: You may also add users to Groups from the User Setup page, in the Include in Group field. In that case, you will be assigning one user to one or more Groups, whereas in the scenario described here you can assign multiple users to one user group.
Change store assignment for a user
-
In the User List page, select the users for which you wish to modify the store assignment.
-
Click the Change Store Assignment button.
The Change Store Assignment window is displayed. -
From the Assign to Store list, select a store to which you wish to assign the selected user.
-
Click OK.
Notes:
-
Only users belonging to user groups that have permissions to the specific store can be assigned to it. Make sure that the assigned store is allowed to be accessed by the user group to which the user belongs.
-
Two users with the same email address cannot be assigned to the same store.