Defining email documents using the email editor
You can create an email document in HTML or plain text in any of your preferred tools, and then upload it to an email touchpoint.
Alternatively, Circle provides an email editor so you can quickly and easily design responsive emails, inserting content objects, images, footers, and more.
When you add an email document to a touchpoint, the New Email panel lets you start from a ready-made email template (created by XMPie or one of its partners), start from a blank email, or upload an existing file. You can also save any email you design as a template and reuse it as a starting point for future emails.
The email editor includes the following benefits:
-
Responsive layout: Compose your emails using a responsive layout.
-
Your emails will look well on a variety of devices and window or screen sizes (desktops, tablets and phones). In order for your email to be responsive, you must also use the editor's responsive building blocks.
-
Responsive building blocks: Select from a list of reusable responsive layouts to organize the content of your email.
-
Preview: Preview your email using sample recipients in both desktop and mobile views.
After you edit and change the code, you must ensure that the changes have not affected the responsiveness of the email.
Create an email document from the touchpoint
-
In the diagram, click the Production icon
 above the touchpoint to open the Production
dialog box.
above the touchpoint to open the Production
dialog box.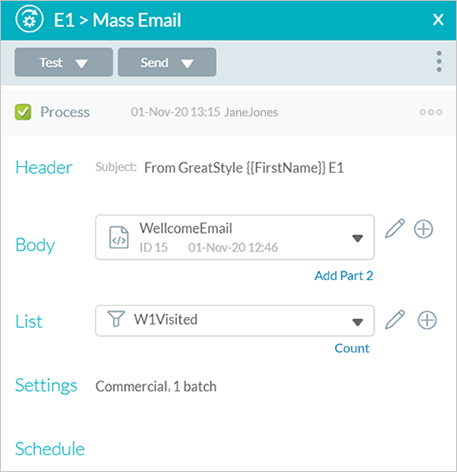
-
In the Body area, click Plus
 .
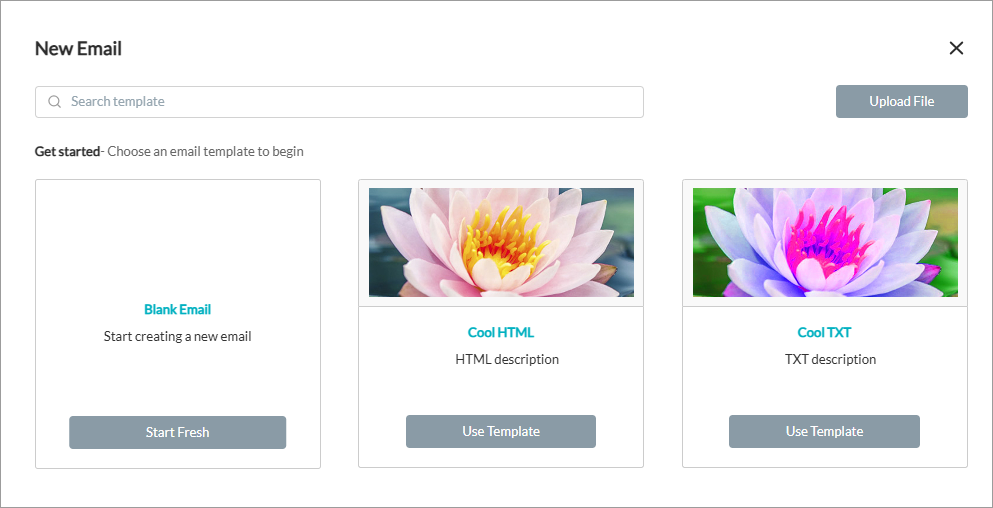
.The New Email panel opens, displaying the available email templates.
-
Choose how to start your email:
-
Use a template: On the card of the template you want to use, click Use Template. The email editor opens with the template's content, ready for you to customize.
-
Start from scratch: On the Blank Email card, click Start Fresh. The email editor opens with a blank document.
-
Upload a file: Click Upload File and select a layout file (*.html, *.htm or *.txt) or a document package (*.zip). The uploaded document opens in the email editor, where you can continue working on it.
-
-
If you wish to add a PDF attachment to your email, see Add PDF attachments to email campaigns.
-
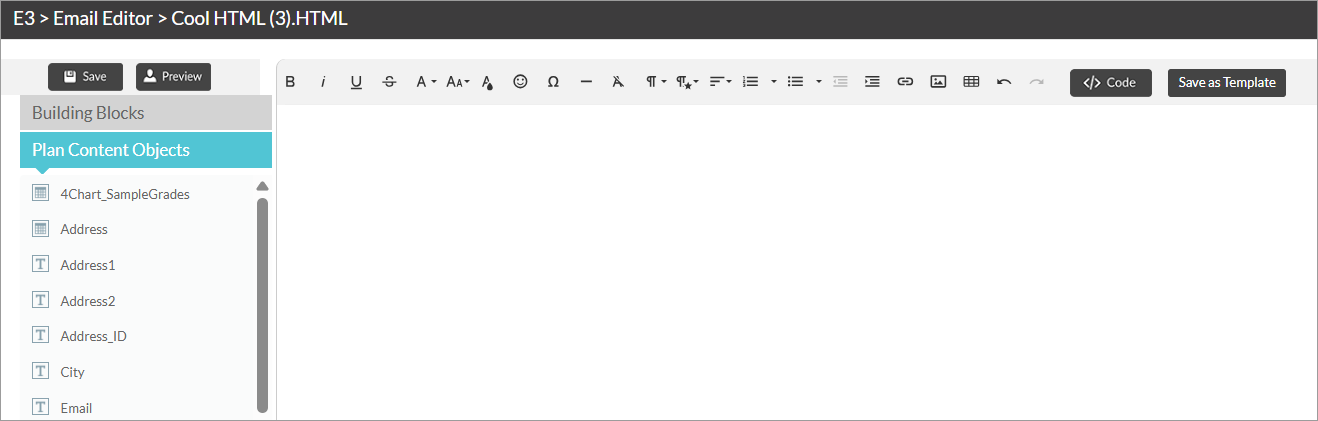
Compose your email message in the white rectangular area using the design options provided on the top toolbar and left panel.

Left-panel options include:
-
Content objects, organized into three categories:
-
Plan content objects (such as First Name, Last name, Address)
-
Special content objects (such as XMPieRecipientKey, XMPie.PDF.P1, XMPie.Web.W1)
-
Email content objects (such as Email Footer, Unsubscribe URL, View in Browser)
Simply click a content object to add it to the insertion point.
-
-
Building Blocks
Click a building block to add it to the insertion point.
-
-
You can add the following automatic link content objects:
-
View in Browser link: Allows the email recipient to view the email content as a webpage in addition to viewing it in the email client. You can add the View in Browser content object to your document body.
The View in Browser content object is located in the Email Content Objects group.
This content object displays a link in the resulting email message. Clicking this link opens the email in the recipient’s default web browser. You can edit the default "View in Browser" link text.
The View in Browser content object is not functional when sending emails via the SMTP delivery provider.
-
Webpage touchpoint links: For each webpage touchpoint in your project there is an automatic object created in the Special Content Objects group. Each link is named with XMPie.Web and the touchpoint ID, for example XMPie.Web.W1 or XMPie.Web.W2.
When placed into the email document, the XMPie.Web.W1 link will create a link to the W1 webpage by using the settings defined on the webpage touchpoint itself, and the website configuration in the Library.
-
PDF On Demand link: The content object list includes content objects beginning with "XMPie.PDF". These content objects represent PDF On Demand touchpoints. These content object are used in emails as well as in webpages.
This content object displays a link in the resulting email message or a webpage. Clicking this link opens the personalized PDF document.
The "XMPie.PDF" content object is displays in the SpecialContent Objects group once the PDF touchpoint has been added to the canvas and configured.
For instructions on creating PDF On Demand touchpoints, see PDF on demand touchpoints.
-
-
If your document is in HTML,
-
Click
 to display and edit the HTML
code. You can use the Search function to search the text.
to display and edit the HTML
code. You can use the Search function to search the text.Click
 to
return to design mode.
to
return to design mode.
-
-
If you wish to preview your document with sample recipients, click
 and then browse between recipients using the recipient list selector
You can see the preview in both desktop and mobile views by clicking
 .
. -
Click Save.
The document name is added to the Body list, and is now available to other email touchpoints in the project.
After you edit and change the code, you must ensure that the changes have not affected the responsiveness of the email.
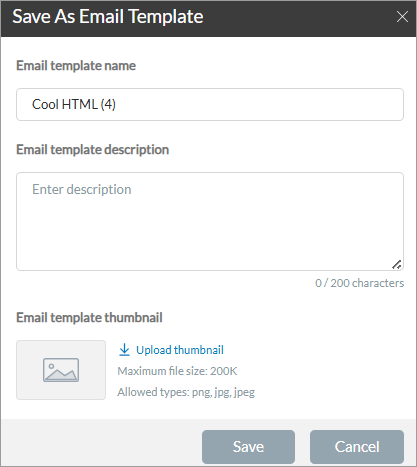
Save an email as a template
After you design an email in the editor, you can save it as a reusable email template. The template then appears in the New Email panel, so you and others in your account can use it as a starting point for new emails.
To save an email as a template:
-
In the email editor toolbar, click Save as Template.
The Save As Email Template dialog box opens.
-
In the Email template name field, type a name for the template.
The field is pre-filled with the current document name. You must change it before you can save the template, and the name must be unique.
-
Optionally, type a description in the Email template description field.
-
Optionally, add a thumbnail image to represent the template in the New Email panel. Under Email template thumbnail, click Upload thumbnail and select a *.png or *.jpg image (up to 200 KB).
-
Click Save.
Add PDF attachments to email campaigns
Circle allows you to attach PDF documents directly to your mass email campaigns. This feature enables you to send personalized documents (such as invoices, statements, reports, or certificates) alongside your email communications.
Prerequisites:
Before adding attachments to your email campaign, ensure you have:
-
PersonalEffect version 26.0 or higher
-
A configured PDF on-demand touchpoint in your project. The PDF attachment can be up to 20MB in size.
-
An email touchpoint set up for batch production. Attachments are supported for batch email campaigns only.
-
You can attach one PDF document per email. It's file name must be static.
-
Sufficient credits in your subscription (attachments consume additional credits based on file size)
Note: PDF attachments are not supported when using the SMTP email method.
Note that Circle cannot track whether recipients open or view PDF attachments.
When you select a PDF on-demand touchpoint as an attachment, you have access to all the features available in PDF touchpoints, such as password protection.
In the Run Center, you’ll see separate job IDs for each step, allowing you to track the progress of PDF generation and email delivery independently.
Replace images with graphic content objects
Static images in your email can be easily replaced with graphic content objects.
To replace a static image with a graphic content:
-
In Design view, click the static image.
-
On the displayed toolbar, click Graphic Content Object.
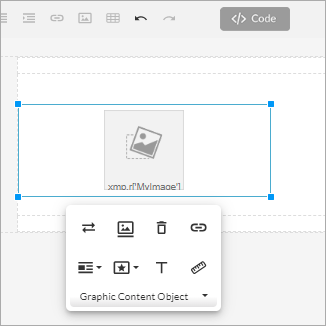
-
From the list of graphic content objects, select the required one.
Add a tracking name to a link
Prerequisite: XES Client 3.5 or higher.
Circle automatically assigns each link a tracking name.
If you wish, you may define your own tracking name in order to easily identify specific links in your email, using "xmp-tracking-action" (see Link tracking name in the Email cheat sheet). The links and their performance can be seen in the Link performance report.
Adding the tracking name is done in the Email Editor's Code view.
Add xmp-tracking-action="trackingNameHere" to the link. Make sure not to add spaces or special characters to the value.

If you do not wish to track a specific link, add <a xmp-no-track="1" href="{{XMPie.Email.ViewInBrowser}}">View in Browser</a>
Note that "1" indicates no tracking and it is not a customizable value.
Add a footer to an email document
You can add a footer to the body of an email in the email editor. Footers can be added to both HTML and plain text documents.
The footers can be added either manually (by typing the text of your footer from scratch with content objects included), or by inserting a predefined footer in the email editor. You can include content objects in the footer.
Note: Predefined footers are set in the Edit Account dialog box. See Defining email account settings.
If you are editing a commercial email, you must add the email footer with unsubscribe information and the physical address of your company. You may do it either by using the Email Footer content object or by manually editing your footer.
To add a default footer to an email document:
-
In the email editor, place your insertion point where you want the footer to appear, and in the Email Content Objects group click Email Footer.

The email footer defined in the account settings is added to your email.
-
Edit the footer as required, including addition or removal of content objects.
-
Click Save.
Watch a video
Creating an email message in Circle