Working with a plan file
Every Circle project must include a single plan file.
The plan file includes the project's schema, which defines the business logic shared by all components in your project.
The plan file consists of the following elements:
-
A data schema, which describes the structure of the data source needed to drive the campaign. The schema fields are the collection of all recipient information required to produce the campaign. These fields must all come from a single data source, but not necessarily a single table in a database.
-
A set of content objects, which can be used for tagging design objects (for example, by using uCreate Print), thereby transforming them into dynamic objects.
-
A set of variables, which are similar to content object except that they cannot be used for tagging design objects (they are internal to the plan). Their use is for computing intermediate results, and using such values in computing values for content objects.
-
A set of rules, which are QLingo or SQL expressions that compute the values of the plan's content objects and variables, once for each recipient.
In high-level terms, one should think of a plan as a program that is being repeatedly executed, once for each recipient. In each of these iterations, the plan performs computations that result in a set of values: one recipient-specific value for each content object.
For example, a plan may have a variable called "discount" that holds the percentage discount one is entitled to, based on the given individual’s purchase history, or affiliation with the Platinum, Gold, or Silver levels of some membership club. This discount variable can be used to compute the value of a content object called, for example, "discountAmount", which will appear in the document, showing the monetary value (as opposed to the percentage value) of a discount that one receives. Variables allow for avoiding repetitive computations or data retrievals, as well as improved readability of the plan, for later revisions, etc.
Create a plan file
You can create a plan file in any of the following ways:
-
Using the Get Started wizard allows you to upload the data source, which automatically creates the plan file. The automatically created plan file is based on the selected recipient table column headers and XMPieRecipientKey you define. See Uploading the data source.
-
Linking to the data source in the uCreate Print plugin in InDesign generates a plan file based on the column headers of the data source and the rules applied to each content object. For details, see the uCreate Print documentation.
-
Using XMPie's uPlan editor. Creating a plan file with uPlan allows you to add complex rules and database expressions. For details, see the uPlan documentation.
Upload the plan file
There are a number of ways to upload the plan file:
Upload the plan file in the library
-
Open the library.
-
In the left pane, click Plan File.
The New Plan File link is displayed in the right pane.
-
Click New Plan File.
The Upload Plan dialog box is displayed.
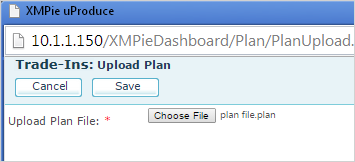
-
Click Choose File, navigate to the plan file you want to upload and click Open.
The file name is displayed next to the Choose File button. The plan file has a *.plan extension.
-
Click Save.
In the library, the plan file name and a list of the content objects it contains are displayed.
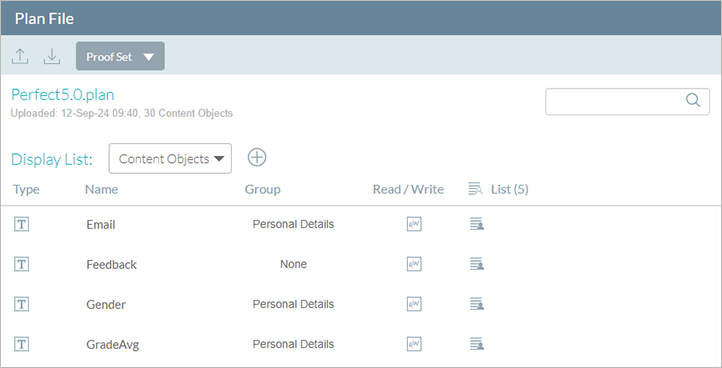
You can replace the existing plan file at any time using the upload and download buttons 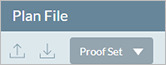 .
.
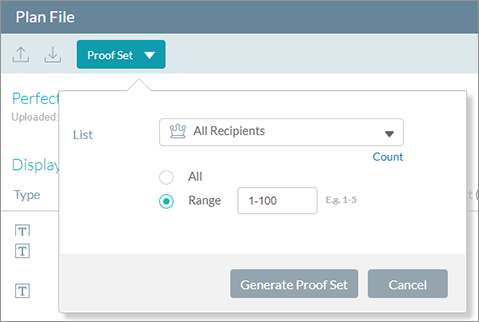
Generate a proof set
A proof set is a file (*.proof) or a package (*.ppkg) that contains recipient data that have been resolved according to the rules specified in the plan.
Generating a proof set allows you to preview the final outcome of your document. The proof set generation procedure evaluates all content objects in your plan and inserts their values into the document, thereby producing real-life examples of your final product.
When this process completes, you can download the output proof set file.
Note: To view a proof set, you must have uPlan installed on your computer. uPlan contains the Proof Set Viewer module.
To generate a proof set:
-
In the library, select Plan File.
-
In the Plan File details pane, click Proof Set.
-
From the List dropdown, select the filtered list for which you wish to generate a proof set.
It is possible to use plan filters to generate a proof set. For example, you can generate a proof set for failed recipients.
-
Specify a range of recipients:
-
To generate a proof set for all recipients in the selected list, select All.
-
To generate a proof set for specific recipients, select Range and specify the recipient's range (e.g., 1-5).
-
-
Click Generate Proof Set.
The proof set generation is initiated. The proof set production status is displayed at the top of the window.

The icon indicates the proof set production status:
 Waiting / In progress
 Completed successfully
 Completed with warning
 0 Recipients (no recipients
satisfied the criteria)
0 Recipients (no recipients
satisfied the criteria) Completed with errors/ Timed
out/ Failed/ Aborted
Completed with errors/ Timed
out/ Failed/ AbortedClicking the Jobs link opens the uProduce Job Center and highlights the job associated with the current proof set. The detailed information about the proof set is available in the details section of the Job Center.
Clicking the Output link downloads the proof set file or package.
Clicking the Alerts link displays errors and warning related to the current run in the new browser tab. See Viewing alerts.
Modify the plan file
You can modify the current plan file or upload a different plan file to replace the existing one.
The plan file remains in the system until you replace it with the edited version.
You can modify the plan file in three places:
Modify the plan file within Circle
You can modify the plan file directly within Circle’s library. This allows for basic plan file editing, such as creating and editing content objects, variables, simple rules, and more. For more advanced editing, use uPlan.
Notes:
-
A prerequisite is PersonalEffect version 12.1 or above and Circle Business Edition.
-
Once you make changes to your plan file, you cannot revert to the original one. We strongly recommend that you back up your plan file before making any changes to avoid losing your original settings.
Create a content object
Content objects are defined based on a number of attributes: their name, type (i.e. text, graphic), expression type (read/write) and their business rule. A rule is an expression that is part of the campaign logic, and defines how to calculate the content object’s value for each recipient.
Content object types
You can set or edit any of the following types of content objects:
-
Text: A text object. This string of text that will be displayed in the document is the result of the calculation of the content object's expression.
-
Text file: A text file containing a large amount of text or text formatted in a specific style. This content object points to an asset that will be shown in the document.
-
Graphic: A graphic object. This content object points to an asset that will be shown in the document.
-
Link: A link to a URL, most often used to include a PURL in a design. The link will be active only in an interactive PDF output.
-
Visibility: Controls the visibility of the document layers/spreads to which the content object is assigned. Visibility content objects also support layer names. This allows one visibility content object to control the visibility of all layers, whose names match its values.
-
Style: Applies a desired format, using one of the following types of Adobe InDesign styles:
-
Character styles: when applied to text, the style content object can be used to format text attributes such as color, font, size, etc. You can also override a text style attributes with an alternative font, including the font size, font style and font color.
Once a character style content object is applied to text, it overrides any static InDesign style: existing, static styles are replaced by the style content object, and new styles cannot be applied on top of the style content object.
-
Object styles: when applied to a frame (whether a text frame or a graphic frame), the style content object can be used to format frame attributes such as fill, stroke, corner effects, etc.
-
Note: Table content objects cannot be edited in Circle.
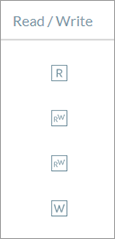
Content object's read/write properties
Circle allows you to create content objects that support three expression types, as follows:
-
Read: Enables you to define an expression that is used to calculate a content object value. Content object values can only be based on data that is read from the database.
-
Write: Enables you to define an expression that is used to update database entries based on the calculated content object value.
-
Read & Write: Content object values of this type can be based on data that is read from the database or they can be used to update database entries.
An indication of the content object's read/write status is provided in the plan file window's Read/Write column:
Rule editor
Content object rules are both created and edited using the rule editor.
The rule editor enables you to define expressions that perform conversions and manipulations on the data source values. The rule expression calculates the content object’s value for each recipient. These expressions are defined using XMPie’s proprietary QLingo Language.
Expressions can be defined manually by editing the content object’s rule definition as a QLingo expression. Alternatively, you can use the Advanced Rule Editor to easily create a rule by selecting the most commonly-used expressions directly from the rule editor’s dropdown lists.
The following is the Advanced Rule Editor:
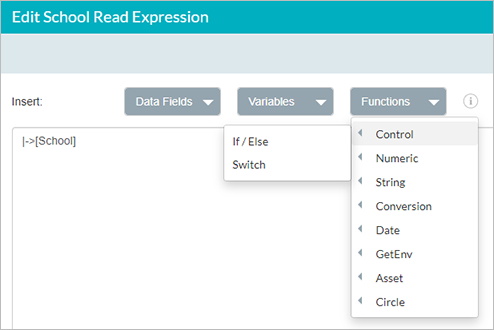
-
The Data Fields dropdown lists the database fields - schema.
-
The Variables dropdown lists any variables that have been created.
-
The Functions dropdown lists all functions used to easily define rules by performing conversions and manipulations on the data source values.
Note that the rule definitions vary, depending on the type of content object you are currently editing or adding (text, graphic, etc.).
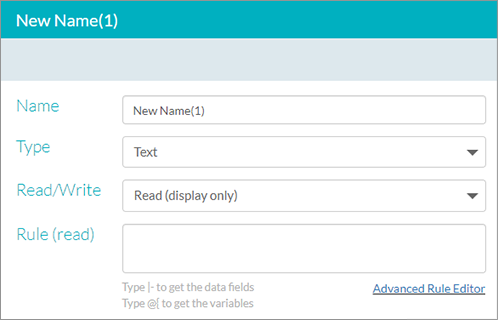
To create a new content object:
-
In the Plan File window, click the
 plus icon, and select New Content Object.
-
Enter a name for the content object.
-
Select the content object type: text, text file, graphic, link, visibility or style.
-
Select the content object's read/write property.
-
Compose a rule by typing in the expression in the text box, or use the Advanced Rule Editor.
-
Click OK to save the changes in Circle.
-
Back in the Plan File window, click the Save button to write the changes to the plan file on your uProduce server. Or, if you change your mind, click Cancel to ignore your edits and revert to the current uProduce plan.
Create a variable
Variables can be used to calculate values per recipient or store a value, and can be used in the content object rule editor expression. This is helpful when you want several content objects to use the same logic or value - you can calculate it or define it once in a variable, and then use the variable in several content objects. If you later want to change the logic or value, you only have to change it in that one variable, and all the content objects will use that updated logic.
To create a new variable:
-
In the Plan File window, click the plus
icon, and select New Variable.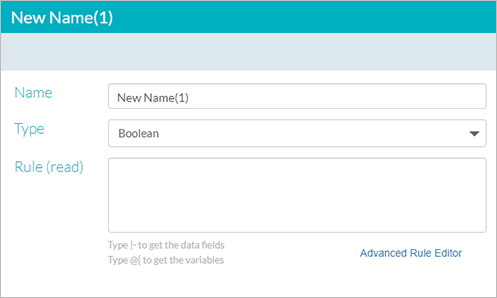
-
Enter a name for the variable.
-
Select the variable type: string, number, boolean or date.
-
Compose a rule by typing in the expression in the text box, or use the Advanced Rule Editor.
-
Click OK to save the changes in Circle.
-
Back in the Plan File window, click the Save button to write the changes to the plan file on your uProduce server. Or, if you change your mind, click Cancel to ignore your edits and revert to the current uProduce plan.
Modify the plan file using uPlan
-
Open the library.
-
In the left pane, click Plan File.
The Plan File details pane is displayed.
-
Click theDownload
 icon.
icon.It is highly recommended to always download the plan file from Circle to make sure you are using the latest version. It is also recommended to download the data source from Circle, so when you edit the plan file, you are connected to the updated data source.
-
Navigate to the location where you want to save the plan file and click Save.
-
Edit the plan file in the uPlan editor.
-
In the library, click the Upload
 icon.
icon.The Upload Plan dialog box is displayed.
-
Click Choose File and navigate to the modified plan file and click Open.
-
Click Save.
The modified plan file is uploaded to the library and replaces the earlier version.
Modify the plan file using uCreate Print - Circle connectivity
This method allows you to create read expressions only. To create write expressions, use uPlan.
-
In uCreate Print Dynamic Content menu, click Open from Server to open a document bound to a touchpoint on Circle.
-
In the Dynamic Content panel, you can perform the following changes:
-
Add new content objects: from the right-click menu, select New Content Object
-
Add new variables: from the right-click menu, select New Variable
-
Edit an existing content object: select a content object in the panel and from the right-click menu click Edit Content Object
-
Edit an existing variable: select a variable in the panel and from the right-click menu click Edit Content Object
-
-
From the Dynamic Content menu, click Save to Server to save the document and the updated plan to Circle.
Additional functions
Search
If your project contains a long list of content objects/variables, you can search to quickly locate the content object/variable you are looking for.
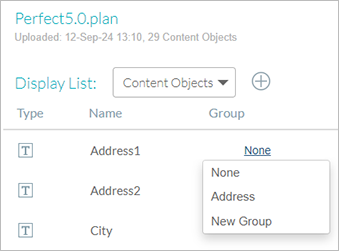
Group
You can organize content objects or variables into groups. Groups help you better organize the elements you are working with. For example, create a group of all content objects that are related to the recipient’s physical location, including street address, zip code, city, state, country. You can filter the list of content objects or variables to display content objects or variables of a specific group, thus filtering out the elements you don’t need to work with.
To assign a content object or variable to a group, simply click it in the Group column and from the menu select the required group.
If no groups have yet been created, select New Group and give the group a name. The object will be assigned to the new group.
Include content objects in list reports
You can select which text content objects to include in the analytics list reports of the project. Any read text content object can be selected for inclusion in list reports. A maximum of 20 content object is permitted.
Selection of content objects is done in the List column.
