Working with campaign Components
To work with a specific campaign, go to the Accounts page and click the campaign name. Alternatively, to open the most recently used campaign, go to the navigation bar and click the Campaigns button.
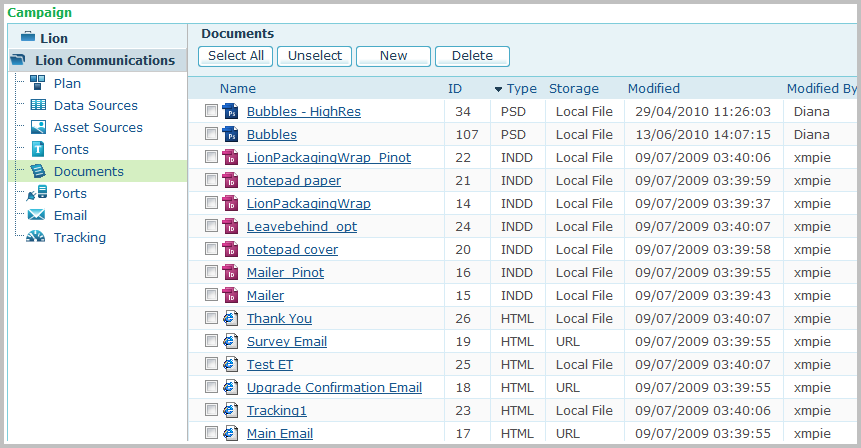
The following image shows an example campaign.

The left pane shows the campaign tree, which lists the campaign components. These include:
-
Plan (mandatory)
The file that defines the campaign logic.
-
Data Sources (mandatory)
The databases that hold the campaign data.
-
Asset sources (optional)
Logical containers that hold the campaign’s assets.
-
Fonts (optional)
The fonts used by the campaign’s documents.
-
Documents (mandatory)
The designs that are personalized per-recipient.
-
Interactive content ports.
-
Email (e-Media only)
Email Activities, used to send personalized email batches in e-media campaigns.
-
Tracking (optional)
ADOR objects to be tracked for this campaign.
By default, the documents component is selected in the tree and the documents page is displayed, provided that you have already uploaded a plan file; otherwise, the plan page is displayed, allowing you to upload a plan file.
The available campaign components and production options depend on your variation of uProduce:
-
uProduce XM (Cross-Media): allows you to create print, eMedia and web campaigns. All campaign components and production options are available.
-
uProduce Print: allows you to proof and process InDesign and XLIM documents. The email component is unavailable.
-
uProduce e-Media: allows you to create web and email campaigns, by creating and using ICPs and by creating and sending batch dynamic emails. All campaign components are available, but there are no print capabilities (no proofing and no processing).
