Setting Up the Store's Advanced Parameters
When setting up a store you can define advanced settings, such as security options, email provider, Excel pricing and more. To do so, go to Store Setting > Set up Store, and click the Advanced tab.

Webpage redirect
You can redirect users that log out to a specific webpage.
-
In the Advanced section, in the When logging out, redirect to field enter a valid absolute URL. Start the URL with
http://orhttps://
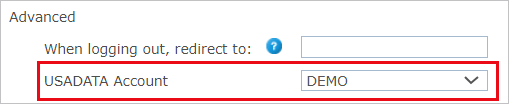
USADATA account
-
In this section you can select the USADATA account that will be used in the store.
-
In the Advanced section, from the USADATA Account list, select the required USADATA account.
-
Select No Selection if you do not want to use the USADATA services.
-
If you wish to add USADATA accounts, see the USADATA Account Table.
The selection of the USADATA recipient list will be displayed when setting up your product recipient list, as described in Allowing Customers to Use USADATA Services.
Default proof type
You can allow customers to proof their documents as either PDF files or JPEG files.
-
In the Advanced section, select the default proof type that will be presented to the customers at the store.
The selection you make here is applicable to the entire range of store products. You can, however, override that selection when you set up a product.
Email provider
The Email Provider list enables you to define the email provider you want to use for sending email messages with uStore.
By default, the email provider list includes a predefined email provider: uStore SMTP. Email messages that are sent using uStore SMTP are sent via uStore.
To define an email provider:
-
In the Advanced section, select an email provider from the ones already defined in uProduce. For example, you can use the XES delivery or an SMTP service that was previously configured in uProduce.
For further information on configuring email providers in uProduce, refer to the uProduce documentation.
-
To retrieve the most recent list of email providers that are defined in uProduce, click the Refresh Email Providers List.
This is possible only after you establish a connection with uProduce.
Manufacturer allocation method
Two options are available for setting the manufacturer of your products.
These can be selected in the Manufacturer Allocation Method list.

-
Default product manufacturer
The manufacturer is set on product level, so all order items of the same product are assigned to the same manufacturer. In this case, the manufacturer is defined in Product Setup > More > Product Manufacturer.
-
External manufacturer service
If you wish to set a specific manufacturer for each item in the shopping cart, you can use an external service (manufacturer webhook).
Examples:
-
You can reduce shipping costs by calling a service which assigns the closest manufacturer for each order item, according to the shipping address.
-
A unique printing request, such as unique lamination, is selected by the shopper in the store. This request can only be fulfilled in a specific printing center. The administrator creates a service which finds these unique items in the cart, and assigns them to the appropriate manufacturer.
Note that when “Allow shipping to multiple addresses” is set for the store, the shopper cannot split order items by units.
To set up an external manufacturer, see Add a Manufacturer Webhook.
-
Store orders exportable by API
-
In the Advanced section, select the Orders of this store are exported by API checkbox to enable the SOAP web service OrderWS.GetLatestOrdersXml to batch-export submitted orders from this store in XML format.
This is used by external systems (ERP, fulfillment platforms) that poll for new orders to fulfill. When unchecked, external systems cannot bulk-retrieve orders from this store via the API.
Note: single-order retrieval via GetOrderXml is not affected by this setting.
AI providers
The AI Providers table lists all AI providers that this store is allowed to use, as defined in Presets > AI Providers. From here you can set a per-store monthly cap for each provider, monitor monthly usage, and turn a provider on or off for the store.

By default, the Monthly Limit field is empty, meaning the limit is taken from the AI Provider preset.
Note: Legacy stores do not have the AI Providers option.
The table shows the following information for each provider:
| Column | Description |
|---|---|
|
Provider Name |
The display name assigned to the provider in Presets > AI Providers. |
|
Capabilities |
The uStore feature(s) the provider is configured to serve, for example, Image Generator or Text Generator. |
|
Provider Limit |
The monthly call limit defined for the provider in Presets > AI Providers, or Unlimited if no cap was set. |
|
Monthly Limit |
An optional per-store monthly call cap. Leave the field empty to inherit the limit from the provider, or enter a positive integer to set a store-specific cap. The Monthly Limit must not exceed the Provider Limit. |
|
Monthly Usage |
The number of calls made by this store in the current month, shown as used / cap. If a Monthly Limit is set, the cap is the Monthly Limit (for example, 4,874 / 5,000). When usage reaches 90% of the cap, the text turns red. |
|
Status |
Set the provider to Active or Inactive for this store. |
Global Data Protection Regulation (GDPR)
GDPR (General Data Protection Regulation) is a European regulation which intends to strengthen data protection for all individuals within the European Union.
uStore assists you in being GDPR compliant by providing you the means to automatically delete personal information. Recipient lists that were uploaded or created by the customer are also deleted 30 days after creation. For detailed information about GDPR, see What is GDPR?.
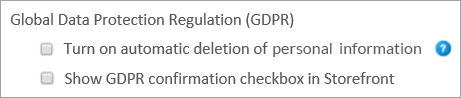
If you wish your store to be GDPR compliant, ensure that the following options are selected:
-
Select the Turn on automatic deletion of personal information checkbox to activate a daily mechanism of deletion of personal information, such as recipient lists, XM campaign instances and uploaded files (of both composite products and File Attachment property). Personal information that had expired (was created over 30 days ago in the backoffice or storefront) will be automatically deleted to conform with GDPR.
You may also configure proof files deleted. To do so to activate the GdprProofDeletion key in the Global Configurations table.
You can change the 30 day default setting in the Global Configurations table.
Note: Even if the GDPR is not applicable in your country, you can still use this functionality as a cleanup mechanism to free up storage space.
-
Select Show GDPR confirmation checkbox in Storefront to add to the storefront Checkout page the I confirm that all order information is GDPR compliant checkbox.
By selecting this checkbox, the shopper verifies that the recipient list(s) used in the order are GDPR compliant, i.e. recipient lists are free from data subjects who asked to be deleted or didn't consent to being included in the specific operation), as well as uploaded files (of both composite products and File Attachment property).
The customer cannot check out unless the checkbox is selected.
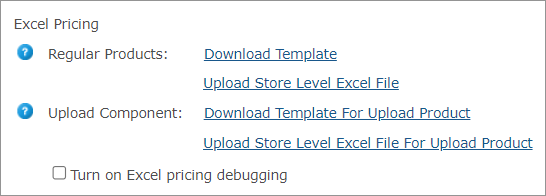
Excel pricing
The Excel Pricing settings allows you to download the default Excel templates and upload custom Excel templates to price products that are configured to use the Excel Pricing Engine or are linked to product profiles that use the Excel Pricing Engine. For detailed information on pricing using Excel pricing, see Setting Up the Excel Pricing Engine File.
It is also possible to turn on Excel pricing debugging which will save the last Excel file that was used to price each product. When enabled, the default debug file can be found in the backoffice, by editing the product in question and clicking Product Pricing Setup. On the Set Prices tab, you will find a link to Download Debug file.
Note: The Excel spreadsheet for upload products is different because it passes information about the page size and number of pages in the document uploaded by the customer.
Regular pricing (pricing calculation engine)
If you wish to raise or lower the price of all store products by a certain percentage, you can bulk update the price for multiple products with a single click. This affects only products using regular pricing. You can do so by clicking the Update Pricing for all Products link.
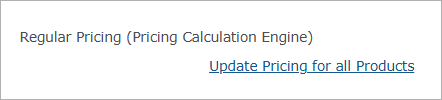
You can update the price of the base property only, or the price of the base and all other properties.
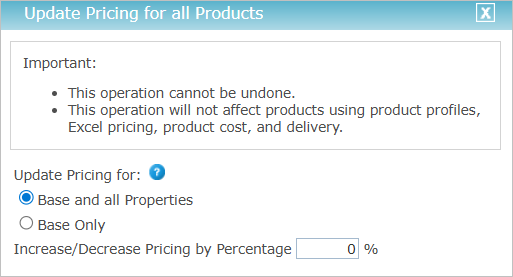
Notes:
-
This operation cannot be undone.
-
This operation does not affect products using product profiles, Excel pricing, product cost, and delivery.
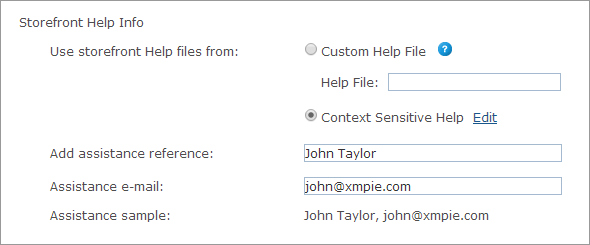
Storefront help info
Note: This feature is for legacy stores only.
When customers click the store’s Help button, uStore displays a default uStore storefront guide. You can replace this file with a general Custom Help File, or with Context Sensitive Help per-page.
The path to your help file may be either absolute or relative:
-
Absolute path: specify the full URL to your help file.
-
Relative path:
-
Place your help file under the virtual directory of the uStore storefront application:
C:\XMPie\uStore\App\CustomerApp -
Specify the relative path to this help file. For example, write help.html
-
To replace the default XMPie uStore user guide:
-
If you want to set your store with a general help file which will be shared by all pages:
-
In the Storefront Help Info section, under Use storefront help files from, choose Custom Help File.
-
To point to your own help file, specify its path in the Help File text box.
If you do not specify a path, clicking the Help button in the storefront displays a default "Under Construction" page.
After you finish setting up the store, you must restart IIS in order for the new help file to show.
-
-
If you want to replace the default XMPie's uStore user guide with a context-sensitive help file:
-
In the Storefront Help Info section, under Use storefront help files from, choose Context Sensitive Help.
-
Set each page in your store with its own context-sensitive help file (instead of a single file that is shared by all pages) as follows:
Click the Edit link to launch the Context Sensitive Help Edit window.
For each Originating Page in your store, enter the relevant help file’s path into the Help File text box.
To define a default help file for all pages that are not associated with a specific help file, specify its path in the Any Unassigned Page text box.
-
-
When you are done, click OK.
-
In the Add assistance reference and Assistance email text boxes, enter the name and email address of the individual that will provide assistance to storefront customers in case they have been locked out from their account.
Security options (SSL)
SSL (Secure Sockets Layer) is used to ensure that information added to uStore is secure. SSL should be installed and configured to be able to use the secure options.
In the Security Options (SSL) section, specify how to use the SSL protocol to secure the information users enter into your online stores (for example, login or payment details).
Securing uStore using SSL requires one of the following certificates, depending on the number of domains you want to secure:
-
A regular SSL certificate: Secures a single domain. This certificate is useful for securing a single store, or several stores that share the same domain name, but differ by their sub-folder name.
-
A Multi Domain SSL certificate: Secures multiple domains. This certificate is useful for securing several stores that have different domain names (friendly URLs).
For more information, see Creating and Installing an SSL Certificate
Once you have installed and configured SSL on your website’s Internet Information Server (IIS), you can configure it in uStore by choosing one of the options below.
Note: When a Proxy server is used in front of an application server and all connections coming from the web to the uStore server are routed through the Proxy server, the SSL certificate must be installed on both uStore and Proxy servers.
To set security options, in the Security Options (SSL) section, select one of the following options:
-
Not Secured: If you do not want the store to be secured by SSL. This option is useful while you are working offline and are in the process of setting up the store. Once you make the store available online, make sure you change this setting to Secure All.
-
Secure All: To secure all pages in this store. This configuration may slow down the page loading.
Important! The
system does not support having both secured and non-secured stores on
the same domain/sub-domain.
If you have both secured and non-secured stores on the same
domain/sub-domain,
please change the non-secured ones to be secured (or vice versa, although
not recommended), or shoppers may have a problem accessing them.
Note: When creating and testing a new store using localhost, disable HTTPS and use HTTP only, since HTTPS does not support localhost. When testing an online store, duplicate it, disable HTTPS and use HTTP on the duplicated store. Then, apply your changes to the original store and delete the duplicated store.