
 View what's in this topic
Defining the Store's Delivery Settings
When you set up the store, you need to define how products will be shipped and delivered to customers.
Go to Store Setting > Set up Store, and click the Delivery Settings tab. Here you define which delivery providers will be available in your store. Customers can then distribute their products by selecting from a list of the available delivery providers.
FedEx and UPS are common delivery providers in North America. If you don't use FedEx or UPS, you can use manual mailing or manual shipping to set up prices for your local courier and mailing services.
-
FedEx and UPS: Administrators can enable customers to use FedEx or UPS as the delivery provider. The prices for the delivery are generated online (typically based on product weight) by the respective delivery provider’s service (i.e., FedEx or UPS Account APIs) and displayed during the checkout phase.
-
Manual Mailing: Used for per-item delivery, where each product of an ordered item is sent to a different address from an uploaded recipient list defined with a dynamic product. For example, a customer may order postcards and mail drop (via the local postal system) the cards to the individual recipients. Using manual mailing, administrators can set up the price per item for the mailing delivery service. This method is used for dynamic or print touchpoints.
-
Manual Shipping: Used for sending the order to a single or multiple shipping addresses (when enabled in Store setup). For example, customers may order sets of business cards and distribute them themselves, instead of sending them directly to clients (i.e., manual mailing). Using Manual Shipping, administrators can set up the prices per shipment for the desired delivery service.
Note: If you're a StoreFlow Cloud customer, the Delivery Excel Pricing provider is included in your subscription. Otherwise, contact Support to purchase this plugin.
Disable/enable delivery
-
Choose whether to enable or disable delivery.
Selecting the Disable Delivery option will remove the delivery option from the Store Setup as well as from the store itself. Furthermore, the Delivery Services tab will be disabled.
Selecting the Enable Delivery option will enable the Delivery Services tab and require selecting services on this tab before placing your store online.

Notes:
-
For uStore Connect stores, Disable Delivery is implicitly selected.
-
If you switch from Disable Delivery to Enable Delivery for a previously configured store, products with no delivery definitions will be taken offline, especially for Manual Mailing and Manual Shipping setup and pricing.
Mailing
Mailing providers
Choose Manual Mailing and/or another custom mailing provider (for example, AccuZip).
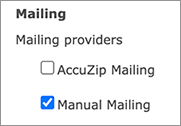
Note: Contact Support to purchase the AccuZip or other plugin and to learn about other uStore plugins.
Shipping
Shipping options
-
Split shipping
You can enable uStore customers to ship products to multiple addresses per order. This is called Split Shipping. Split shipping is allowed in the following cases:
-
When ordering more than one product, a customer can select a different shipping address for each product.
-
For products that do not have a recipient list attached, a customer can choose to select multiple shipping addresses for different quantities of the same product.
-
-
Global address book
You can also enable your customers to select shipping addresses from a global address book. Once this option is selected, you can upload a global address book. The global address book can only contain countries and states (or provinces) marked as supported for a given store in the Supported Locations section of the Store Setup page.
Make sure that your global address list file includes the codes of the required countries and states (or provinces).
In the storefront, the customer will be able to select the shipping address either from his/her shipping address list or from a global address book. Once a global address is selected, it is automatically added to the customer’s address list.
-
EORI and Tax ID
If you wish to include EORI (Economic Operators Registration and Identification) and Tax ID numbers in both billing and shipping addresses, select the Include EORI Number and Tax ID checkbox. These distinct identification numbers are crucial for businesses engaged in international trade and e-commerce within the European Union.
-
EORI Number: A unique identifier used by customs authorities to track and manage economic operators in the EU. Essential for smooth import and export processes.
-
Tax ID: A key identifier used for VAT and other tax-related purposes within the EU.
Including these numbers in your addresses helps ensure compliance with EU regulations, streamlines customs processing, and simplifies VAT handling.
-
To select shipping options:
-
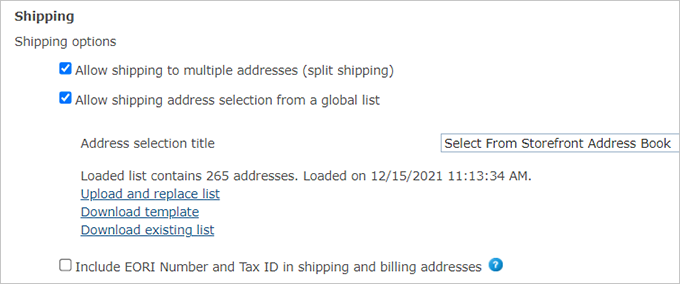
To allow uStore customers to split the shipping by selecting multiple addresses for their order delivery, in the Shipping section select the Allow Shipping to multiple addresses (split shipping) checkbox.
-
To enable your customers to select shipping addresses from a global address book, select the Allow shipping address selection from a global list checkbox, and continue with the following steps:
-
In the Address selection title box, enter the name of the global address book. This name will be displayed to the customer in the storefront.
-
Upload your global address book file:
-
If you already have a global address book file, click the Upload and replace list link to upload it .
Note: The file is accepted or rejected as a whole. If any one row is incomplete - a missing City, for example - the entire file is rejected, and the error message does not identify the row. Check that every row is complete before you upload.
Note: The Country column in the uploaded file must contain a country code as it appears in the System Setup Country table, for example "US" for United States.
-
If you want to prepare a new global address book file based on the uStore template, click the Download template link to download the global address template file (GlobalAddressTemplate.xls). Use this template to create your global address book and then upload it to uStore backoffice using the Upload and replace list link.
-
If you want to edit an existing global address book, click the Download existing list link to download the existing global address book for editing. Once you have edited the file, upload it to uStore backoffice using the Upload and replace list link.
-
-
Adding addresses in another country
If a row's country is not active, or is not selected in the store's Supported Locations, the whole file is rejected, and an error message names the country code. The same applies to a province that is not selected in Supported Locations. By default, United States is the only active country. To use another country:
-
In Global Settings > System Setup > Country, find the country, note its Country ID, and set its Status to Active. See Setting Up the Country Table.
-
In Global Settings > System Setup > Province, filter the Country column by that Country ID, and set the Status of each province or state you need to Active. Provinces are activated one at a time; there is no bulk action. See Setting Up the Province Table.
-
Enable the country for this store in Store Setup > Appearance > Supported Locations. See Defining Localization Settings.
-
Confirm that a delivery service covering that country is enabled for the store, in the Delivery Services tab.
Shipping providers
FedEx and UPS are common delivery providers in North America. If you don't use FedEx or UPS, you can use manual mailing or manual shipping to set up prices for your local courier and mailing services.
To select a shipping provider:
-
Select one of the following shipping providers:

-
FedEx
-
In the Shipping providers section, select the FedEx checkbox, and then select the FedEx Account you want to use, as defined in Setting Up an Account for FedEx Delivery Service.
-
Select the Default Drop Off Type that will be used for delivery fulfillment.
-
-
UPS
-
Select the UPS checkbox, and then select the UPS account you want to use, as defined in Setting Up an Account for UPS Delivery Service.
-
Select the Default Delivery Confirmation method. Available options include: No confirmation, Confirmation required, Signature required, Adult signature required.
-
-
Manual Shipping - Select this option to use per-shipment delivery.
-
-
From the Pickup Address list, select the pickup address you want to use for your store. Addresses are defined in the Global Settings > System Setup > General Pickup Address table. You can click the Add or Edit links to add a new pickup address or edit an existing one. Note that the new address will be available for this store only.
Click Validate Address with Carriers to check the selected pickup address against the carriers configured for this store, and correct whatever it reports. See Pickup address and carrier account.
Pickup address and carrier account
The carrier validates the store's pickup address - the shipper address - and not only the customer's destination address. If the pickup address is incomplete, or if the carrier account is not in the mode uStore expects, the carrier rejects the request and the delivery cannot be created.
-
Person Name is required. The pickup address must include a Person Name. uStore sends it to UPS as the shipper name - the Company field is not used for this. For UPS it must be 3 to 35 characters long. If it is left blank, the carrier reports that the shipper name is invalid or missing, and a delivery cannot be created for the order in the backoffice. Pickup addresses are defined in the General Pickup Address table.
-
Validate the address after every change. Whenever you change the pickup address, click Validate Address with Carriers next to the Pickup Address list, and correct whatever it reports. For UPS, the validation also checks that the Person Name is 3 to 35 characters long.
-
The carrier account mode must match. The carrier account must be in live mode rather than test mode, and the mode must match the one configured in uStore. On UPS, this is set under My Settings > Delivery Preferences on the ups.com site.
Delivery services
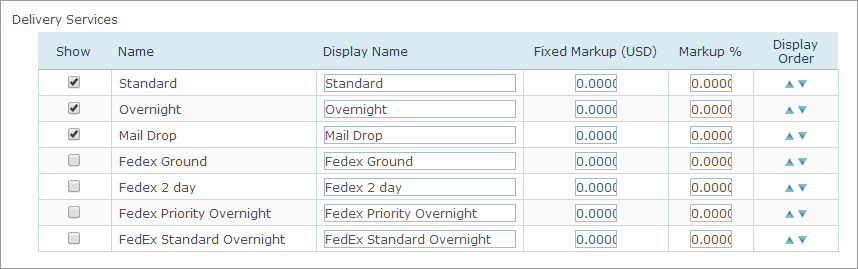
In the Delivery Services tab of the store setup, you determine which services of the delivery providers (as set in the Delivery Settings tab) will be provided in your store. If you choose to disable delivery settings on the Delivery Settings tab, the Delivery Services tab will not be available.
To define delivery services:
-
In the Show column, select the delivery service you want to allow in your store. The services you select here are made available for selection to the end customer during the purchase process.
The Display Name is what the customer will be shown during the checkout process, along with applicable pricing.
-
You can add a delivery markup value as a fixed price in the Fixed Markup column, or as a percentage of the total delivery cost (Markup % column) to cover overhead expenses.
The total markup value is calculated as follows (in case both percentage and fixed markups are used):

-
Use the up and down arrows to set the location of the delivery service in the list that appears during store setup and in the store itself.
More topics
Setting Up the Delivery Services Table
Setting Up the Delivery Package Table
Setting Up the Delivery Service Package Table