Producing Print Output Files
After you have created and uploaded the campaign components, you can create a print output file. You can print the individual personalized documents locally, or send them to a commercial printer for printing.
uProduce supports the creation of output files in the following formats: PDF, PDF/VT-1, PDF/VT-3, Interactive PDF, Preflight, VPS, VIPP, PPML, VDX, Post script, Legacy PDF (deprecated), JPG, PNG, EPUB (Fixed Layout) and EPUB (Reflowable). Customers may choose the format required by their printing environment.
Once uProduce has generated the print output files, you can send them to one of the following destination types:
-
FTP site
-
Network path
-
Network printer
The network printer can also be used as a printer queue for the Xerox FreeFlow Output Manager (FFOM) mechanism or for Xerox FreeFlow Print Manager (FFPM).
Note: You can use the automatic batching (job split) option to pipeline jobs and begin sending off the batches that are ready, without waiting for the entire job to complete. This feature also makes it easier to reprint only specific batches instead of the entire job when required.
To produce the print output file:
-
Go to the Campaigns page and select the campaign containing the document to be produced.
-
Click the document name.
-
Click the Process button.
The Process page is displayed.
-
Define how the document will be processed by setting the required parameters in each of the following sections:
-
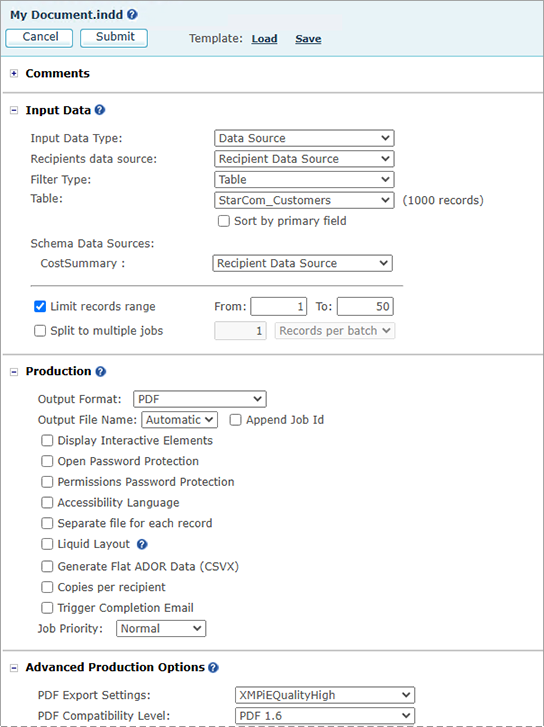
Comments
You can add comments when processing a document. These comments will be included in the triggered email when the job completes, and in the job center's details area.
Different settings are available, depending on what is best suited for your printing environment. These groups of options are described in the following sections.
After you define the parameters, you can save them as a template for future use. You can also load an existing template with all of its parameters. For more information, see Working with Templates.
Note: The Process page options depend on the chosen print format.
-
-
Click the Submit button.
A page is displayed with information on the job status.
A
 sign
next to the Recent Job field indicates that messages have been produced
relating to the job. Click this sign to view the messages.
sign
next to the Recent Job field indicates that messages have been produced
relating to the job. Click this sign to view the messages. If the print output file is produced successfully, the
 icon is displayed
next to the Recent Job field, both in the
Process page and in the Job
Center page.
icon is displayed
next to the Recent Job field, both in the
Process page and in the Job
Center page. -
To save the resulting print output file, click the
 icon
to the left of the Print job listing, either here or in the Job
Center page.
icon
to the left of the Print job listing, either here or in the Job
Center page. The File Download dialog is displayed, prompting you to open or save the file.
-
Click Save and then select the location to which you want to save the file.
A message is displayed, notifying you when the download is complete. At this point, you can choose to either open the file for modification or close the dialog.